
 I am so excited to finally share this recipe with you! A while ago (oh, geeze, can it really have been over two years ago!?!), I shared a recipe with you for lemon cornmeal cookies. In that post, I detailed how I had been fiddling with two different recipes. The recipe I previously posted makes a light, tender, lemony cookie that is sweet and - most definitely - a cookie. The other recipe, which I am sharing today, is a cookie-like crisp that is less sweet, more crispy, and has some resemblance to a thin, crispy cracker. Although the basic flavors of the two are the same, the end result is quite different, and I absolutely adore them both!
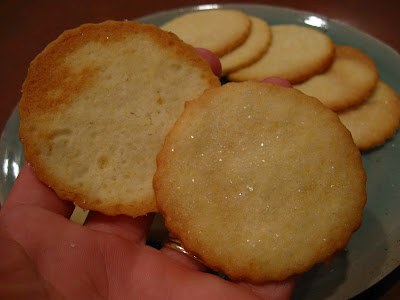
 I am trying to come up with the best way to describe the texture of these lemon cornmeal crisps. If you look at the following picture, showing the top and bottom of the crisps, you can see they almost look like really thick tuile cookies. And in a way, they fit that bill. These crisps are snappy and delicious!
 I mix the dough in a food processor. The procedure for making this dough is very similar to making pie crust. I love the wonderful texture and flavor that cornmeal adds!
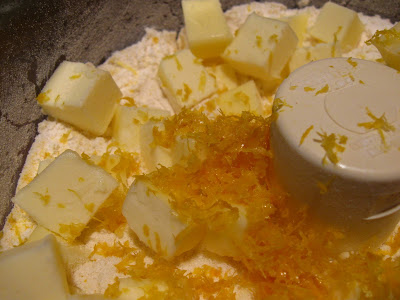
 After mixing the dry ingredients (including the sugar), add the cold butter (cut into cubes) and the lemon zest. Pulse just until the mixture resembles coarse crumbs.
 Mix the buttermilk and vanilla together and then add to the processor, only working the dough until it just starts to pull together. A word of caution: this dough is quite a bit stickier than regular pie crust due to the high sugar content. If you dampen your hands before handling it, it helps a bit.
 Dump the dough onto the counter and shape into a disk. Wrap in plastic wrap and refrigerate for 6 to 24 hours. Longer tends to be better in the case of this dough. Again, it's a bit sticky, but as it sits in the refrigerator, the cornmeal hydrates and results in a less sticky dough. When you are ready to cut the cookies, cut the dough into four sections so you can work with a small amount at a time. Keep the remaining parts refrigerated until you are ready for them.
 Prepare sheet trays with parchment and preheat the oven to 375° F. The crisps don't spread too much, so you can place them fairly close together (closer even than I show in this picture).
 The big thing is to roll them thin!! Again, this dough can be a little tricky to work with, but I promise the end result is worth it. Just roll them as thinly as you can while still having the dough maintain its integrity.
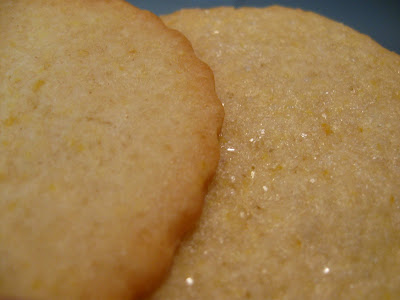
 The last step, if you're so inclined, is to sprinkle the tops with sanding sugar. I really like the added crunch this adds to the crisp, but it is entirely optional. I also like how it adds a little sparkle to the crisps. In the photo below, the crisp on the left is naked while the one on the right was sprinkled with sanding sugar.
 Bake for 12-14 minutes, or until the edges are nicely golden. The crisps will not brown evenly and they will burn on the edges before the centers become golden, so keep an eye on them. Like any cookie this thin, once they start to brown at all, keep a close eye on them; they can go from "not yet" to "oh no!" in a matter of moments. Let the cookies cool briefly on the sheet and then transfer to a cooling rack to finish cooling completely. Strangely enough, I find I prefer these cookies after they have had a chance to sit a few days. This can be a wonderful thing as they make great gifts that can be made ahead of time.
 I mix the dough in a food processor. The procedure for making this dough is very similar to making pie crust. I love the wonderful texture and flavor that cornmeal adds!
 After mixing the dry ingredients (including the sugar), add the cold butter (cut into cubes) and the lemon zest. Pulse just until the mixture resembles coarse crumbs.
 Mix the buttermilk and vanilla together and then add to the processor, only working the dough until it just starts to pull together. A word of caution: this dough is quite a bit stickier than regular pie crust due to the high sugar content. If you dampen your hands before handling it, it helps a bit.
 Dump the dough onto the counter and shape into a disk. Wrap in plastic wrap and refrigerate for 6 to 24 hours. Longer tends to be better in the case of this dough. Again, it's a bit sticky, but as it sits in the refrigerator, the cornmeal hydrates and results in a less sticky dough. When you are ready to cut the cookies, cut the dough into four sections so you can work with a small amount at a time. Keep the remaining parts refrigerated until you are ready for them.
  Prepare sheet trays with parchment and preheat the oven to 375° F. The crisps don't spread too much, so you can place them fairly close together (closer even than I show in this picture).
 The big thing is to roll them thin!! Again, this dough can be a little tricky to work with, but I promise the end result is worth it. Just roll them as thinly as you can while still having the dough maintain its integrity.
  The last step, if you're so inclined, is to sprinkle the tops with sanding sugar. I really like the added crunch this adds to the crisp, but it is entirely optional. I also like how it adds a little sparkle to the crisps. In the photo below, the crisp on the left is naked while the one on the right was sprinkled with sanding sugar.
 Bake for 12-14 minutes, or until the edges are nicely golden. The crisps will not brown evenly and they will burn on the edges before the centers become golden, so keep an eye on them. Like any cookie this thin, once they start to brown at all, keep a close eye on them; they can go from "not yet" to "oh no!" in a matter of moments. Let the cookies cool briefly on the sheet and then transfer to a cooling rack to finish cooling completely. Strangely enough, I find I prefer these cookies after they have had a chance to sit a few days. This can be a wonderful thing as they make great gifts that can be made ahead of time.
 Lemon Cornmeal Crisps
Yield: approx 60 - 2 1/2 inch rounds
1 3/4 cup flour
3/4 cup granulated sugar
1/3 cup cornmeal
1/4 tsp salt
3/4 cup cold butter, cut into small cubes
zest of one lemon
1/2 cup buttermilk
1 tsp vanilla
sanding sugar (optional)
In a food processor, pulse together the first four ingredients. Add the butter and lemon zest and pulse until the mixture resembles coarse crumbs. Mix together the buttermilk and vanilla and add to the processor, mixing only until the dough starts to come together. Dump the dough out and shape it into a disk. Wrap the disk in plastic wrap and refrigerate for 6 to 24 hours. For easier dough handling, longer refrigeration is better.
When ready to bake, cut the dough disk into four pieces. Rolling one piece at a time, keep the remainder refrigerated until ready to use. Preheat the oven to 375° F. Roll the dough out as thinly as you can. This dough can be a bit tricky and you will want to use plenty of flour to keep it manageable. I cut mine into 2 1/2 inch rounds, but you can cut them in any shape you desire. Sprinkle with sanding sugar if you want a shiny, crispy top to the crisps. Bake 12-14 minutes, or until the crisps are nicely golden around the edges. They will not brown evenly; the edges will become too done before the center turns golden, so keep an eye on them. Cool slightly on the baking sheet before transferring to a cooling rack to cool completely. Store in an air tight container for up to ten days. These crisps actually taste best two or three days after they are baked.
love your site :) the food ideas and tips/recipes all sound really good and so happy to see its from scratch cause well really lets be honest its the only way to cook. yes im a snob like that. Love spending hours in the kitchen cooking and brewing and putting a pinch of this and that and rubbing my hands together in anticipation and upon that first bite throwing my fork down like a football at the superbowl....yes i love it that much and so enjoy reading your stuff....kiss kiss and a dash of flour thank you
ReplyDeleteThanks for the kind words, Michele! I totally agree... it is the only way to cook, as far as I'm concerned, but I may be a little biased. ;-) Take care!
ReplyDeletethank you so much
ReplyDelete