I am now blogging new recipes on my farm website.

Cooking from Scratch is on facebook! Click here to check it out!

Monday, September 14, 2009

Toasted Pumpkin Seeds


Have I told you lately how much I love my freezers? I know its approaching pumpkin season, but I still have plenty of seeds in my freezer from when I grew a bounty of pumpkins two years ago. Check out the date on that baggie: December '07!

When I processed my pie pumpkins to freeze the pulp for bread and pies, I saved all the seeds and froze them. You don't need to do anything except measure them into the baggies and freeze. You can use whatever pumpkin seeds you have... heck, keep them from your jack o'lantern. I prefer the smaller seeds from pie pumpkins because the hulls are more tender and I like that, but they're all good.

Thaw the seeds out and let them come to room temperature before preparing. If you try and mix them with the butter when they're still cold, you'll get a clumpy, yucky mess.

Mix the seeds, melted butter, Worcestershire sauce, and seasoning salt (like Johnny's) together. Spread the seeds out onto a sheet pan and throw in a 250 degree F oven. Bake, stirring occasionally, until they are nicely browned, about one hour.

Let the seeds cool completely before storing in an air tight container. I find that plastic bags do not keep them at their freshest. I prefer to keep them in a canning jar with an air tight lid.

Toasted Pumpkin Seeds
Yield: 2 cups

2 cups unwashed seeds
2 tsp Worcestershire sauce
1 1/2 TBS melted butter
1 tsp seasoning salt

Mix all ingredients together and spread onto a sheet pan. Bake at 250 degrees F for an hour, stirring occasionally, until they are nice and toasty brown. Cool completely before stirring in an air tight container.

Saturday, September 12, 2009

Potato Wheat Bread

Long, long ago in a land far, far away, in a lifetime I don't always feel is my own anymore, I was introduced to homemade potato bread. This was way back in high school, when I first realized that, deep down inside, I am a cowgirl. It was as if I had never really lived until I started working cattle.

As part of this coming of age, I spent a fair amount of time with some friends on their ranch in Soap Lake, Washington. Now, I grew up eating homemade bread and I always loved it, but the bread my mom made was very whole wheat and quite dense and rustic. That's not a bad thing and I know that's how my dad preferred it. But, I guess I had never realized just how soft homemade bread could be until I tried Sy's potato bread. Sometimes, I think I drove over there to visit just so I could eat some of her bread. She was nice enough to give me her recipe and I've made it often over the years, but one day I happened to wonder what it would be like to take that super soft bread and make it a wheat dough. I wondered if it could make a nice, light wheat bread. As it turns out, it does! This is the softest homemade wheat bread you'll ever taste.

By the way, if you can't find soy flour, you can substitute for all-purpose, but the soy flour does some interesting things to the dough's texture, flavor, and storage length. Therefore, I recommend using it if you can find it.

It starts out with boiling a diced up potato in water. Boil it until it's nice and tender.

You need to let it cool quite a bit before heading to the next step or you will end up with scalding hot potato water shooting all over your kitchen. Trust me... I learned that one the hard way a long time ago! Please note that I made a double batch here, so your blender will not be this full. I have a 6 quart Kitchen-Aid, and I must say that a double batch of this bread is so big it's a fair pain in the rear. I'd recommend just sticking with a normal batch size. Blend the potato and water together until it's nice and smooth.

Mix all the wet ingredients together. Boy, doesn't look very appealing here, does it? Don't worry, it will turn into a fairly nice dough. It's going to be a bit sticky even when it's done, but that's why the mixer is nice. Add the soy and whole wheat flour and gluten and mix for a bit with the paddle. Then switch to the dough hook and add 2 cups of the white flour and the salt. Knead, adding as little of the remaining flour as necessary to obtain a nice, cohesive dough. Again, it will still be sticky, but it should also be nice and elastic.

Put the dough into a greased bowl and cover with plastic wrap. Leave in a warm place to rise until double. This dough is very active, so don't walk away and forget about it. I did that once, too, by accident. I had been letting it rise in the oven and, while I went out for a ride on my horse, the dough rose up and over the sides of the bowl and all through the oven rack. Yuck, was it ever a mess. Just be sure you keep an eye on it.

Here it is doubled. It didn't seem to take very long, but I put it in our 80 degree garage for about 45 minutes. The yeast apparently like that.

Dump the dough onto a floured counter and pat it down into a rectangle. Have your pans ready and lubed before getting started. I use the 8x4 size pans. Cut the dough so that you have two rectangles where one side is close to the length of the pan. Again, I made a double batch, so I had four rectangles.
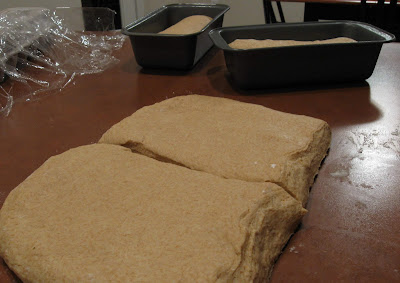
Roll the dough up into a log and pinch the ends together. Pinch the ends up too and then flip the whole thing over and place in the pans, seam side down.

Cover with plastic wrap and let rise until doubled, about an hour.

Once they have doubled, remove the plastic wrap and preheat the oven to 375 degrees F. Don't worry if the loaves don't seem to be as poofed as you would like because they have a good spring in the oven. In fact, if you let them rise too long and too high before baking them, they might fall in the oven.

If you like a split-top loaf, you can cut a line down the middle of the loaf with a sharp knife or razor blade. Don't cut too deeply or your resulting loaf shape will be odd. About 1/4 of an inch deep is enough. Place bread into the preheated oven and bake for about 30 minutes. Bread should sound hollow when done or have reached an internal temperature of 200 degrees. Let cool slightly before taking the loaves out of the pan to finish cooling. For a beautiful, soft, glossy top like shown in the first picture, brush the tops with butter. For best results, wait until the loaves are completely cooled before cutting... yeah, right.

Potato Wheat Bread
Yield: 2 loaves

1 small potato, peeled and diced
water to make 2 1/2 cups potato puree
3 TBS softened or melted butter
1 TBS instant yeast
2 TBS honey
2 TBS molasses
1/2 cup soy flour
3 TBS vital wheat gluten
2 1/2 cups whole wheat flour
2 - 2 1/2 cups white flour
1 tsp table salt

In a small sauce pan, boil the prepared potato in about 2 cups of water. Boil until the potato is very tender. Remove from heat and let cool. Place mixture into a blender and blend for a few seconds. Add water to make 2 1/2 cups and blend until smooth.

Add the potato water to the bowl of a stand mixer. Add the butter, yeast, honey, and molasses and mix thoroughly. Add the soy flour, gluten, and wheat flour. Mix on medium speed with the paddle for about 5 minutes. Remove the paddle and put on the dough hook. Add 2 cups of white flour and the salt. Knead on speed 2 for another 3-5 minutes, adding as little of the remaining 1/2 cup of flour as you can while still trying to keep the dough from being too sticky. It will never completely lose its stickiness and it is better to err on the side of less flour.

Place the dough in a greased bowl, cover with plastic wrap, and let rise in a warm place until double. Dump the dough onto a floured counter and pat into a large, flat rectangle. Cut into two rectangles and roll each rectangle into a loaf, pinching the seams closed. Place the load, seam side down into a greased 8x4 inch load pan. Cover the pans with plastic wrap and let rise again until double, about an hour.

Preheat the oven to 375 degrees F. Slash the top of the dough if you prefer a split top loaf and place in the oven for about 30 minutes. When done, the loaf should sound hollow when tapped or have reached an internal temperature of 200 degrees. Let cool slightly before removing from the pans to finish cooling on a rack.

Thursday, September 10, 2009

Produce Perfection

The most amazing thing happened today. I was standing at the kitchen counter trying to make potatoes, Tupperware, and blue water do special things for my earth science class tomorrow when my stomach yelled at me. I don't mean the meek kind of rumble that makes you think casually, "Hmm, I think I might be hungry." This was a roar of epic proportions that made me immediately drop what I was doing and walk straight to the refrigerator. When the tummy starts barking orders like that, I obey.

Somehow, I suddenly remembered the forgotten honeydew in the back of the refrigerator. I'm not really sure how I had forgotten it since every time I opened the fridge door the last two days, its sweet aroma enveloped me.

That's what was so wonderful. This one was divine. Sweet and juicy, tender and flavorful. The perfect specimen. How often do you actually get a honeydew that smells like a honeydew, let alone tastes like one? I was walking through the produce aisle the other day and, from two rows away, I knew that there were ripe honeydews to be had. This is a truly rare event; I can count on one hand then number of decent honeydews I've had in the last ten years.

It's a shame that getting decent produce from the grocery store should be so challenging... and it's surprising to me that people actually buy and eat under ripe, flavorless produce (honeydews are not supposed to be crunchy!). It's no wonder Americans don't eat enough fruits and vegetables; many of them must not know what they're missing!

I always enjoy watching shoppers in the produce aisle. Everyone has a different method of picking fruit. Some simply pick the prettiest specimen there. Others pick them up and fondle them. Me? I'm a sniffer for most produce. If I can't smell it, I don't buy it. There are exceptions, of course. Listed below are a few of the criteria I use for choosing my favorite produce. What techniques do you favor?
  • Cantaloupes and honeydews: absolutely must pass the sniff test
  • Watermelons: I look for a yellow area on one side (where it sat on the ground) and sounds hollow when thumped
  • Peaches, nectarines, plums: has the slightest give when pressed lightly, must pass the sniff test
  • Grapes: I like my grapes to crunch when I bite into them, so I give 'em a squeeze to see how firm they are, for green grapes, I look for a yellow hint as they tend to be sweeter, I also am not opposed to testing one right there in the produce department
  • Tomatoes: pointless to test at the grocery store, but if you are at a market where you suspect they might be locally grown, submit them to the sniff test
  • Pears (especially D'Anjou, my favorite): I reject any with bruises, I like just a slight hint of yellow to ensure they ripen properly
  • Red Delicious Apples: most apples are pretty easy to pick, I think. Red delicious is the exception as it can often be mealy. To be sure I don't end up with mealy Red D's, I give them a squeeze. If there is even the slightest hint of give, I put it back and choose another.

Tuesday, September 8, 2009

Creamy Pesto Pasta

I love this dish, not only because it is sooooooo quick to make but because it is sooooooo delicious. Tonight was one of those nights. But just because I can't spend a lot of time making a meal doesn't mean that I don't' want to eat well. Tonight, it was steaks with sauteed mushrooms. With the steaks, I made steamed squash and broccoli with a browned butter drizzle and this pasta.

If you've been one of those folks that reaches for pasta in a box on those quick meal nights, give this a try. I think it's actually faster than any box could hope to be. The trick is to always have pesto in your freezer. I make mine in the summer when the basil is plentiful and then freeze it in ice cube trays. I pop them out of the trays and store in zip top bags. Ready to go at a moment's notice!

Boil your pasta and drain. In this case, I used the remnants from two bags. If you look closely, we had small shells and some large alphabet pasta from Trader Joe's. Thaw the pesto in a small dish in the microwave. For ice cube sized hunks, it only takes a few seconds (literally! start with 15 seconds). Pour the pesto over the pasta, add a good splash of cream (heavy or light, whatever you've got), and a nice shake of Parmesan cheese. For this recipe, I just shake it right out of the green can. On nights like these, I can't be bothered to grate fresh. That's it! Stir it around and then eat it up. Just make sure you make enough. This is one of those dishes that when I go to do the dishes, I have to have a few more spoonfuls. Sssshhhhh. Don't tell!

Sunday, September 6, 2009

Crispy Coconut Macaroons

I grew up eating Mother's Coconut Macaroons. You know, the ones with the circus top logo? They were crispy and coconuty and so delicious. I've made macaroons a lot in the last few years, but I have always been dissatisfied. While "traditional" macaroons are the best cookie you can eat if you're looking for a "healthy" cookie, they just seem kind of blah to me. I knew to get to the kind of cookie I was looking for, I was going to have to bring butter and flour into the equation. Sometimes, you just have to make these kinds of sacrifices.

It only took me three tries. Batches, that is. And on the last batch, I had to make some mid-batch alterations. But I've got it now! If you like coconut and a nice, buttery, crispy cookie, then give these guys a try. You won't be disappointed. Unfortunately, as a result of the multiple batch process, most of the pictures I took were not for the final batch (I guess I was starting to get discouraged). So, all I've got to share with you is this one of the final product. Well, at least I can share the recipe with you!

Crispy Coconut Macaroons
Yield: approximately 30 cookies

1/2 cup softened butter
3/4 cup sugar
2 whole eggs
1/2 tsp vanilla

1 cup flour
1/4 tsp salt
1/4 tsp cream of tarter
1 tsp baking powder
1 1/2 cups unsweetened coconut

Cream the butter, sugar, eggs, and vanilla together. Unless you can find unsweetened, "macaroon coconut" which is finely ground, you will need to run it through the food processor a bit. If you cannot find unsweetened coconut, you can use the sweetened, but you will have to adjust the amount of sugar. Toast the coconut in a dry saute pan over medium heat, stirring frequently until the coconut has a nice, light, toasty color. Let the coconut cool.

Preheat the oven to 325 degrees F. In a separate bowl, mix together the flour, salt, cream of tarter, and baking powder. Stir in the coconut and then add the wet batter. Stir to mix thoroughly. Drop batter by tablespoons onto a parchment lined sheet. The cookies will spread quite a bit, so be sure to leave plenty of room between each. Dampen your fingers and press the batter flat.

Bake for 15-20 minutes, until the cookies are flat and nicely golden. Cool completely on a rack before enjoying.

Friday, September 4, 2009

Chocolate IV Cake

Warning! Only make this cake if you are in dire need of a fix. It is dangerous. Very, very dangerous... and rich. Oh la la.

This thing is like a cross between a molten cake and a pudding. It starts with chocolate. I made it with Ghiradelli's bittersweet chocolate chips and, boy, was it chocolaty. If you want, you could use chocolate that is less intense. But I personally like it super chocolaty.

Melt the chocolate, butter, sugar, and vanilla together in a medium heat proof bowl over gently simmering water. It will be thick and the sugar will still be grainy, but that's okay. It'll do its thing in the oven just fine.

Add the eggs and stir gently. It will become very gelatinous. Again, it's okay. Just roll with it.


Stir in the flour just until the batter is well mixed.


Butter and flour four ceramic ramekins. Evenly distribute the batter between the four. FYI, the batter does not rise, so if your batter fills your ramekins more than mine, don't worry about it. Pour hot water into the baking pan halfway up the sides of the ramekins. I used the water from the double boiler. Bake for 30 minutes in a preheated 375 degree oven. Remove from the oven and jiggle each ramekin briefly before inverting onto a plate. The cake should come out very easily. Let cool slightly before dusting with powdered sugar and serving. Prepare yourself! This dessert requires the accompaniment of either coffee or milk. Don't say I didn't warn you!


Chocolate IV Cake
Yield: 4 cakes

10 oz high-quality semi- or bittersweet chocolate
5 TBS salted butter
2 TBS sugar
1/2 tsp vanilla
3 eggs
1/4 cup sifted flour

Melt the chocolate, butter, sugar, and vanilla together in a medium bowl over gently simmering water. Stir together until it is melted and smooth. Do not worry if the sugar is still grainy. That is normal.

Remove from the heat and let cool slightly. Preheat the oven to 375 degrees F. Butter and flour four small ceramic ramekins. Set into a baking an with one inch sides.

Add the eggs to the chocolate mixture and stir until just mixed. It will seem somewhat gelatinous. Add in the sifted flour and fold in until well mixed. Divide evenly between the four ramekins. Prepare a water bath by pouring hot water half way up the sides of the ramekins. Bake for 30 minutes. A pick will come out clean, but the middle will not be set.

Jiggle the ramekin slightly and then invert immediately onto a serving plate. Let cool slightly before sprinkling with powdered sugar and serving.

Wednesday, September 2, 2009

Potato Gratin

I made these beauties a couple of evenings ago. Nothing is more beautiful than golden, bubbly cheese. I put these together on a whim because I didn't know what I was going to make for a main dish. I figured the 30-40 minutes they took to cook would provide me with plenty of time to figure it out. I wasn't so thrilled with what I came up with while these cooked (I can't even remember what I made), but I do remember these guys.

I made just a small pan of them. Last year, I purchased a cute little glass baking dish at IKEA. I think it's in the 6 x 10 inch range, but you can mix this to fit any size pan or crowd. This was a great amount for just the two of us.

First, I peeled and sliced four medium potatoes. Slice them pretty thinly so they cook quickly. Then minced up some shallot and parsley and toss them into a bowl with the taters. Throw in some olive oil, salt, pepper, freshly grated Parmesan, and heavy cream. Toss to mix and loosely layer into a baking dish. I love the flavor the shallots add to this dish. You could use onions in a pinch, but I think shallots are really the way to go.

Sprinkle the remaining cheese on top and drizzle with a bit of extra virgin olive oil.
Bake in a preheated 400 degree F oven for 30-40 minutes, until the cheese is nice and golden and bubble and the potatoes are nice and tender. I like to test them with a fork to be sure they're ready.

Potato Gratin
Yield: serves 2-3

4 medium potatoes, peeled and thinly sliced
4 TBS extra virgin olive oil, divided
1/4 tsp ground sea salt (or to taste)
1/4 tsp freshly ground pepper
1 TBS minced fresh parsley
3/4 cup freshly grated Parmesan cheese, divided
2 TBS minced shallot
1/3 cup heavy cream

In a bowl, toss together the potatoes, 2 TBS of the oil, the salt, pepper, parsley, approximately half of the cheese, the shallot, and the cream. Pour into a greased baking dish. Sprinkle the remaining cheese on top and finish with a drizzle of the remaining 2 TBS of oil.

Bake in a preheated 400 degree F oven for 30-40 minutes, until the top is golden and bubbly and the potatoes are nice and tender.

Monday, August 31, 2009

Blueberry Pudding

You reckon it's too late for a gal to decide she rather was enjoying her life of leisure before going back to full-time work? Whew! I forgot how much teaching can take out of you. Hopefully, before too long I'll get back in the groove. But for now, I'm feeling crazy! Fortunately, we still have to eat. And chopping and dicing and sauteing is still cathartic for me. For better or worse, this recipe does not involve any of those things, but I'll forgive it since it tastes so good.

My mom got this recipe from a friend of hers back when I was just a wee thing. It's another one of those recipes that are comforting to me. We ate it a lot... at heart, we are blueberry people. But don't feel limited to blueberries! Mix it up with whatever combination sounds good to you. You may have to adjust the sugar a bit, but that's no big deal.

This is a somewhat different recipe than those you usually see for cobblers. In fact, up until about four years ago, I thought this was a cobbler and couldn't for the life of me figure out why all those cobbler recipes I was trying weren't turning out "right". The name of "pudding" here is probably used simply to mean a dessert. Regardless, it is quick and simple and the result is fabulous!!

In an 8 x 8 baking pan, add the fruit, lemon juice and cinnamon.

Then, in a small bowl, mix 1/4 cup of the sugar, butter, and milk together. Don't worry if it looks a little funky... it's all good.

Add the flour, baking powder, and salt to the butter mixture. Spoon it over the fruit as evenly as possible. It's a bit tricky because it's thick; I recommend using two spoons to spread it around.

Next, it's time to sprinkle a mixture of cornstarch and sugar over the top of the whole deal.
The last step is to pour a cup of boiling water over everything. Looks kind of strange, doesn't it? Don't worry though, it will turn out fabulous.
Bake in a 375 degree F oven for one hour. Look how wonderfully golden that top looks! Don't be fooled to pull this thing out of the oven early. It will start browning before it's actually ready... go the full hour. Let cool slightly before serving so that the fruit filling can thicken up a little bit.

Blueberry "Pudding"
Yield: 6 servings

2 1/2 to 3 cups blueberries (or other fruit)
juice from one lemon
1/2 tsp ground cinnamon

Put fruit into an 8 x 8 baking dish. Add the lemon juice and cinnamon, sprinkling both evenly over the top. Meanwhile, preheat the oven to 375 degrees F.

1/3 cup sugar
3 TBS butter, melted
1/3 cup milk

Cream the sugar and butter together. Add the milk and whisk together. It may look lumpy and strange. Don't worry about that; it's normal.

1 cup flour
1 tsp baking powder
1/4 tsp salt

Sift together and then mix into the butter and milk mixture. Stir until it is smooth. Using two spoons, spread the batter evenly over the fruit.

1 TBS cornstarch
1/3 cup sugar

Mix the cornstarch and sugar together and sprinkle over the top of the fruit and batter.

1 cup boiling water

Pour the boiling water over the entire top of the batter, trying to wet the entire surface. Do not stir. Bake for one full hour at 375 degrees F. Cool slightly before serving so the fruit filling can thicken slightly. Serve plain or with vanilla ice cream or whipped cream.

Friday, August 28, 2009

Stolz Kielbasa


The idea of this dish originally came from some close friends of ours. Often when we would go to their place for get togethers, they served a dish very similar to this one. One time, I asked what was in it and got a brief listing of the main ingredients. From there, I started to experiment, trying to duplicate/modify the recipe. One of the changes I was shooting for was to make the dish less sweet. While the sweetness was tasty as "football food," for a dinner main dish, I wanted something a little more savory. A fair bit of experimentation brought this end result. It is one of our favorite meals.

The first step is to slice the kielbasa into 1/3 inch coins and boil them to remove some of the fat. While you can skip this step in a pinch, there really is a difference in the end result. Let the kielbasa boil for a few minutes. Scum will form on the surface. Cut off the heat and spoon off the scum. Then drain the sausage.

Preheat the oven to 400 degrees F. In a 13 x 9 inch glass baking dish, mix together all the remaining ingredients. If you can't find ground bay leaves, you can throw in 2 bay leaves instead. Just remember to pull them out of the sauce before serving.

Throw in the drained sausage and stir to coat. Smooth out and place in a 400 degree F oven.

Bake for 35-40 minutes, until the sauce is nice and thick. Let cool slightly before serving.


Stolz Kielbasa
Yield: serves 4

2 lb kielbasa, cut into 1/3" coins
1 large onion, diced
8 oz tomato sauce
1/2 cup dry red wine
3/4 cup catsup
1/4 cup brown sugar
1/4 tsp ground allspice
1/4 tsp ground bay leaves (or two whole bay leaves)
1 TBS chili powder
1/4 tsp salt
1/4 tsp ground black pepper

Boil the kielbasa in water for 3-5 minutes. Skim off the scum and then drain.

Preheat the oven to 400 degrees F. In a 9 x 13 inch glass baking dish, mix the remaining ingredients. Add the drained sausage and stir to coat thoroughly. Bake for 35-40 minutes, until the sauce is thick and bubbly and the edges of the sausages are browned. Let cool slightly before serving.

Thursday, August 27, 2009

Milk Gravy

The other day I made some fried chicken. I really wanted mashed potatoes and gravy, but fried chicken doesn't exactly leave pan drippings that can be used to make gravy. I used to buy those little packets for making white gravy, but they were always less than the best, and - besides - I didn't have any on hand. I decided this time to try and make some milk gravy from scratch. I figured it couldn't be too hard. The only thing I was worried about was getting enough flavor into it. Fortunately, bacon is the world's best flavor maker.

This gravy is a cinch to make and would also be perfect over chicken fried steak. Mmmmmm.... chicken fried steak.

Milk Gravy
Yield: 2 cups

4 strips bacon
4 TBS flour
2 cups warm milk
1/2 tsp salt (or to taste)
1/4 tsp coarsely ground black pepper

Cook the bacon over medium/medium-high heat until all the fat is rendered out. Remove the bacon and save for bacon bits or simply enjoy the slices while standing at the stove. You deserve it! You're the one doing the cooking!

Reduce the heat to medium/medium-low. Do not pour off any of the fat. Add the flour to the pan and stir into the grease to make a nice roux. Stir and cook slightly. Add the warm milk slowly (I heat the milk in the microwave before adding it; it seems to help keep the lumps from forming), stirring constantly. Cook until the mixture is just about to boil and is nice and thick. Add the salt and pepper and serve.