Cooking from Scratch is now on facebook! Click here to check it out!

Monday, August 31, 2009

Blueberry Pudding

You reckon it's too late for a gal to decide she rather was enjoying her life of leisure before going back to full-time work? Whew! I forgot how much teaching can take out of you. Hopefully, before too long I'll get back in the groove. But for now, I'm feeling crazy! Fortunately, we still have to eat. And chopping and dicing and sauteing is still cathartic for me. For better or worse, this recipe does not involve any of those things, but I'll forgive it since it tastes so good.

My mom got this recipe from a friend of hers back when I was just a wee thing. It's another one of those recipes that are comforting to me. We ate it a lot... at heart, we are blueberry people. But don't feel limited to blueberries! Mix it up with whatever combination sounds good to you. You may have to adjust the sugar a bit, but that's no big deal.

This is a somewhat different recipe than those you usually see for cobblers. In fact, up until about four years ago, I thought this was a cobbler and couldn't for the life of me figure out why all those cobbler recipes I was trying weren't turning out "right". The name of "pudding" here is probably used simply to mean a dessert. Regardless, it is quick and simple and the result is fabulous!!

In an 8 x 8 baking pan, add the fruit, lemon juice and cinnamon.

Then, in a small bowl, mix 1/4 cup of the sugar, butter, and milk together. Don't worry if it looks a little funky... it's all good.

Add the flour, baking powder, and salt to the butter mixture. Spoon it over the fruit as evenly as possible. It's a bit tricky because it's thick; I recommend using two spoons to spread it around.

Next, it's time to sprinkle a mixture of cornstarch and sugar over the top of the whole deal.
The last step is to pour a cup of boiling water over everything. Looks kind of strange, doesn't it? Don't worry though, it will turn out fabulous.
Bake in a 375 degree F oven for one hour. Look how wonderfully golden that top looks! Don't be fooled to pull this thing out of the oven early. It will start browning before it's actually ready... go the full hour. Let cool slightly before serving so that the fruit filling can thicken up a little bit.

Blueberry "Pudding"
Yield: 6 servings

2 1/2 to 3 cups blueberries (or other fruit)
juice from one lemon
1/2 tsp ground cinnamon

Put fruit into an 8 x 8 baking dish. Add the lemon juice and cinnamon, sprinkling both evenly over the top. Meanwhile, preheat the oven to 375 degrees F.

1/3 cup sugar
3 TBS butter, melted
1/3 cup milk

Cream the sugar and butter together. Add the milk and whisk together. It may look lumpy and strange. Don't worry about that; it's normal.

1 cup flour
1 tsp baking powder
1/4 tsp salt

Sift together and then mix into the butter and milk mixture. Stir until it is smooth. Using two spoons, spread the batter evenly over the fruit.

1 TBS cornstarch
1/3 cup sugar

Mix the cornstarch and sugar together and sprinkle over the top of the fruit and batter.

1 cup boiling water

Pour the boiling water over the entire top of the batter, trying to wet the entire surface. Do not stir. Bake for one full hour at 375 degrees F. Cool slightly before serving so the fruit filling can thicken slightly. Serve plain or with vanilla ice cream or whipped cream.

Friday, August 28, 2009

Stolz Kielbasa


The idea of this dish originally came from some close friends of ours. Often when we would go to their place for get togethers, they served a dish very similar to this one. One time, I asked what was in it and got a brief listing of the main ingredients. From there, I started to experiment, trying to duplicate/modify the recipe. One of the changes I was shooting for was to make the dish less sweet. While the sweetness was tasty as "football food," for a dinner main dish, I wanted something a little more savory. A fair bit of experimentation brought this end result. It is one of our favorite meals.

The first step is to slice the kielbasa into 1/3 inch coins and boil them to remove some of the fat. While you can skip this step in a pinch, there really is a difference in the end result. Let the kielbasa boil for a few minutes. Scum will form on the surface. Cut off the heat and spoon off the scum. Then drain the sausage.

Preheat the oven to 400 degrees F. In a 13 x 9 inch glass baking dish, mix together all the remaining ingredients. If you can't find ground bay leaves, you can throw in 2 bay leaves instead. Just remember to pull them out of the sauce before serving.

Throw in the drained sausage and stir to coat. Smooth out and place in a 400 degree F oven.

Bake for 35-40 minutes, until the sauce is nice and thick. Let cool slightly before serving.


Stolz Kielbasa
Yield: serves 4

2 lb kielbasa, cut into 1/3" coins
1 large onion, diced
8 oz tomato sauce
1/2 cup dry red wine
3/4 cup catsup
1/4 cup brown sugar
1/4 tsp ground allspice
1/4 tsp ground bay leaves (or two whole bay leaves)
1 TBS chili powder
1/4 tsp salt
1/4 tsp ground black pepper

Boil the kielbasa in water for 3-5 minutes. Skim off the scum and then drain.

Preheat the oven to 400 degrees F. In a 9 x 13 inch glass baking dish, mix the remaining ingredients. Add the drained sausage and stir to coat thoroughly. Bake for 35-40 minutes, until the sauce is thick and bubbly and the edges of the sausages are browned. Let cool slightly before serving.

Thursday, August 27, 2009

Milk Gravy

The other day I made some fried chicken. I really wanted mashed potatoes and gravy, but fried chicken doesn't exactly leave pan drippings that can be used to make gravy. I used to buy those little packets for making white gravy, but they were always less than the best, and - besides - I didn't have any on hand. I decided this time to try and make some milk gravy from scratch. I figured it couldn't be too hard. The only thing I was worried about was getting enough flavor into it. Fortunately, bacon is the world's best flavor maker.

This gravy is a cinch to make and would also be perfect over chicken fried steak. Mmmmmm.... chicken fried steak.

Milk Gravy
Yield: 2 cups

4 strips bacon
4 TBS flour
2 cups warm milk
1/2 tsp salt (or to taste)
1/4 tsp coarsely ground black pepper

Cook the bacon over medium/medium-high heat until all the fat is rendered out. Remove the bacon and save for bacon bits or simply enjoy the slices while standing at the stove. You deserve it! You're the one doing the cooking!

Reduce the heat to medium/medium-low. Do not pour off any of the fat. Add the flour to the pan and stir into the grease to make a nice roux. Stir and cook slightly. Add the warm milk slowly (I heat the milk in the microwave before adding it; it seems to help keep the lumps from forming), stirring constantly. Cook until the mixture is just about to boil and is nice and thick. Add the salt and pepper and serve.

Tuesday, August 25, 2009

Chocolate Pudding

I've really been trying to eat a little healthier lately. For me, that simply means trying to cut back on the high fat, high calorie treats. I always eat a well balanced diet; it's just the "extracurricular" foods that get me in trouble. Fortunately, there are a number of desserts that are good choices when you want to calm your sweet tooth without having to eat a stick of butter.

Pudding is about the most straight-forward chocolate treat there is. Milk, sugar, and some cornstarch for thickening. These are the only basic requirements for pudding. Add a few minor additions for flavoring, and you've got a perfect dessert. While you can use low fat milk, I strongly recommend using whole milk if you want a nice smooth, rich pudding. Pudding from scratch is the only way to go. It tastes so much better than that stuff that comes in a box. And it's really not that much more time consuming to make than instant!

The first step is to sift the dry ingredients together into a medium sauce pan.

Add just enough of the milk to make a paste. Once all of the dry ingredients are moistened, add the rest of the milk and mix thoroughly. Don't worry if it gets a little frothy; that will go away as the pudding cooks.


Cook the pudding over medium heat whisking occasionally. Be careful not to cook over heat that is too high - scorched milk is no fun. Continue cooking until the pudding is just about to reach a boil. It should be thick and smooth. Remove from the heat.

Let cool slightly before pouring into serving bowls. Like all puddings, this one will form a skim on the surface unless you place plastic wrap directly onto the surface. Serve warm or chill. It will thicken more upon chilling. I like serving with whipped cream! Or make a chocolate pie. Simply pour the pudding into a pre-baked pie crust. Yum!


Chocolate Pudding
Yield: 4 servings

1/3 cup sugar
1/3 cup cocoa powder
1/4 tsp salt
3 TBS cornstarch
2 1/2 cups milk
1 tsp vanilla extract

Sift the sugar, cocoa powder, salt, and cornstarch into a medium sauce pan. Mix the milk and vanilla. Pour just enough of the milk into the dry ingredients to make a loose paste. Once the dry ingredients are all moistened, pour in the rest of the milk and whisk until well mixed.

Cook over medium-high heat, whisking occasionally, until the pudding just about reaches a boil and is thick and smooth. Remove from heat and let cool slightly before pouring into serving bowls. Serve warm or cold. When storing, be sure to place plastic wrap directly on the pudding surface to prevent a film from forming.

Sunday, August 23, 2009

Pork Tenderloin Sandwich

Behold the supreme Midwestern sandwich. My husband has been trying to get me to make these for years now. Based on my, apparently poor, previous experience with pork tenderloin sandwiches, I was not in any hurry to put them on my menu.

Earlier this week, I decided I had put it off long enough. You know what? That just may have been one of the tastiest sandwiches I've ever eaten. I can't believe I waited so long to make them! I think every time I had had one of these while at restaurants they must have used pork loin and not tenderloin. Oh, what a difference! Be sure you use the real thing; you'll be glad you did.

The first step is to slice the tenderloin across the grain into two inch slices. Set the slice, cut side down, on the cutting board. Lay a piece of plastic wrap across the top and pound with the smooth side of a meat mallet until the piece is nice and thin, just shy of a quarter of an inch.


Set up a breading line. In the first container, break two eggs and beat slightly. In the second container, put a couple of handfuls of panko bread crumbs. Crush the panko between your fingers for a minute to break down some of the larger pieces. Add a teaspoon of salt, a teaspoon of garlic powder, and half a teaspoon of ground black pepper.

Fill a large skillet with one inch of vegetable oil. Heat over medium-high heat until the oil is nice and hot, about 350 degrees F. Dip the meat in the egg and then in the panko and then place directly into the hot oil.

Fry the tenderloins, flipping periodically, until they are nice and golden and cooked through. Mine cooked in about eight minutes total. Adjust the heat as necessary to keep the oil hot but not too hot. Remove the pieces onto a paper towel lined dish. Serve on butter-toasted hamburger buns. I like mine plain, but my husband loves his with mayo, mustard, onions, and pickles.


Pork Tenderloin Sandwich
Yield: variable

2" slices of pork tenderloin, pounded thin

2 eggs
1 cup panko bread crumbs
1 tsp salt
1 tsp garlic powder
1/2 tsp ground black pepper

enough vegetable oil to fill a large skillet one inch deep
hamburger buns
softened butter

Pound the slices of pork tenderloin until about 1/4 of an inch thick. Pour the oil into the skillet and turn the heat on to let it come up to frying temperature, 350 degrees F. Meanwhile, using a counter top griddle (or something similar), butter the cut sides of the buns and toast until nice and golden.

Toss together the bread crumbs, salt, garlic powder, and pepper. Dip the pork fillets into the lightly beaten eggs and then into the bread crumb mixture. Place into the hot oil. Do not over crowd the pan. Turn periodically until they are nice and golden and cooked through, about 8 minutes. Serve on the toasted hamburger buns.

Friday, August 21, 2009

Steamed Mixed Veggies


I almost didn't post this. I thought that maybe it was too simple. I mean its only vegetables, butter, and sesame seeds. Well, and some salt and pepper. But they don't really count as ingredients, do they? The problem is, I just couldn't not post it. Look at that picture! The colors! The shapes! It's like happiness on a plate. Every time I look at this picture, I want to eat some more of this dish. When you make it, be sure you make enough for seconds; you're going to want them.

Obviously, you could use any combination of vegetables you want. I chose these because of the color combination and because they just seemed like they'd go together. No, I'm lying. I was cleaning out the refrigerator and this is what was left. I had a bunch of small bits of veggies; nothing was enough to cook on its own, so, by default, I cooked them together. I love serendipity.

Again, I took advantage of those steaming bags I mentioned in my post on Pad See Ew. I have really come to love these things, especially when I am preparing a dish where certain parts have to be pre-cooked. In this case it was the carrots (cut fairly thinly) and broccoli that needed a head start on the steaming. I placed them in the steaming bag and zapped them in the microwave for about two and a half minutes.

In a large skillet, I melted two tablespoons of butter (not oil, I was going for the browned butter thing here). When the butter was nice and bubbly, I added the red bell pepper and sugar snap peas. Don't forget the pull the strings off those peas before you cook them. It's really hard to pick them off at the table without losing some sense of dignity. Add the steamed broccoli and carrots and toss occasionally over medium-high heat until the vegetables are all just tender and have some nice caramelization on them in places. Add salt and pepper to taste and a pinch of sesame seeds. That's it! Sit back and enjoy the fruits of your labor... oh wait, that may have been too easy to involve any labor! Even better.

Thursday, August 20, 2009

Rosemary & Lime Marinated Salmon

Don't those little morsels look tasty? They were, you know. So easy and so delicious. What I love about this recipe is that it makes for exceptionally moist and flavorful bites of fish. While I really enjoy skewering them and grilling them on the barbie, since I am currently sans BBQ still, I had to settle for the broiler in my oven. I'm sorry, did I say "settle"? That was a poor word choice because there is no settling about this recipe.

See those wonderfully golden tops? That's where it's all at. Mr. Maillard was a pretty smart cookie to recognize that magic happens when certain foods brown. Named after him, the Maillard Reaction occurs when amino acids in the food react with certain types of sugars. The end result is that a wide variety of new flavors are produced. And all of those flavors are formed here! Yowsa. Be sure to cook the salmon with enough heat and long enough to develop this wonderful color; it makes all the difference in the world. If you are geeky like me and want to know more about the Maillard Reaction, I enjoyed this site.

If you're a little worried about the lime thing, don't be. Despite there being a fair amount of lime juice in this marinade, the salmon does not taste limey (huh, is that a word?). Somehow, the lime, garlic, and rosemary meld together into a wonderful new taste that is all their own. It's scrumptious; trust me.

Lastly, this recipe is really easy to modify for whatever number of people you are trying to feed. As long as your proportions for the marinade are in the ball park and there is enough marinade to coat the salmon chunks, all will be well.

Rosemary & Lime Marinated Salmon
Yield: serves 4-6

1/4 cup of extra virgin olive oil
the juice of one lime
1 TBS minced garlic
1 tsp minced fresh rosemary
1/2 tsp kosher salt (or to taste)
1/4 tsp freshly ground black pepper
2 lbs of skinned, boned salmon, cut into one inch chunks

Mix all ingredients except the salmon in a bowl. Add the salmon and toss to coat. Cover the bowl and refrigerate for about two hours, stirring occasionally.

Turn on the broiler in your oven. Place the rack in the middle of the oven. Line a pan with foil and place the salmon pieces on the pan, spreading them out so that no pieces are touching. Broil until the tops turn a lovely golden color, about 8-10 minutes. Remove from the oven and serve drizzled with a little bit of extra virgin olive oil.

To grill the salmon: If you are going to grill the salmon, soak the skewers in water for 30 minutes before skewering to prevent them from burning. Skewer the salmon pieces loosely onto the sticks and then grill over high heat until the salmon is nice and golden and cooked through.

Wednesday, August 19, 2009

Croissants - Take Two

Please note that I have posted a much better croissant recipe since this one. For best results, I strongly recommend you use this recipe instead of the one on this page.

We are getting closer! If you compare this photo to the one in the last post, you can see that quite a few improvements have occurred. This photo actually looks like a croissant to me. While there are still a few tweaks I think I'll try, these are pretty darn tasty. And a lot easier than I had ever been led to believe that croissants could be. I spaced the work, again, over two days. One of these days I will make them in one day and see how that changes things, but that would be asking a lot this week!

So here's how it went this time. I made the dough, being extremely careful about adding my ingredients this time. I'm thinking I must've really screwed up last time because my dough was a very different beast this go around. It was still a nice dough, but it was much looser and stickier.... more like cinnamon roll dough rather than the stiffer, bread-like dough I had last time. I let the dough proof and then rolled it out fairly thinly into a large rectangle. It is very hard to see in this picture, but I smeared a thin layer of room temperature butter over the bottom two thirds of the dough. In this case, I used salted butter and the croissants were border-line too salty. I would recommend using half salted and half unsalted butter to end up with the right saltiness.

I then folded the top third down over the dough and then the bottom third over the top. Basically, I made a brochure out of the dough. In this manner, you end up with three layers of dough and two layers of butter in one fell swoop.

Here's my folded brochure. I placed it on a parchment lined tray and chilled it for about half and hour.

You then repeat this roll, butter, fold, chill process two more times. If you are going to make the croissants all in one day, proceed to the next step. Otherwise, wrap the dough like I did here and stick it in the refrigerator. I would not let the dough sit for more than 12-18 hours or your yeast may get worn out. Pooped. Kaput.

When you are ready, roll the dough out into a nice big square. I rolled it so that it was about a quarter of an inch thick. In hind sight, because the croissants are still not as light and fluffy inside as I would like, I would roll the dough quite thin. As thin as you can work it and not run into dough integrity issues. Trim the edges so that you have a nice, even square.

Note to self: use a pizza cutter. That knife I used to trim the edges was just silly! Use the pizza cutter. It is so much easier. Cut the square into four equal squares and then cut those four squares on the diagonal. It looks like one of those pinwheel things kids like to play with, doesn't it?

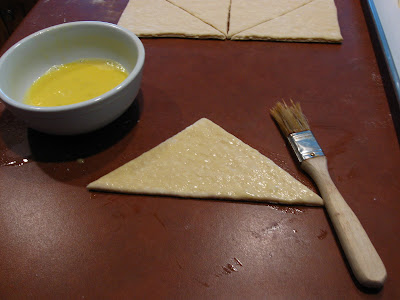
Beat an egg and a little water together to make an egg wash. Line a sheet pan with parchment. Actually, if you are using normal sized pans, you will probably need two pans. I have recently come across 2/3 size sheet pans (the largest pan that can possibly fit into a home-sized oven) and they're the cat's meow. All eight croissants fit on one perfectly. Anyway. Take each triangle and brush the top with egg wash and then roll it up from the long side toward the peak of the triangle. Form the roll into a little crescent and place onto the sheet pan.

Here are the little gems ready to proof. Awwww... aren't they cute?

Here they are doubled in size. You can see that they aren't crazy puffy, but now I think maybe you should shoot for almost crazy puffy. Unlike normal yeast doughs which can have problems with collapsing if they are over-proofed, I think the layers of butter, providing lift and puff during baking would help keep this from happening. They turned out tasty like this, but I think next time I am going to try proofing them until they are really big.

I preheated my oven to 425 degrees F. They bake up quite quickly. These took about 15-20 minutes. I rotated the sheet pan once during baking to keep them from browning unevenly. Notice how little butter has oozed out of these guys compared to last time (of course, that means that all that butter we rolled into the dough is still in the dough). Aaaghh, we knew when we made 'em that we weren't making diet croissants, right?


Croissants
Yield: 8 croissants

1 package active dry yeast OR 1 TBS instant yeast
2/3 cup lukewarm milk
1 2/3 cup bread flour OR 1 2/3 cup flour with 2 tsp of the flour exchanged for gluten
1 tsp table salt
1 tsp sugar
1 egg yolk

1/2 stick unsalted butter
1/2 stick salted butter
1 egg yolk beaten with a little water

Soften the yeast in the milk and sugar. Sift the flour and salt together into the bowl of a mixer (this is a soft dough that should be fairly easy on a hand-mixer). Add the yeast/milk mixture to the flour and mix thoroughly. Add the egg and mix until the dough comes together and becomes elastic. It will never lose its stickiness, but if you have oil coated hands, it should be a nice, cohesive dough ball. Spray a smallish mixing bowl with oil and roll dough to coat. Cover with plastic wrap and let rise until double. This is a good time to pull the stick of butter out to let it come to room temperature.

Roll the dough out on a generously floured board until it is a nice, thin rectangle. Spread one-third of the softened butter on the bottom two-thirds of the rectangle. Fold the top third down over the dough and then the bottom third up over the dough to make a nice dough brochure. Place on a parchment lined pan and refrigerate for half and hour.

Repeat the previous step two more times, refrigerating between each step. When finished, either proceed to the next step or wrap the dough tightly in plastic wrap and refrigerate over night.

Roll the dough out into a nice, large square. Roll the dough as thin as you can without running into problems with the dough falling apart, somewhere between 1/8 and 3/8 is about right. Use a pizza cutter to cut the dough easily. Then cut the large square into four even squares and diagonally divide each square.

Prepare the egg wash and brush the tops of each triangle and then roll up the croissants from the large end to the point. Shape the rolls into a crescent and place on parchment lined sheet pans. Brush with egg wash and let proof until at least doubled, perhaps even tripled.

Preheat the oven to 425 degrees F. Place the croissants, one pan at a time into the oven for 15-20 minutes, until they are nice and golden. Rotate the pan mid-way through baking if they appear to be browning unevenly. Let cool before enjoying!

Tuesday, August 18, 2009

Corn Chowder

This is such a great little recipe. I think I've mentioned before that I firmly believe corn and cumin were made for each other. Somehow, the flavors are perfect compliments. This soup takes perfect advantage of this pairing.

While I usually make this soup with chicken stock, it can just as easily be made vegetarian by using vegetable stock. In fact, I think that's how this soup originated, but I just can't be bothered to keep vegetable and chicken stock on hand.

If you want a soup that tastes good and looks its best, then use only 1 teaspoon of cumin. I really like the flavor than an additional teaspoon provides, but I have to admit that it does make the soup look a little more brown and a little less attractive.

Corn Chowder
Yield: 6 servings

2 TBS butter
1 large onion, finely chopped
1-2 tsp ground cumin
2 cup chicken broth/stock
2 medium potatoes, peeled & diced

1 cup cream-style corn
2 cups whole corn kernels
3 TBS chopped fresh parsley
2 cups milk
1 cup grated cheddar cheese
1 tsp lime juice
salt & pepper to taste
2 TBS heavy cream (optional)
fresh chives (optional)

Melt the butter in a stock pot on the stove top. Add the onions and saute until they are tender and translucent. Add the cumin, broth/stock, and potatoes. Cook, covered, at a low boil until the potatoes are tender (15-20 minutes).

Remove the lid and add the corn, parsley, and milk. Stir to mix and then reduce the heat slightly. You want to heat the corn and milk but not bring it to a boil. Once it is nice and hot, add the cheese and the lime juice. Add salt and pepper to taste. If you want to add an extra richness, add a small dollop of heavy cream. You can also garnish with a small bit of cream. Serve into bowls and garnish with chives, if desired.

Sunday, August 16, 2009

A New Category: Flops

Is that not the most piteous looking croissant you've ever seen? It makes me sad just to look at it. Today, I decided that it was time to add a new recipe/post category: flops. The reason is because I learn so much every time I have a flop, and I figured someone out there might benefit from seeing what I did that did not work. I mean, really just did not work. I guess it really could've been worse. I mean some of them ended up with a bit of layering, but nothing close to how a good croissant should be.

In fact, the most successful part of the whole mission was the cut-off scraps that I tied into knots and ate last night. They were not laminated really at all (no surprise there since the scraps were from the edges where there was no butter layered). But they at least turned out fairly light and tasty. I also was a little perplexed that they tasted so flat: I used unsalted butter, as instructed for the butter package, but it tasted like there was no salt at all! Maybe I forgot the salt in the dough... I've been forgetting ingredients quite a bit lately.

The dough was very easy to make and, while many recipes I looked at did not include an egg and the one I used did, I don't think that negatively affected the recipe. It was such a beautiful dough. I think the main problem had to do with the application of the butter "packet": the recipe I used instructed me to cut the butter into small pieces and sprinkle it over the dough in a strategic fashion and then fold and roll to make the laminations in the dough.

Unfortunately, as you can see here, instead of ending up with nice thin, even layers of butter between layers of dough, I ended up with big pockets of butter.

Uh, yeah. So this is what happened to those big blobs of butter: they oozed out of the dough when I baked them this morning and ended up all over the baking pan. Goodness there was a lot of butter squirting out everywhere!

Anyway, nevertheless, I moved forward in blissful ignorance last night. I rolled and cut the croissants the way my book showed me and let them rise until double in bulk. It was getting late at this point, and the book told me I could cover them and refrigerate overnight without any issues and simply bake them off in the morning. Uh huh.

Unfortunately, when I got the pan out of the refrigerator this morning, the croissants were all flat and deflated! I let them sit out for a while, hoping that the yeast would come back to life and poof them back up, but my waiting was in vain. I actually threw away more than half of them. If I'm going to consume those kinds of calories, they're gonna be worth it, dang it!

So here's what I have planned for the next go around:
  • I wonder if something didn't happen to my yeast. Next time I'll be very careful with my temperatures.
  • I think I'll use the same dough since it seemed so lovely.
  • I'll be very sure that I include the salt in the dough and I think I'll use salted butter in the butter package.
  • Instead of adding the butter as little cubes, I think I will warm it enough to be just spreadable and then just be sure that I refrigerate thoroughly between layers.
  • For the next time, I will try to make at least half of the batch in one day and experiment with the others to see if, indeed, they can be made mostly the night before and baked off the next morning.

Hopefully, these changes will make them a lot better! The reason I was so excited about the recipe I used was that the butter package part seemed so much simpler than the traditional method, which appears very time consuming. Hopefully, I can successfully come up with an in between method that produces good product with less effort. I'll let you know how it goes...

Saturday, August 15, 2009

Creamy Cukes

What a lazy day! Which, really, is not a good thing considering that I have to be ready to start teaching 140 students science in one short little week. But, that's what Saturday is for, right? Relaxing? The only thing of any real significance that my husband and I accomplished was a visit to the local animal shelter to begin the search for a new four-footed member of the family. There are some good possibilities! But we didn't want to rush into a choice. So we came home and did not much of anything.

For better or worse, I sometimes have a hard time doing that. So, before long, I got up and moseyed into the kitchen. I made a batch of granola, and then I started my first attempt on croissants. They're not done yet, but I'll let you know how they come out. Then I made cherry clafoutis for the first time. Not sure I'm a big fan of that... for multiple reasons. But I think a blueberry clafoutis tart would be divine. I'll get back to you on that later, too. Lastly, my husband finished his beloved creamy cukes, so I whipped up another batch. It's so nice when something so simple can make your husband so happy!

The first thing to do is peel the cucumbers. I prefer the greenhouse cucumbers, but my husband really likes the regular ones, so I use them since this is really his dish. Their skin can be really tough, so I peel most of it off. I like to leave little strips, though, for color.

Slice the cucumbers into rings and place in a bowl with the salt. Toss to coat. Let them sit while you prepare the dressing.

Mix the remaining ingredients together in a small bowl. Stir to mix. If you mix too much or too aggressively, you'll end up with a very frothy dressing, which still tastes good, but looks a bit funky. Pour any water that has come out of the cucumbers down the drain and then add the dressing to the cukes. Toss to coat and serve. Keeps well in the refrigerator for up to three days.
Creamy Cukes
Yield: approximately 1 1/2 quarts
2 large cucumbers, mostly peeled and sliced
1 1/2 tsp kosher salt
2/3 cup sour cream
1/3 cup buttermilk
1/4 cup vinegar
1 TBS sugar
1/4 tsp ground black pepper
1/2 tsp celery seed
3/4 tsp beau monde (a spice blend)
2 TBS minced onion
Toss cucumber slices with the salt; let sit while mixing the dressing. Mix the remaining ingredients in a small bowl. Be careful not to mix too aggressively, or you will end up with a very frothy dressing. Drain any water that has come out of the cucumbers and then add the dressing and toss to coat. Serve immediately or refrigerate until ready to use. Keeps covered in the refrigerator for up to three days.

Thursday, August 13, 2009

Herbed Croutons

Crazy times! I recently hired on with the local school district. I'm very happy because I didn't expect any positions to be available here since the district has been on a hiring freeze. Suddenly having to get ready to go back to a full-time job is keeping me busy. School starts in just a little over a week. I am hoping that this job will not impact my posting too much... I'm sure I will need the soothing effect of playing in the kitchen fairly regularly! Perhaps instead of trying to post 6-7 times a week, though, I will shoot for 4-5.

Despite this craziness, I still like to cook from scratch; it just takes a little more planning. I made these croutons the other night when we had soup and salad. I made a fairly simple soup, so it was not too much extra work to make the croutons from scratch.

While you can make croutons with any type of bread, my favorite is ciabatta. I like how the large holes tend to grab the herbs and, I think, help make them so delightfully crunchy. Cut the bread into small cubes. I shoot for cubes slightly larger than half an inch in each direction. Give the cubes a good drizzle of oil and toss to coat evenly. I found that I prefer using a mildly flavored oil instead of the strong and fruity extra virgin olive oil. That way, the flavor of the oil doesn't compete with the flavor of the herbs.

Preheat the oven to 250 degrees F. Prepare the herb mixture and set it aside. Heat a skillet over medium heat. Add the bread cubes when the pan is heated. Cook, turning occasionally, until the cubes are nice and golden on all sides. Sprinkle the herb mixture when the cubes are getting close to being done. You don't want to add the herbs too soon or they tend to get a slightly burnt taste. Pour the cubes onto a sheet pan and place in the oven. Turn off the heat and let the cubes dry out so they become nice and crunchy upon cooling. Let cool before serving.

Herbed Croutons Herb Mix

1/2 tsp kosher salt
1/2 tsp parsley
1/2 tsp oregano
1/2 tsp thyme
1/2 tsp sage
1/4 tsp garlic powder
1/4 tsp ground pepper

Be sure not to use fresh herbs; they tend to clump up on the bread cubes. Lastly, provided they are dried out completely, they keep well for a few days in an air tight container.

Wednesday, August 12, 2009

Broiled Flank Steak

This is another one of those meals that I grew up eating. It's an absolute gem.

Flank steak is a flat, long-fibered piece of meat that comes from between the cow's ribs and the hips. While this cut of meat is flavorful, be sure you serve it by slicing it across the grain. If it is cut across the grain, the meat fibers are short and the meat will seem very tender. Cut with the grain and you will be working it for the next ten hours. The good news is that with flank steak, it is very easy to tell which way the grain is going because the fibers are easily visible.

I like using my mom's simple preparation. I marinate it in equal parts soy sauce and rice wine (not rice wine vinegar!). Before pouring the marinade over, I like to prick the meat with a fork a whole bunch of times. Let the steak marinate for thirty minutes to two hours.

Preheat the broiler to high and move the oven rack to the middle of the oven. You don't want the steak too close to the element or the outside will begin to smoke before the meat is done. Line a sheet pan with foil. Remove the steak from the marinade, let excess marinade drip off, and then place flat on the sheet pan. Broil, about 10-12 inches from the element until the top begins to show some nice browning (about 6-8 minutes). Flip the steak over and broil until the fresh side turns a nice golden color. You can use a thermometer to poke in the middle to be sure it is where you want it. I recommend shooting for rare to medium rare in the middle (140-150 degrees F). This means you will have a nice range of meat doneness. The ends, which cook quicker, will be more done.

Remove the meat from the oven and let rest for about ten minutes before cutting. As you can see in the picture above, I skipped that step. I tried to wait, but I was ravenous tonight. I suppose only having eaten two slices of bread and a handful of Fruity Pebbles all day will do that to a gal. Anyway. If you let it rest, the meat won't hemorrhage juice so badly all over your cutting board. We enjoyed this steak tonight with a rice pilaf and mixed vegetables. Boy was it ever good (and not just because I was starting to think about eating my shoes, either!).

Oh, and one last thing. If you're a fan of grilling, this can also be cooked on the BBQ. Just be sure the heat is relatively high. Flank steak is fairly thin, so you want the heat high enough to be able to sear the outside and get some nice color on it before over-cooking the inside.