I am now blogging new recipes on my farm website.

Cooking from Scratch is on facebook! Click here to check it out!

Showing posts with label Holiday. Show all posts

Sunday, November 23, 2014

Planning A Thanksgiving Feast


Can someone please tell me how the heck it is already the week of Thanksgiving? If you were to ask me what time it felt like, I might say mid-September. Huh. Thanksgiving's really this week? I guess maybe I should start planning my meal. At least this year I only have a modest gathering of people to cook for. Last year, now that was another story. I had great intentions of posting more about it at the time, but it was tricky enough making dinner for twelve with a nine month old, let alone posting about it, but it's all about the planning. Even when you don't have a baby, it's all about the planning.  

Let me show you what I mean by planning. The first step, obviously, is to decide what (and how much) you're going to make. This was my menu last year. At the top, you can see the appetizers that I wanted to make. Then you can see the main meal, followed by dessert. I smoked the turkey on my Weber grill. Because I had never done it before, I smoked a test turkey a couple of weeks before Thanksgiving. It worked pretty well and, hopefully, I can share how I did that with you this week, too. I always have great intentions of posting holiday appropriate recipes in a timely manner, but... well, you can see that it doesn't always happen. 


After I made the menu (and the requisite grocery list), the next step was to come up with my timing planning. When preparing food for large meals such as this, I always try to prepare as much as I can in advance, especially when a lot of the work is limited to nap time. As you can see, I started the Friday prior with making the bread, which I was planning to use in the stuffing. 

As you can see, as I finished tasked, I crossed them off... usually, I'm not sure why the name card cookies task isn't crossed off, since I did get them done. You can also see that I allow for some changes as I go as well. Note that I switched a couple tasks between Monday and Tuesday. Flexibility is the name of the game when preparing large, complex meals. Another important thing to point out is my oven plan at the bottom of the page. When you only have one oven (or even two) with many items needing to be baked, this step is essential. If I plan on having more than one item in at the same time, I make sure the dishes that I plan on having the items in will, in fact, all fit in the oven at the same time. There's nothing worse than planning so well only to be foiled by dishes that won't fit!!


And then, because turkey day itself is always crazy, especially if people are showing up early in the day, I make sure to have a timeline for the day of. Not only is it important to think through the logistics of how it will all work ahead of time, I find it critical to have a list to keep me from forgetting things the day of. 


As I mentioned, my meal this year is quite a bit simpler. Thank goodness, since I've only just planned my menu. Since I'm a traditionalist, it's very similar to what I make every year. The big change is that, this year, I'm not baking up a whole turkey. I'm going to stuff a turkey breast and roll it up into a roulade. If I can find the meat in the store, I would like to also roast some turkey legs and thighs to be able to serve some dark meat (and help make gravy), but we'll have to see how the grocery stores are around here! I plan on making/prepping almost everything ahead of time, so Thursday, hopefully, will be relaxed and festive. That's my favorite kind of Thanksgiving!

Saturday, November 16, 2013

Hosting Thanksgiving


I am so excited for this Thanksgiving. For the first time ever, I am getting to host a large family dinner. As military folk, we're usually by ourselves far away from family. Sometimes we invite a few airmen or colleagues who are in the same boat over, but often it's just us. One year, when my husband and I were doing split duty for a time, I went to visit him and we had Thanksgiving dinner in a pub. Finally, we are close enough to one side of the family to be able to host the event. It's not a huge crowd; I expect it to round out at close to a dozen, but that's enough for me to have an enjoyable time hosting a dinner I don't normally have a chance to.

So, what am I serving? I am so glad you asked! (You did ask, didn't you?). As I sit here writing this, I am smoking my first turkey on the grill. I'm a huge fan of smoked salmon (which I plan on serving cold as an appetizer), but I've never tried to smoke poultry, let alone a bird big enough to serve twelve. I figured I'd better give it a test run, and that's what I'm doing today. I'll let you know how it works out. It's been out there for an hour and a half, and it already looks great. Fingers crossed!!

In addition to a turkey, I'll serve a small ham (just in case I blow the turkey, right!?!). Not everybody loves turkey and leftover ham is awesome, so why not? I have a counter top roaster oven to bake it in, so I'm not hurting for oven space.

Let's see... so that takes care of the meat. I'll be serving the traditional dressing. I like a bread cube stuffing with mushrooms and sage. And, of course, there will be mashed potatoes and gravy. I may even spike the potatoes with a little cream since it's a special occasion!

I'll be making my green bean casserole from scratch. No cans of mushroom soup here!


I also plan on making my fabulous and gorgeous spiced cranberry sauce, shown - here - with currents, and shown - at the top of this post - without. I love it both ways, but maybe just slightly better with. I know a lot of folks aren't cranberry sauce fans, but this version has certainly converted a person or two.


And what Thanksgiving meal would be complete without some form of home baked bread? These refrigerator dinner rolls fit the bill since they taste phenomenal. Additionally, they fit well with my "do as much in advance as possible" doctrine.


For a nice change of pace, I decided I would serve these mincemeat peaches as a side dish. They're sweet and sassy with all the spice of the holidays. Using canned (whether home canned or store bought) mincemeat makes them the fastest dish in the west.


I'm still thinking about maybe adding one more side dish... a vegetable, I think, but we'll see if it happens. I've been thinking about creamed pearl onions or maybe slices of pecan crusted acorn squash. Since we have plenty of food already planned, I'll play this last dish by ear.

What about dessert, you say? Well, of course, I can't forget about dessert. While I like to get really fancy for Christmas desserts (think buche de noel or cream puff swans), I'm more of a traditionalist for Thanksgiving. Pies it is! I plan on making a classic apple pie and will serve it with homemade vanilla ice cream. I do think, however, that I will make the pie with my newer, super flaky pie crust. I've even held back a few Cortland apples for making the pie extra tasty.


And, what Thanksgiving would be complete without pumpkin pie? Apple pie may be all American, but pumpkin pie is all Thanksgiving! I always make mine with pumpkin puree I've put up myself. I can't abide by canned pumpkin.


Lastly, I think I'll make a pecan tart. This is like a pecan pie, but not so... well, goopy. I love the flavors of pecan pie, but am always overwhelmed but how much filling there is compared to nuts. It's too heavy and sweet for my tastes. I've made it as a tart before. I just used a tart pan instead and only added half the amount of filling (but all of the nuts!!). I found the balance perfect. Nutty, sweet, and delicious. A perfect ending to a meal filled with family and fellowship.

Friday, November 15, 2013

Mincemeat Peaches


Behold! The most simple recipe ever! I am starting to get my menu in order for Thanksgiving and I thought I might include this recipe my mom used to make a lot when I was a kid. I haven't had it for years though, so I figured I'd better try a few today and make sure they are as good as I remember. Yup! They are. And they are a great, flavorful, and simple side dish to serve on a table of bounty... or on any day of the year.

Here's how to do it: spray a baking dish with oil and preheat the oven to 375 degrees F. The good news is that since you are really just heating these things through, you have some flexibility on the oven temperature. This is a good thing if your Thanksgiving oven is already scheduled to the max. Open a can of peach halves (I prefer them in heavy syrup for this application) and lay them cut side up in the baking dish. Scoop a spoonful of mincemeat into the center. I used a #40 disher to get the filling in perfectly shaped mounds. Then... and this is the hard part... put them in the oven. That's it! Bake them until they are hot and slightly bubbly, about 25 minutes. They cool fairly quickly, but - fortunately - they taste good hot or at room temperature.

Sunday, October 27, 2013

Puff Pastry Pumpkins


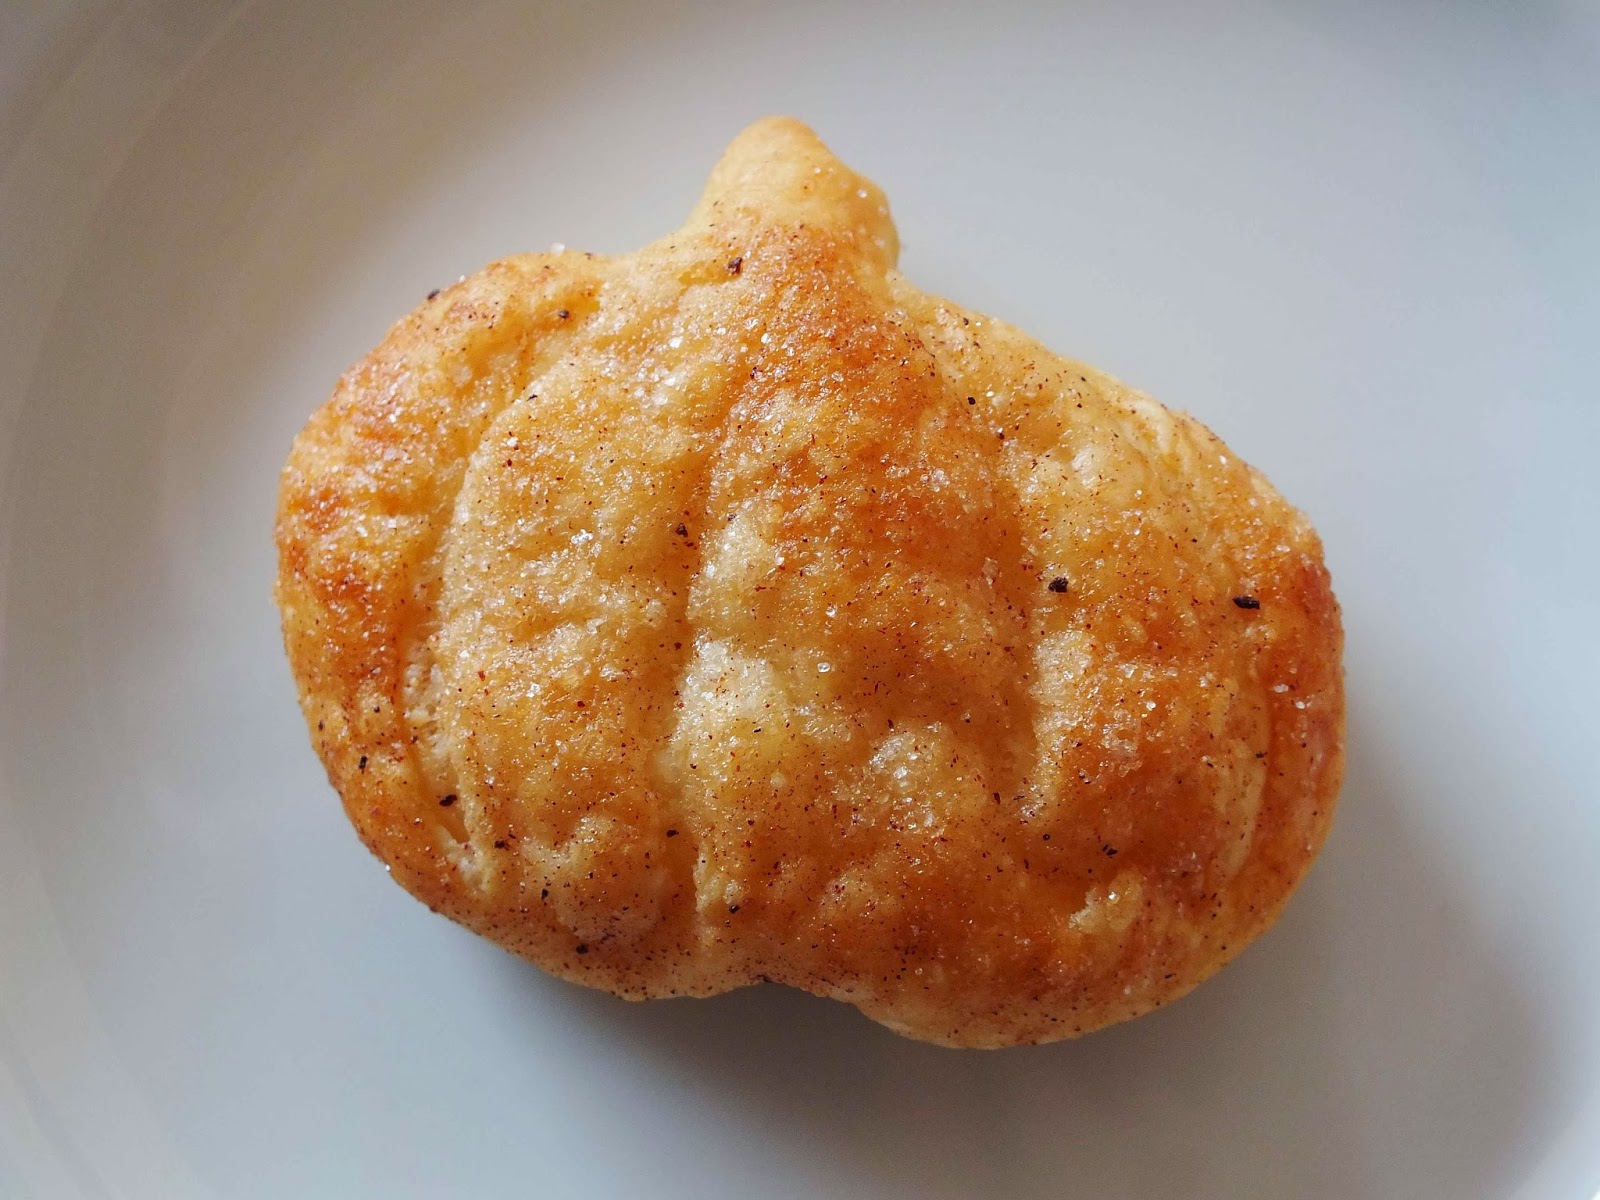
If you're looking for a super cute little treat for the impending "harvest" holidays, look no further. These are easy to make since they use frozen puff pastry from your local grocery store. I love puff pastry. There's something about that puffed up, crispy, buttery pastry that just knocks my socks off. In this case, they have a hint of fall wrapped up in them with pumpkin pie spice and a little pumpkin or sweet potato.

Thaw out the puff pastry overnight in the refrigerator and then lay it out on a lightly floured counter. Preheat the oven to 400 degrees F. Using a pumpkin cookie cutter, cut out as many pumpkins as you can. A medium sized cutter is best. Too small and they won't puff right. Too big and they'll have ungainly seams in the middle from where the dough is folded. Place the cut outs on a sheet pan lined with parchment.


Cutting lines into the face of the pumpkin is what gives them that ribbed pumpkin look. Be careful, though. Here, I used a paring knife. See how the knife dragged through the dough? Not good. Additionally, I didn't cut the dough deeply enough. Also not good.


Here's what this poor cutting job turned out like... and this was the good one of the batch. So how do you get good cuts?


Use a razor! Here you can see how the dough is sharply cut. What you can't see is that I cut much more deeply that I did in the example above, about two thirds of the way through the dough. Be careful not to cut completely through, but go deep. If you're still having problems getting the dough to cut nicely, your dough has probably warmed up too much. Put the pan in the refrigerator for thirty minutes and then try cutting again.


Mix together the coating ingredients and use a pastry brush to apply. You can use either pumpkin or sweet potato puree. It only takes one tablespoon of puree per batch of eighteen cut outs. You can steal this amount from your pie or other holiday recipe without making much of an issue in most cases. Here, I used some homemade sweet potato puree that I had made for my baby.


Brush the top of each cut out with some of the coating. I think it looks best not to coat the stem of the cut out... it gives a little contrast to the finished product that I like.


Sprinkle each one with a bit of granulated sugar. You can forgo this part and make savory puffs, but - to be honest - the finished product doesn't have an overwhelming flavor (coating them too thickly keeps them from puffing and crisping properly) and that sweet touch on the tongue helps to bring out the flavor of the puree and spices.


Bake the puffs in a 400 degree F oven for 10-15 minutes or until puffed and golden. Be careful not to take them out of the oven too early or the texture of the finished product once they are cool will be disappointing. As soon as they come out of the oven, transfer them to a cooling rack so that they can fully crisp. Hey! Don't waste those scraps! I threw them on a separate sheet and sprinkled sugar on them. They were tasty! Don't forget to take the cooks commission!


Puff Pastry Pumpkins
Yield: 18 puffs

1 box of frozen puff pastry, thawed
2 TBS melted butter
1 TBS pumpkin or sweet potato puree
1/4 tsp pumpkin pie spice
granulated sugar for sprinkling

Preheat oven to 400 degrees F. Cut out pumpkin shapes from the puff pastry using a 2 1/2 inch (approximately) cookie cutter. Place cut outs on a parchment lined baking sheet. Score each cut out with a razor to make the ribs of the pumpkin. Cut about two thirds of the way through the dough. If the dough is not cutting well despite using a very sharp implement, chill the dough for thirty minutes.

Mix together the butter, puree, and pumpkin pie spice.  You can make your own pumpkin pie spice if necessary by mixing 3 TBS ground cinnamon, 3 tsp ground nutmeg, 1 1/2 tsp ground ginger, and 1 1/2 tsp ground cloves. Brush each cut out with the coating. Lastly, sprinkle each cut out with sugar. Bake in a 400 degree F oven for 10-15 minutes, until the pastry s puffed and nicely golden. Be sure not to under bake to insure your cooled pumpkins will be flaky and crispy. Transfer pumpkins to a cooking rack as soon as they come out of the oven. They can be stored in an air tight container for a few days, but they taste best fresh.

Sunday, December 9, 2012

Gingerbread Men Shaped Lollipops


I love the holiday season. I especially love that it really gives me an excuse to go all out making all sorts of food goodies to give away. When I first started making lollipops a handful of years ago, I bought a variety of molds at a baking store (SugarCraft). The metal molds made by Sweet Creations are definitely my favorite. You can see what they look like in my Old Fashioned Lollipop post. I love them because they are easy to use and come in a variety of shapes.

In the packs of molds that I bought previously, I had ended up with two person shaped molds. One day, as I was making some root beer lollipops, I looked at those two and thought, "Wow! Those would make awesome gingerbread men for the holidays!" And then my life got busy and the idea got put on the back burner because I didn't really want to buy as many packs of molds as I'd need to get a reasonable number of the gingerbread men molds.

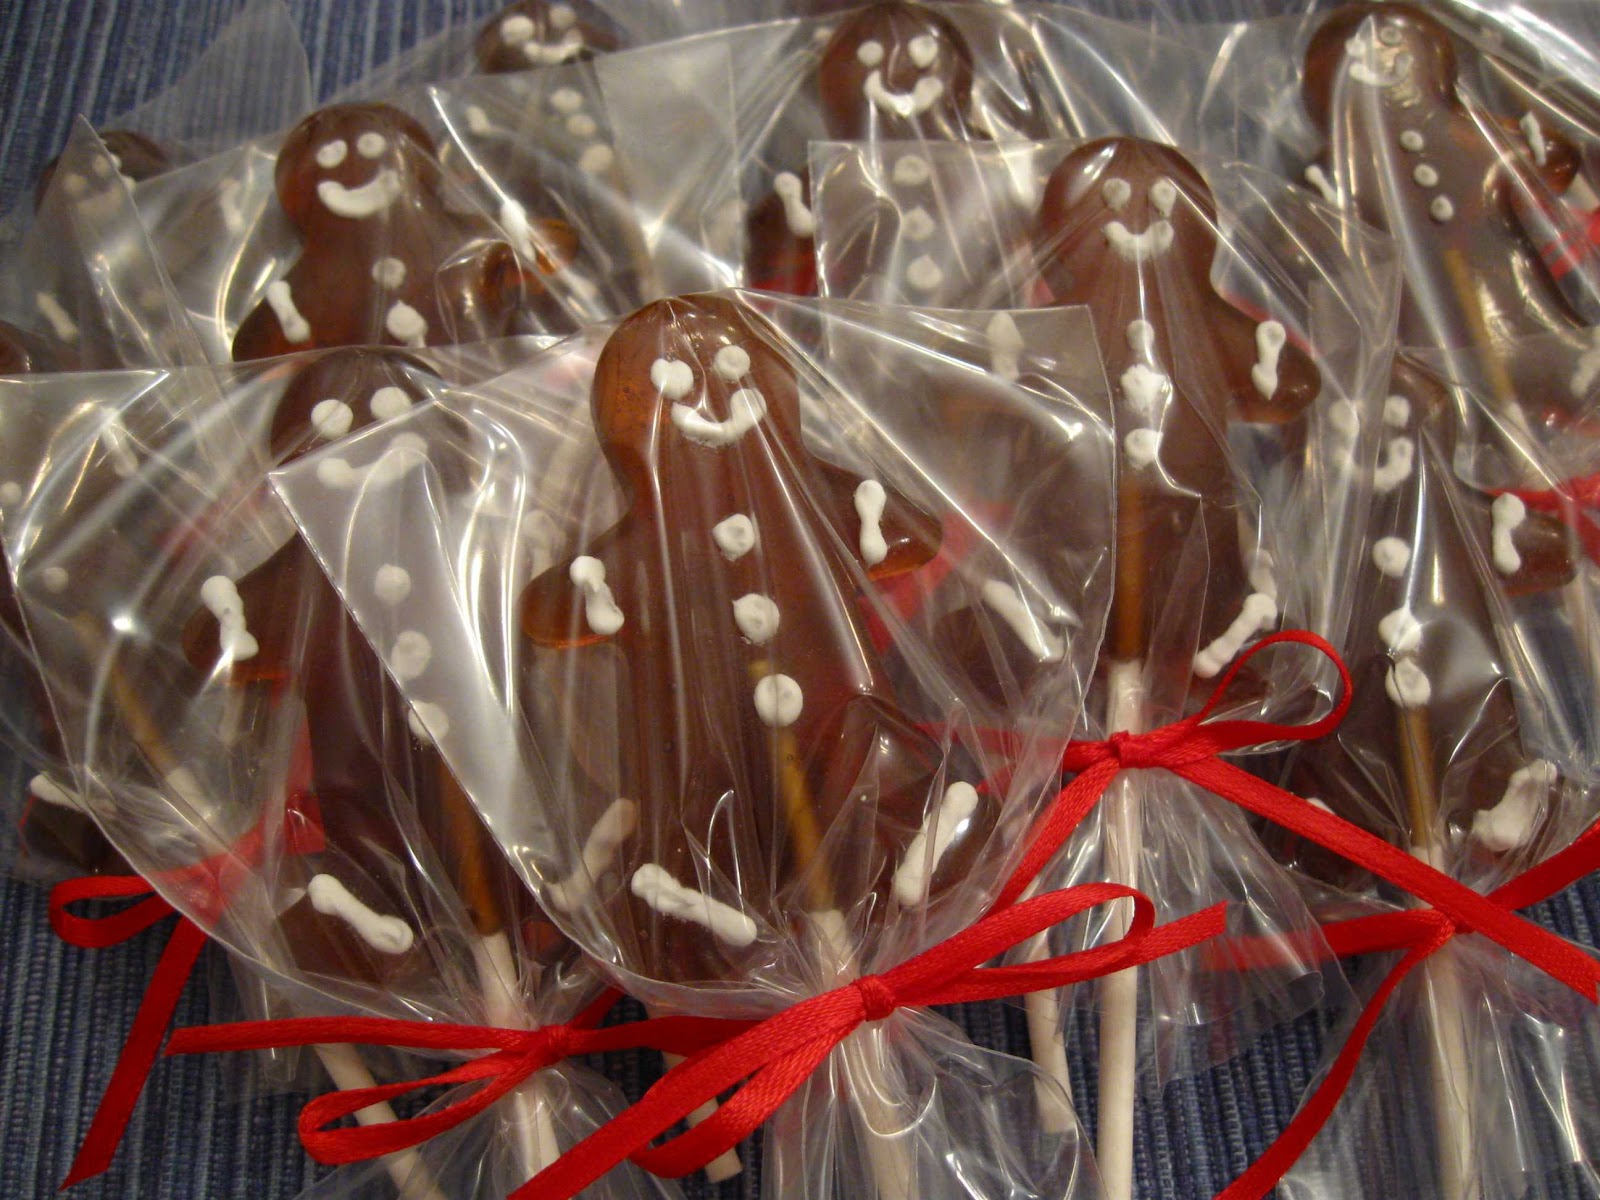
For some reason last month, on a whim, I decided to call the company and ask if they could make me a special pack of all gingerbread men molds. The folks at Sweet Creations were wonderful. Within a week, I had my new pack of molds and was ready to roll! They said they could create any package of molds from the shapes they offer that I wanted! How great is that? I am so happy that I called them, because look at how cute these little lollipops are!!!


I made a batch to give away to the little ones in our family for Christmas. I always make goodies to give to their parents, why shouldn't they get something special too? I made the lollipops exactly as I describe in my Old Fashioned Lollipops post. The only difference here was the addition of the white details. For this I used a stiff royal icing (I used the recipe on a package of Wilton meringue powder) and then let them dry uncovered at room temperature until the icing was dry and hard. Although most of our homes are on the dry side this time of year from the furnace, don't leave the lollipops out any longer than necessary or they could end up absorbing moisture and getting too sticky.

I then packaged them the same way I described in my previous lollipop post. I dusted them with powdered sugar and brushed the excess off with a pastry brush. Into the bags they went with pretty bows and, voila!, perfect little gingerbread men lollipops!


Sunday, December 11, 2011

Pumpkin Pie

Everyone has their favorite pumpkin pie recipe, I guess... unless you always get yours from the store. As a scratch cooker, obviously, I can't condone such actions. ;-) I am, however, a serious pumpkin pie snob. Pretty much, unless I've made it, I usually don't eat it.

I have a number of problems with most of the pumpkin pie out there, not the least of which is that canned pumpkin tastes, well, like canned pumpkin. It's the same reason I don't eat canned peas or green beans. Canning vegetables just changes their flavor and texture in a way I can't enjoy. I also often find other's pie too sweet. I don't like it savory, mind you, but I don't want it to be syrupy either. This started out as the recipe from the back of a can of Libby's pumpkin, I think. Then my mom tweaked it, and then I tweaked it even more. I really like the balance. I use the frozen pumpkin puree I put up every fall. The frozen, not canned, puree gives this pie a fresh flavor that can't be beat. To me, it's the perfect pumpkin pie.

Pumpkin Pie
Yield: one 9-inch pie

2 eggs
1 1/2 cup pumpkin puree (preferably not canned)
1/4 cup white sugar
1/4 cup brown sugar
1/2 tsp salt
1 tsp cinnamon
1/2 tsp dry ginger
1/4 tsp cloves
1 1/2 cups evaporated milk (one 12 oz. can) or light cream

Prepare a 9-inch pie shell. If you want to be sure your pie shell does not get gummy (see note 2 below), blind bake it first in a 425° F oven for 10-15 minutes lined with a little foil and weighted down with pie weights or beans. Let pie shell cool completely before filling. Preheat the oven to 425° F. In a bowl, lightly beat eggs. Add the remaining ingredients and stir gently to mix. If you mix too aggressively, you will end up with foam on the top of your pie. It doesn't taste bad, your pie just won't be as pretty. Pour the filling into a prepared pie shell. Bake at 425 F for 15 minutes. Reduce the heat to 350° F and bake for another 45 minutes or until a knife comes out clean. Serve well chilled.

NOTE 1: I also like to make this as a custard, where I simply make the filling and bake it in a dish without a crust. Use a 9x9 inch glass/porcelain baking dish or similar. Otherwise, make exactly the same as for a pie. It's a great, easy, treat to make year round!

NOTE 2: The picture above shows a pie crust that I did not blind bake first. I was in a hurry, so I skipped that step. See how the crust looks like it has two layers? The inside layer here was chewy and not flaky at all like the outside half. The pie still tastes good, but the crust is not quite as delicious. I strongly recommend blind baking first, if you have the time and patience. If you do go this route, be prepared to lightly cover the edge crust with foil as it may begin to darken too much toward the end of the baking period.

Saturday, December 10, 2011

Gingerbread Cutouts

I've been in serious cookie making mode lately. Last week I made an army of these cute little guys for a "cookie caper" on base, where volunteers bring in homemade cookies and then they are packaged and distributed to airmen. (I also made a double batch of my sugar cookie holly cutouts.) What I love about gingerbread men is that the cookie is not overly sweet and has a nice spiciness to it. I often make and give them as gifts. They can be packaged in such cute ways and everyone loves to receive them!

The dough is very easy to mix. Probably the hardest part is grating the ginger, but a microplane makes short work of the task. Just be sure that the fresh ginger is ground into a paste; you want it to mix evenly into the dough. Mix the wet ingredients together first.

Then mix the dry ingredients in a separate bowl before adding the flour mixture to the wet mixture. I've tried a lot of gingerbread cookie recipes, and I love the combination of spices in this one.

Form the dough into a log and wrap in plastic wrap, letting it firm up in the refrigerator for at least an hour. Once it has firmed up, cut the dough into four or five large slices and roll one disk out at a time. Roll it fairly thin, about one eighth of an inch is best. Use a gingerbread cutter to make figures. Bake on a greased cookie sheet or a parchment lined pan. For best flavor, bake until the cookies are nicely browned. I've found if they are under cooked, the flavor is a bit lackluster.

Once they are baked and completely cooled, pipe decorations in royal icing (I use the recipe on the package of Wilton meringue powder). Let the cookies sit out for at least a few hours until the icing is dried hard. Then package them up! They keep fairly well in an air tight container. I like to maximize my time, so I always do the same decoration on them, but you can certainly get creative! You can use a variety of colors and small candy decorations if you want. Make your gingerbread army however you see fit!

Gingerbread Cutouts
Yield: approx. 70 3-inch cutouts

3/4 cup brown sugar, firm packed
1/2 cup butter, softened
2 eggs
1/4 cup molasses
1 tsp fresh ginger, grated
3 1/4 cup flour
1 1/2 tsp baking soda
2 tsp powdered ginger
1/2 tsp allspice
1/2 tsp cinnamon
1/2 tsp nutmeg
1/2 tsp salt

Beat the sugar and butter together until smooth. Add eggs, molasses, and fresh ginger. Mix thoroughly. In a separate bowl, mix the remaining ingredients. Stir well. Add slowly to the wet ingredients, stirring until well mixed. Shape dough into a log and wrap in plastic. Chill for at least one hour. Slice log into four or five disks. Roll out one disk at a time. Roll fairly thin, about 1/8 of an inch. Place on greased or parchment lined cookie sheets. Bake at 350° F for about ten minutes, or until nicely browned. Cool completely before decorating with royal icing.

Tuesday, November 22, 2011

Green Bean Casserole from Scratch


I have always been a fan of the idea of green bean casserole. I mean who wouldn't be? Fresh green beans swimming in a savory mushroom sauce with crunchy onions on top? Sounds pretty good when it's put that way, huh? Unfortunately, being a scratch girl, not only do I never have canned cream of mushroom soup on hand, I am not a big fan of it's commercial taste. The use of frozen green beans over canned was an automatic; there was no debate there at all.

Last week I decided to make my own green bean casserole, from scratch. What that means is simply making a homemade sauce versus opening a can. It's pretty quick and easy, and boy was it good! I'm going to make it again later this week for the big day. Here's how it goes...

Green Bean Casserole from Scratch
Yield: 8-12 servings

3 TBS butter
1 medium onion, diced
8 oz baby bella mushrooms, diced
1/4 cup cream sherry
1/8 tsp garlic powder
1/2 cup flour
1 tsp salt (or to taste)
1/4 tsp pepper
4 cups whole milk, warmed
2 1/2 lbs frozen cut green beans, cooked and drained
1 1/2 cups french fried onions

Preheat the oven to 375° F. Melt butter in a deep skillet. I prefer using a stainless pan so I get better browning on the bottom, leading to a richer flavored sauce. Add the onions and cook over medium high heat until translucent and starting to caramelize. Add the mushrooms and cook until they are tender and browned. Add the sherry and stir vigorously to deglaze the pan and lift up all the browned bits on the bottom of the pan.

Mix the flour, salt, pepper, and garlic powder together. Add to the skillet and stir to mix. Slowly add the warmed milk, stirring as you go to minimize lumps. Once all the milk is added, cook, stirring continuously until it just comes to a boil and is thick. It will thicken more as it bakes and then cools. Add the green beans and stir to coat. Pour the mixture into a greased 9x12x1 inch baking dish (or similar). Sprinkle the top evenly with the french fried onions. Bake at 375° F until bubbly through and the onions are nicely browned, about thirty minutes. Cool slightly before serving.


Monday, December 13, 2010

Spiced Cranberry Sauce

I feel like a failure for not getting this posted before Thanksgiving. Of course, I didn't actually make up the recipe until I was making cranberry sauce the day before we all sat down to eat. I suppose there are a lot of folks out there who do another round of traditional feasting for Christmas. Additionally, this version of cranberry sauce may just alter your thinking about it only being a once or twice a year dish.

I have always felt that store bought cranberry sauce was a little blasé. Well, that goes without saying... I am all about cooking from scratch, after all. Unfortunately, I always felt freshly made cranberry sauce had an astringent quality to it I didn't quite care for. I noticed early on that when I canned my own cranberry sauce, I really only started enjoying it after it had been sitting on the shelf for a few months.

With that in mind, I started playing with ways to balance the cranberry's natural tannins. Citrus became my go-to ingredient for many years. This year, I wanted to try something a little different, so I decided to add some apples and spice. What a wonderful decision! This is, hands down, the best cranberry sauce I've ever eaten. Apparently, my mom agrees, since we practically started duking it out over who would get to eat most of it. Even if you're not a big fan of traditional cranberry sauces, I urge you to give this one a try.

You can start with fresh or frozen berries. I found this bag in the deep, dark recesses of my freezer. To be honest, I'm not really sure what year I bought those berries. Fortunately, since we were going to cook them, it didn't really matter. There are four main flavors in this sauce: cranberry, orange, apple, and fall spices. You want to start with the cranberry and orange. In a sauce pan, mix the berries, orange juice, zest, sugar, and water and bring to a simmer.

Once the cranberries have started to pop, add the peeled, diced apple and orange segments. Simmer over medium low heat until the apples are tender and then add the spice mixture. Let simmer five minutes and then remove from the heat and cool slightly before decanting into a pretty bowl, covering with plastic wrap, and chilling in the refrigerator.


Spiced Cranberry Sauce
Yield: 2-3 cups

1 bag of fresh or frozen cranberries
1 orange, zested, sectioned, and juiced
2 granny smith apples, peeled, cored, and diced
2 cups granulated sugar
1/4 cup water
1/4 tsp spice mix (mix 1/4 tsp of ginger, nutmeg, cinnamon, and cloves)
1 TBS brandy (optional)

In a sauce pan, bring the cranberries, orange juice and zest, sugar, and water to a boil. Reduce heat and simmer until the berries start to pop, about 5-10 minutes. Add the apple and orange sections (cut out so that you do not end up with the membrane) and cook over medium low heat until the apple is tender. Stir periodically to ensure the mixture does not scorch on the bottom.

When the apple is tender, mix together 1/4 teaspoon of the following dried spices: ginger, nutmeg, cinnamon, and cloves. Then use 1/4 teaspoon of that mixture to spice to sauce. You can save the remaining mixture for later or discard it. Let the mixture simmer for five minutes before removing from the heat, cooling, and decanting into a bowl to refrigerate before serving.

NOTES: This sauce is quite delicious warm and you could very easily serve it right after removing it from the heat. Also, it would be wonderful with some currents or raisins. If you decide to add them, be sure to put them in when you put in the apples so that they can soften.