I am now blogging new recipes on my farm website.

Cooking from Scratch is on facebook! Click here to check it out!

Showing posts with label Gift Ideas. Show all posts

Saturday, September 1, 2018

Sweet Cherry Preserves

As gorgeous as I think that strawberry jam is, I sure have gotten sick of looking at it! Wow, has this year been a whopper. Major changes, but all for the good. We have purchased a farm and I am finally getting back to my agrarian roots. Besides all the physical labor of getting the farm how we want it, I have been spending an enormous amount of time brainstorming and researching what I want our farm to be and what I want to produce. I feel like I'm really getting close to a plan. Yay! But all of this has kept me very, very busy. 

One of the things we did this year was put in an orchard. I chose a wide variety of trees and sweet cherries definitely made the cut! When I saw the most beautiful Bings I've ever seen on ridiculous sale earlier this summer, I went a bit crazy and justified it as business research saying, "I'm going to have to come up with recipes for putting them up for when my trees start producing." Sadly, then, as the summer went on, it was becoming clear that there was something up with the cherry industry this year. I think they are suffering from the ramifications of the tariff fiasco and have been having to dump huge amounts of cherries into the domestic market. I feel badly for them! But I will also do my part to "help" them out by buying way more than my share! When I saw sweet cherries on sale for 99 cents a pound last week, I knew I had to put up more of this amazing preserve recipe I developed this year. It's very simple and very, very tasty. I will be gifting quite a bit of it at the holidays this year!


Is that not just gorgeous!?! And the flavor and texture are divine. I originally thought it'd be great on ice cream or used in lemonade, etc., but it turns out I've mostly just been eating it straight out of the jar. 


As far as canning goes, this recipe is pretty simple. the most time consuming part is pitting the things. You can do it without any special tools or go whole hog and get a fancy contraption. I'm somewhere in between. I have this hand held pitter that came from Pampered Chef and I like it quite a bit. I can pit six to eight pounds in less than 30 minutes. 

Now days, when I develop a new canning recipe that requires pectin, I stick with Pomona's because it means that in the future I can scale the recipe to any amount of fruit I want. I've posted a couple of Pomona's recipes previously and if you aren't familiar with the stuff, I'd check out those posts, too. You don't use it quite the same way as regular pectin. My standard recipe uses eight cups of pitted cherry halves, but as long as you scale the recipe, you can make it with any amount of fruit that you have on hand. 


After you pit and halve the cherries, add the first batch of sugar and macerate the cherries overnight in the fridge. This helps to keep the fruit from floating in the jar, only an aesthetic issue, but one that irks me nonetheless. It also helps to bring out the cherry's delicious juice, helping to make a wonderful syrup for the cherries to swim in. 


When you are ready to can, be sure to have your water bath canner and jars ready. If you are new to canning, check out my Canning 101 post for more details on the process. Follow the Pomona's pectin process for when to add the different batches of sugar and it will come out perfectly! The only other detail I'll mention in detail is the optional citric acid ingredient in the recipe. Sometimes, cherries can be so sweet that when canned with sugar, they become cloying. The first two batches I made were naturally well balanced fruit and I only used the lemon juice. The last batch was made with almost overripe cherries and they needed some citric acid to balance the sweet. You can start with a 1/4 teaspoon and taste to decide how much they need. You can add the citric acid at any point in the process, so feel free to continue tasting to be sure they turn out just right. Go help those cherry growers and be prepared to be wowed!

Sweet Cherry Preserves
Yield: 8-9 cups

8 cups pitted and halved dark sweet cherries
1 cup sugar

Mix the fruit and sugar together and let macerate overnight in the refrigerator before proceeding.

1 cup sugar
1 1/2 tsp Pomona's pectin

Mix the sugar and pectin together thoroughly and set aside.

1/4 cup lemon juice
1/4 tsp citric acid (optional and to taste as needed for extra sweet cherries)
1/4 tsp canola oil (or butter, to prevent foaming)
2 tsp calcium water (provided with the Pomona's pectin)

In a large pan, add the macerated cherries, lemon juice, citric acid, if needed, canola oil, and calcium water. Heat over medium high heat until the mixture is at a roiling boil. Add the sugar/pectin mixture and stir thoroughly until the mixture returns to a hard boil. Boil, stirring continually, for one minute. Pour into prepared jars, leaving 1/4 inch of headspace. Process in a boiling water canner for 10 minutes for half-pints and 15 minutes for pints.


Saturday, May 13, 2017

Strawberry Jam


Well, goodness, it has been a long time! I've got no excuses; I just have been doing other things. But I still cook and I still love developing new recipes. Some day, I'll start posting all the wonderful concoctions I've come up with in the last couple years. 

One of the things I have been working on for years now is strawberry jam. I can't tell you how many batches I have made that I was so unhappy with I couldn't hardly even eat them. Firstly, I am a hardcore strawberry jam snob. I do not care for the taste of overly cooked strawberries, and most strawberry jams just don't taste fresh. They have a very dull color and are just not that tasty. You would almost have to pay me to eat store bought strawberry jam, for instance. I've mostly stuck with strawberry freezer jam in the last decade, but it's not great for gift giving, honestly. 

So I've been fiddling. My biggest hurdles were: color, fresh taste, and floating fruit. I am so excited to report that I have finally achieved success in all three categories. This jam is perfect. Absolutely perfect. And so easy to make. I use Pomona's pectin which means that I can scale it up or down to use the exact amount of strawberries I have on hand. If you are unfamiliar with Pomona's pectin, I highly recommend it! Since I discovered it last year, it has revolutionized my jam making. But, it's a bit different than traditional pectin, so if you aren't familiar with it, I urge you to read through my first Pomona pectin post which was for Peach Pie Jam.

The trick for keeping the fruit evenly distributed in the jam is to macerate the mashed strawberries in some of the sugar overnight. This allows the water in the strawberries to be partially replaced by sugar, making them a little closer in density to the syrupy jam they'll be sitting in. Look at these jars! The fruit is evenly distributed all the way to the bottom!! Yay!!


The benefit to taking care of the floating fruit problem before the fruit ever hits the pot is that you can cook the jam really fast and maintain that color and flavor quite well! I am suddenly sad that I only made a small batch. I think I might have to go back out to the strawberry fields this week!!

Strawberry Jam
Yield: approx 5 1/2-pints

4 cups hulled, finely chopped, and hand mashed strawberries
4 cups sugar, divided into 1/2, 1/2 c, and 3 c amounts
2 tsp Pomona's pectin (available on amazon and elsewhere)
2 tsp Calcium water (included with the Pomona's pectin)
1/4 tsp butter, as needed

Prepare your water bath canning gear. If you need instructions on this process, consult my Canning 101 page. Combine the strawberries and 1/2 cup of the sugar, stirring to mix thoroughly. Cover and refrigerate overnight, up to two days. When ready to make jam, add the strawberries to a minimum 3 qt pot. Add the calcium water and stir. Combine the pectin and 1/2 cup of the sugar; set aside. Bring the strawberries to a boil. Add the pectin/sugar mixture all at once and stir until the jam returns to a boil. Stir for another two minutes to allow all the pectin to dissolve. Add the butter as needed to reduce foaming. Add the last 3 cups of sugar and reduce the heat to a gentle simmer. Stir until the sugar is completely dissolved. Skim and foam and immediately ladle into prepared 1/2-pint jars. Allow 1/4 inch head space. Process for 10 minutes. Allow to sit in the water bath off the heat for five minutes after processing to prevent oozing. Let cool to room temperature before removing bands to dry them for storage.

NOTE 1: Here's another thing I love about Pomona's. Would you rather have a jam that has even less sugar? You can leave out any and all of the last 3 cups of sugar and this recipe should work great. The nice thing about adding it at the end like you do is that you can actually add a bit at a time until you get it to the sweetness you want. Just remember, the longer this jam cooks, the less red and fresh it will end up being.

NOTE 2 (added 5/18/17): I am so in love with this jam that I went and picked another bucket of strawberries and made another batch. These strawberries must have been more ripe as the jam came out a bit cloyingly sweet. It's good, but not quite eat-by-the-spoonful good, so think I'm going to actually reprocess them after adding a little acid. The moral of the story here is to make sure and taste your jam and adjust tartness as necessary. If it comes out too cloying (even in this reduced sugar jam compared to standard pectin jam), just add a little lemon juice or citric acid to taste. 

Sunday, August 21, 2016

Spiced Pear Jam


It's still jam season in my house! We were on the road so much this summer, that I really didn't get much canning done at all... except for jams. I've been a jam making fool this year! I've been having so much fun experimenting with new flavors and fruits and pectin. This is my newest creation. I was in the grocery the other day and there was a bin full of the most beautiful Forelle pears I'd ever seen. It was a split second decision that there would be pear jam in my future. I had never made pear jam before. I've canned many pears over the years... you know, in syrup. And I know how delicate the flavor can be, so I wanted to be sure that when you took a bite, you knew - yup - that's pear. So, I decided to use the Pomona's pectin, which can jell with much less sugar than conventional pectin. I knew from making my Peach Pie Jam with Pomona's that it's great for getting a more intense flavor punch (you know, instead of the sugar punch).

I was winging it a bit on making this recipe, but it came out superb! I am so happy with this recipe, I am headed back into the world to see if I can find more Forelles... 'cause I'm sad since the batch only made five jars. This is definitely a jam flavor I will be thrilled to gift this holiday season!

If you are new to Pomona's Pectin, be sure to read the directions on the package and/or check out my Peach Pie Jam post to get the basic gist of the stuff. This recipe will NOT work as intended with regular powdered or liquid pectin!!


Spiced Pear Jam
Yield: approx 5 half-pint jars

4 cups Forelle pears, minced and treated with Citric acid or Fruit Fresh
1/4 cup lemon juice
4 tsp Calcium water (mixed as directed from the Pomona's packet)
2 + 1/2 cup sugar (do not add sugar all at once!!!)
3 tsp Pomona's Universal Pectin
1/4 cup ginger syrup (see note below)
1/2 tsp ground cardamom

Prepare the jars and a water bath canner. If you are new to canning , please review my Canning 101 post for details on how to safely can using a water bath canner. Peel and core the pears, placing in a bowl of acidified water to prevent browning. Mince pears quickly, hand crush them a bit, and then place in a stock pot on the stove. Heat gently to a simmer. Let pears cook, stirring occasionally until fairly soft, about 5-10 minutes. Add the lemon juice and calcium water to the pear mixture. In a separate bowl, mix the pectin and 2 cups of the sugar. DO NOT ADD ALL THE SUGAR ALL AT ONCE! Be sure it is evenly mixed. Bring the pears to a hard boil. Add the sugar/pectin mixture and stiff completely. Continue stirring and return the mixture to a hard boil. Add the rest of the sugar, the ginger syrup, and the cardamom. Stir thoroughly and bring to a boil again. Remove from the heat and fill the jars, leaving a 1/4 inch head-space. Secure lids and rings. Process in a water bath canner for 10 minutes. Let jars cool 5 minutes in canner before removing to cool. If the jars have sealed properly, they can be stored in a cool, dark place for over a year. Please note that lower sugar jams will not last as long in the refrigerator once they've been opened as traditional jams.

NOTE: I make a lot of crystallized ginger and so I usually have some thick, sticky ginger syrup on hand. If you don't have it on hand, you can make your own by peeling a two inch finger of ginger, slicing it, and simmering it in one cup of water for ten minutes. Add one cup of sugar and simmer another twenty minutes. Strain syrup and keep refrigerated until ready to use.

9-8-16 I loved this jam so much that I wanted to make another batch. I couldn't find Forelles this time and thought, "How much different could it be with Bartletts?" Well, I'm here to tell you, quite different. The Bartletts have a somewhat cloying flavor and do not make a jam that is nearly as good. I strongly advise making this delicious jam with Forelles. 


Wednesday, March 11, 2015

Andy's Mints


Last week, I made one hundred goody bags to donate to a women's mini-retreat. I included gingersnaps, toffee butter crunch, and these little mint gems. I'd made these mints once before and thought them wonderful enough to make again. If you like those little green foil wrapped chocolate mints, you'll love these things, too. They're darn easy to make, too, which is never a bad thing in my book.

I based them off a recipe I found in Taste of Home magazine. I just knew, though, that the way the recipe was written, I would find them cloyingly sweet. I am not a big fan of most fudges for that reason. But, I figured there was a way around that. Instead of using semisweet chocolate, I used a 60% bittersweet chocolate. It made them just right. The lack of excess sugar in the chocolate is more than made up for by the sweetness in the condensed milk. It ends up being the perfect balance. Interestingly, I have made these using both real white chocolate and white chips for the middle part and am not sure the flavor difference is worth the very real difference in price between them. It seemed to me they both worked well, so use either.

The first step is to melt the bittersweet chocolate and one cups of the condensed milk. Heat it in a heavy pan over medium-low heat, stirring frequently. Meanwhile, prepare an 8" square pan (use a 9x13 pan for a double batch) by spraying with a little oil and lining with a sheet of parchment (the oil simply helps keep the parchment from moving around on you as you spread the mixtures into the pan). When the chocolate is smooth, add the vanilla. Spoon half of the mixture into the prepared pan and spread it around. Chill until firm to the touch, about 10 minutes.


Then melt the white chips or white chocolate and the remaining condensed milk in another pan over medium-low heat. Heat until smooth, adding the color and extract as you remove it from the heat. Spread the green mixture on top of the now slightly firm chocolate layer and spread around. Let it firm up in the refrigerator another 10 minutes. Reheat the remaining chocolate mixture until it is smooth again and spread it on the top of the green mixture once it has firmed up.


Let the tray sit in the refrigerator until completely firm, at least one hour, preferably two. Use the edges of the parchment to pull the candy out of the pan. Cut into roughly one inch wide strips. Use a sharp bench scraper or knife to then slice each strip into 1/2 inch wide pieces of candy.


Andy's Mints
Yield: approx 100 mints

2 cups bittersweet chocolate chips (~60% cacao)
1 14-oz can sweetened condensed milk (divided)
2 tsp vanilla extract
6 ounces white chocolate or white chips
2 1/2 tsp peppermint extract
3 drops food coloring

Heat the bittersweet chips and one cup of the milk in a heavy saucepan over medium-low heat. Heat, stirring frequently, until the mixture is smooth, Remove from heat and add the vanilla extract. Prepare an 8" square pan with spray oil and a piece of parchment. Pour half of the chocolate mixture into the pan and spread evenly. Let pan chill in the refrigerator for about 10 minutes or until firm to the touch.

Heat the white chocolate or chips with the remaining condensed milk, stirring frequently, until smooth. Remove from the heat, add the extract and coloring, and spread evenly on top of the first chocolate layer. Let chill ten minutes. Rewarm the remaining dark chocolate mixture and then spread over the top of the green layer. Spread evenly and chill until completely firm, at least one hour.

Remove candy from pan using parchment. Cut along the long axis into roughly one inch wide strips. Use a sharp bench scraper to cut each strip into 1/2 inch wide candies. Can be stored at room temperature, but they will keep longer if stored in a refrigerator. Let warm to room temperature before eating.

Note: If you ever find the mixture seems to firm to spread easily, you can always add a dollop of heavy whipping cream to the mixture. This will loosed it up without adversely impacting the final product. If making a double batch, use a 9x13" pan.

Tuesday, November 4, 2014

Cran-Orange Marmalade


I can't tell you how excited I am to finally be posting this recipe. I've only been working on it for five years now!! While every batch has always turned out good, I was having trouble standardizing the recipe. There were a couple of batches that ended up with jelling issues, either too jelled or not jelled enough, but I think I've got it perfected now. This marmalade has a wonderful blend of sweet and tart. I absolutely adore the bits of orange peel in it; they are tender and sweet with a citrus bite. There is no bitterness here!! I often just eat it straight out of the jar, but it's good for other things too. It's an important part of my favorite sandwich (Chicken and Herb Cheese Panini). It could easily take the place of straight-up cranberry sauce at your holiday table this year. And it is absolutely gorgeous! Make it for gifts; no one will be disappointed!

The first step is to prepare the peel. You need about 8 average sized naval oranges. Use a peeler to remove all the skin on each orange. Then slice the peel into thin strips. Place in a bowl and cover with cool water. Soak the peel for ten minutes and then drain.


The next step is to cook the peel. Place it in a small sauce pan with the apple juice and sugar and simmer until the peel is soft and translucent, about an hour.


Then add the dried cranberries so they can soak up the syrup as well, This helps to keep them from floating in the final jam. Let them cook with the peel for 20-30 minutes. I especially love the dried cranberries in this jam because they hold their shape and have such a nice chewy texture.


In a separate pot, cook the fresh (or frozen) cranberries with sugar and a small amount of water. Cook until they are split and nice and soft. Cool slightly and then press through a sieve. We want the flavor of the berries without all the seeds of skins.


Lastly, supreme the oranges (that's where you peel and then cut the sections out of the membrane) and cut the flesh into small pieces. You do not want all the excess juice, just the flesh cut in pieces. Cook these pieces in a large pot with sugar until it comes to a boil, and then continue boiling for 3-5 minutes.


The last step is to put all the pieces together. Add the peel mixture and the sieved cranberries to the cooked orange and stir. Bring to a hard boil and add the liquid pectin packet. Return to a hard boil and boil one minute. Let sit five minutes before ladling into half-pint jars, leaving 1/4 inch head space. Process in a water bath canner for 8 minutes. Remove from the heat and let the jars sit in the water for five minutes before removing, otherwise they may ooze and weep.


Cran-Orange Marmalade
Yield: approx 7 half-pint jars

1 1/2 cup firm-packed orange peel
3/4 cup apple juice
1 cup sugar
1 cup dried, sweetened cranberries

Use a peeler to remove the peel from approximately 8 average sized oranges. Slice into short, thin strips. Soak the peel in a bowl of water for ten minutes and then drain. Then simmer in a small sauce pan with the apple juice and sugar until soft and translucent, about an hour. Add the dried cranberries and let cook another 30 minutes. Set aside.

1 bag of cranberries (fresh or frozen)
1/4 cup water
1 cup sugar

Cook the cranberries, water, and sugar together until they split and are soft and then pass the mixture through a sieve to remove the seeds and skins. Set aside.

1 cup chopped, supremed orange sections
2 cups sugar

Supreme the peeled oranges (cut off the skin and cut out the sections from the membrane) and then cut the sections into small pieces. In a large pot, add the orange sections and sugar and cook until boiling, and then continue to cook for 3-5 minutes.

1 pouch liquid pectin

At this point, add all three components together. Add the peel/dried cranberry mixture and the sieved mixture to the hot orange sections. Stir together and bring to a boil. Add the pouch of pectin and return to a boil. Boil hard for one minute. Let mixture sit five minutes before ladling into prepared half-pint jars. Leave a 1/4 inch head space and process in a water bath canner for 10 minutes. At the end of the processing time, remove canner from heat and let the jars sit in the water for five minutes before removing (this helps keep them from oozing). Note that this jam may take 24 hours to fully jell.

If you need more guidance on canning basics, see my Canning 101 post.

Monday, November 4, 2013

Ginger Jellies


As we rapidly approach the holiday season, I am already getting excited about the various goodies I can make to give as gifts to my loved ones. In the last few years, lemon, lime, and orange jelly candies have been staples of my gift giving repertoire. The candies are really tasty, pretty darn quick to make, and folks are always so pleasantly surprised to receive them. Lately, though, I've been trying to think if there was a way to freshen up the idea. My mom, who is an ardent ginger fan, inspired this version. They have such a wonderful flavor, and I've been eating them up very quickly as I've made my test batches. If you like ginger, you'll love these!

The basic process for making them is just like I posted previously when making lemon jellies. You just have one brief extra step because instead of juicing a fruit, you need to steep some flavor. In this case, stronger is better, so don't skimp on the amount of ginger you use. These candies have enough sugar in them to counteract the one-two punch the ginger can sometimes give when it's too strong.

It takes almost half a pound of ginger to get this juice potent enough, so buy plenty! Either cut or scrape the skin off the outside of the ginger and then cut it into thin slices and then cut those slices into small sticks. I cut up one and a half cups of small ginger sticks.


Then you add one and a half cups of water. Pour into a small sauce pan and heat over medium heat just until it comes to a simmer. Turn the heat off and let sit for an hour, stirring periodically. Strain the juice from the ginger first through a fine mesh strainer and then through coffee filters (or similar). You need one cup of ginger juice for this recipe. Surprisingly, the color of these jellies is beautiful without any added coloring. They end up a soft golden color - understated but beautiful.


Ginger Jellies
Yield: 3-4 dozen candies

1 cup ginger juice
   (made from 1 1/2 cups finely cut ginger and 1 1/2 cups water)
3 TBS unflavored gelatin
pinch citric acid powder (~1/16 tsp) optional
2 cups sugar
1/2 cup water
1-2 cups sanding sugar

Prepare the ginger by cutting or scraping off the skin. Slice thinly and then cut into small sticks. Place the ginger in a small saucepan with 1 1/2 cups of water and bring to a simmer. Remove from the heat and let steep for one hour, stirring occasionally. Strain through a fine mesh strainer and then through a coffee filter. Measure out one cup of the now cooled juice.

Mix together the ginger juice and the unflavored gelatin. Stir and let sit while the sugar heats on the stove. If desired, add the citric acid and stir to mix. Prepare a 4x13 pan or similar dimensions by spraying with oil and then line with parchment. Spray the parchment with oil as well. Set aside.

Pour the sugar into a sauce pan, add the water, and gently stir. Stir over medium-high heat until the sugar has dissolved. Stop stirring and place a candy thermometer in the pan. Continue heating without stirring until the mixture reaches 255 degrees. Pour the gelatin mixture into the hot sugar mixture, stirring completely. Pour into the prepared pan. Let sit at room temperature for at least four hours.

Pour one cup of sanding (or regular granulated sugar) on a sheet pan. Turn out the candy onto the sugar. Spray and pizza cutter with oil and cut the candy into strips and then square pieces. Toss in the sugar to coat all sides. Let the candy sit out at room temperature for two days, turning frequently.

For more details on making this candy, view the post on making lemon jellies.

NOTE: The citric acid is completely optional in this candy, but can help to keep the candy from becoming cloyingly sweet if you do not make a strong enough ginger juice.

Friday, April 19, 2013

Homemade Instant Oatmeal


I assumed going into this motherhood thing that, since I had a fair amount of childcare experience, I had it all figured out. What I hadn't realized, having always taken care of children six months and older, is that infants are quite a bit more time consuming than I had anticipated. I guess it's hard to entertain yourself when you can't sit up on your own, let alone reach out and hold something. On top of it all, my little boy is opposed to sleep. Oh, he sleeps great at night. In fact, last night, I got over six hours in a row and then a few more to boot! The problem is that my boy, who is almost ten weeks old now, doesn't like to nap much during the day. I looked up online how much infants should be napping at his age and it says around five hours a day. I'm lucky to get two out of him most days. The good news is that he isn't crabby with that little sleep. He's wide eyed and bushy tailed and ready to face the world... if only he could interact with it more!

As you might guess, between this sleep issue and keeping him fed, there isn't a huge amount of time for playing in the kitchen, but I've been making a concerted effort lately. I miss that tasty, creative outlet! So, in the last week, I've developed three new recipes. Of course, now the trick is to have the time to post them!

The first recipe I put together is for a homemade instant oatmeal. Once you've made the mix and put it in the pantry, you can prepare a serving in less than a minute and it is very, very tasty. It took me a few tries to get the flavor right, but I definitely think I've got it now. It's a brown sugar and maple flavored oatmeal with just a hint of cinnamon and vanilla. Very satisfying.

As I've mentioned before, muffins are usually my go to breakfast; it's my husband that's been consuming all the instant oatmeal up to this point (although that may change now!). As you might imagine, it galled me just a bit every time I put that box in the grocery cart. I just knew I could do better and cheaper. This recipe makes six servings for less than a buck. It looks very similar to what comes out of the box, doesn't it? But it doesn't have all those fillers in it! Just oats, salt, brown sugar, cinnamon, vanilla, and real maple syrup.


You start by mixing a portion of the oats with all the flavorings and then baking to dry it out and make it shelf stable. You then grind up that mix in a food processor (I suppose a blender might work too) until it is fairly finely ground. Finally, mix in the remaining oats and put it in a jar in the pantry. That's it! 


Obviously, you can make the servings as large or as small as you want and add the water to your taste, but as a general guide, five tablespoons of dry mix makes a serving. That's approximately 40 grams. A Quaker Instant Oatmeal serving is 34 grams and has 120 calories. Based on the nutritional information and measurements for my recipe, it comes to about 170 calories a serving. If it was a similar serving size as the Quaker, it would be 145 calories. Why the difference? It's not that my version is sweeter. I think it has to do with the fillers they have in there. 34 grams of oats have 128 calories. Oats are less calorie dense than sugar, so to be able to have only 120 calories per serving, there must be a bunch of other, very low calorie stuff in there... perhaps the guar gum, sucralose, or calcium carbonate. 

Homemade Instant Oatmeal
Yield: 6 servings

1/2 tsp table salt
4 or 5 TBS packed light brown sugar
1/8 tsp ground cinnamon
1 or 2 TBS real maple syrup
1/4 tsp vanilla
1 1/2 cup quick oats, divided

I have added some flexibility into the measurements of the sweeteners. My husband ultimately decided he wanted it slightly less sweet, so I've been making it with 4 TBS brown sugar and 1 TBS of maple syrup. Feel free to adjust to your tastes.

Preheat the oven to 250 degrees F. In a small microwave proof bowl mix the salt, brown sugar, cinnamon, maple syrup, and vanilla. Stir together and then heat gently in the microwave to liquefy the mixture, about 25-30 seconds.  Add 1/2 cup of the oats. Stir to completely mix. I like to use my hands to really ensure things are well mixed, which helps keep hard sugar balls from forming. Sprinkle out on a sheet pan lined with parchment. Bake for 30-40 minutes, stirring once, until the mixture is dry looking. Remove from the oven and let cool completely. Once cool, place the mixture in a food processor and process until the mix is fairly finely ground. Pour into a glass jar. Add the remaining cup of oats and shake to mix. Store tightly capped for maximum freshness. This recipe can be multiplied as many times as necessary to obtain the desired amount of mix.

To prepare the oatmeal, spoon 5 tablespoons of the instant oatmeal in a bowl. Add between 1/3 and 1/2 cup very hot water and stir. Let sit 30 seconds, stir again, and enjoy. The amount of water you use will be a matter of personal preference. Using 1/3 cup of water will lead to a thicker, more pasty oatmeal while 1/2 cup will be somewhat watery. Personally, I think halfway between is the perfect balance.

NOTE: A triple batch of this recipe will just about fill a one quart jar. 

Sunday, December 9, 2012

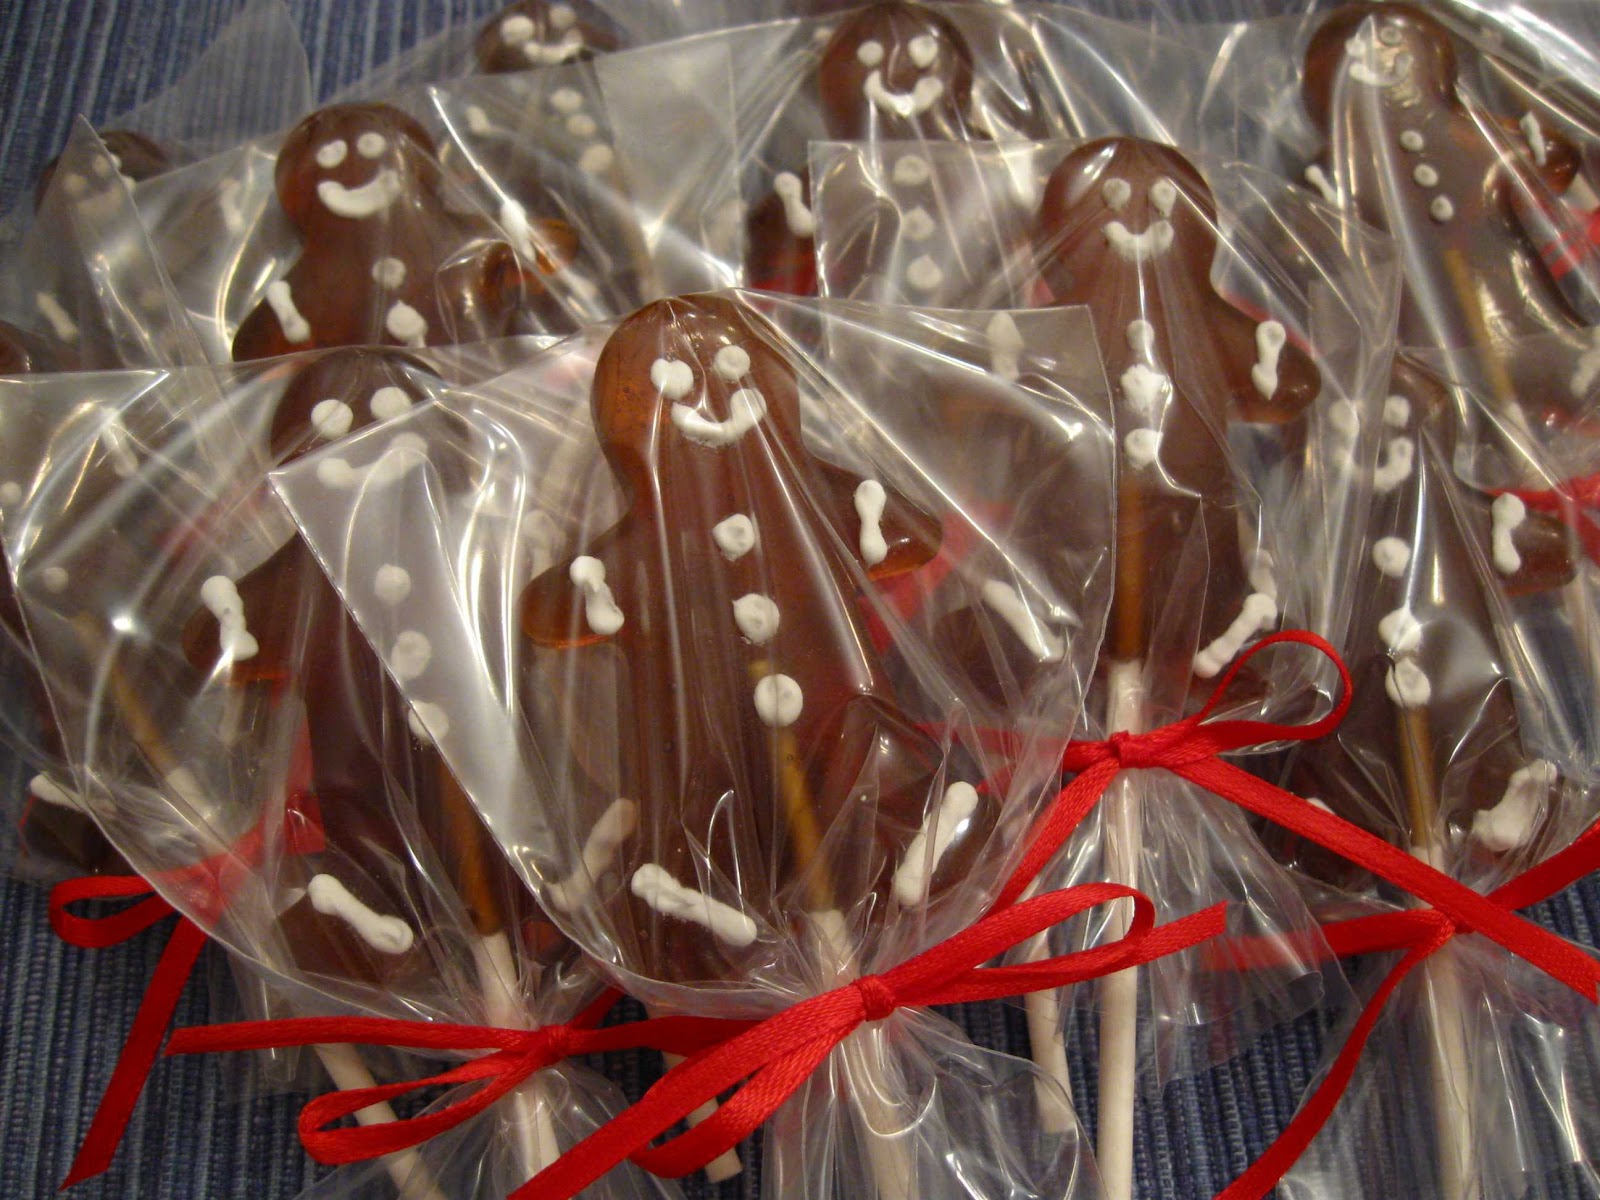
Gingerbread Men Shaped Lollipops


I love the holiday season. I especially love that it really gives me an excuse to go all out making all sorts of food goodies to give away. When I first started making lollipops a handful of years ago, I bought a variety of molds at a baking store (SugarCraft). The metal molds made by Sweet Creations are definitely my favorite. You can see what they look like in my Old Fashioned Lollipop post. I love them because they are easy to use and come in a variety of shapes.

In the packs of molds that I bought previously, I had ended up with two person shaped molds. One day, as I was making some root beer lollipops, I looked at those two and thought, "Wow! Those would make awesome gingerbread men for the holidays!" And then my life got busy and the idea got put on the back burner because I didn't really want to buy as many packs of molds as I'd need to get a reasonable number of the gingerbread men molds.

For some reason last month, on a whim, I decided to call the company and ask if they could make me a special pack of all gingerbread men molds. The folks at Sweet Creations were wonderful. Within a week, I had my new pack of molds and was ready to roll! They said they could create any package of molds from the shapes they offer that I wanted! How great is that? I am so happy that I called them, because look at how cute these little lollipops are!!!


I made a batch to give away to the little ones in our family for Christmas. I always make goodies to give to their parents, why shouldn't they get something special too? I made the lollipops exactly as I describe in my Old Fashioned Lollipops post. The only difference here was the addition of the white details. For this I used a stiff royal icing (I used the recipe on a package of Wilton meringue powder) and then let them dry uncovered at room temperature until the icing was dry and hard. Although most of our homes are on the dry side this time of year from the furnace, don't leave the lollipops out any longer than necessary or they could end up absorbing moisture and getting too sticky.

I then packaged them the same way I described in my previous lollipop post. I dusted them with powdered sugar and brushed the excess off with a pastry brush. Into the bags they went with pretty bows and, voila!, perfect little gingerbread men lollipops!


Wednesday, November 14, 2012

Strawberry Margarita Jelly


It's getting to be that time of year again. That time when I start to cook, and bake, and stockpile all sorts of assorted yummies to give as gifts. Some gifts need to be made right before they are given, but jams and jellies are wonderful in that you can make them in advance and pull them out of the pantry at the last moment.

I made this jelly before as a plain margarita jelly, and while it turned out well, I prefer to drink strawberry margaritas, so I wondered how a jelly would turn out. Oh my! It's beautiful and so reminiscent of a strawberry margarita. It's got a hint of the strawberry with a tart lime back. You can taste the tequila, but it's not overwhelming and the booziness has burned off. The other nice thing about this jelly is that you can basically make it year round. You just need a couple of clam shells of strawberries, limes, a little booze, and a packet of liquid pectin.

The first thing to do is prepare the strawberry juice. The recipe calls for one cup of clear strawberry juice and one cup of lime juice. If you want your jelly flavored more with strawberries and less with lime, you can adjust the proportions by up to half (i.e. max of 1 1/2 cup strawberry juice to 1/2 cup lime).

To prepare the strawberries, wash and hull them. Then cut them into small pieces. Measure out the sugar into a bowl and then use some of it, maybe 1/2 cup, to help get the strawberries juices flowing. In this bowl, the strawberries have only been macerating for a couple of minutes and look at all the juice that has formed already!


Once they get a good start, you can pour the strawberries into a cheesecloth lined colander over a measuring cup. Let the strawberries drip until you reach the correct amount of juice. Try not to press the fruit too much or you'll end up with jelly that is a little cloudy. For the best juice clarity, let it drip slowly through a muslin bag or a coffee filter.


When you have the correct amount of strawberry juice, it's time to juice the limes. Lime juice becomes bitter on standing, so you'll want to juice them right before you are ready to make the jelly. These were pretty good sized limes and they each gave about 1/4 cup of juice, so I used four. Strain the lime juice like you did the strawberry. The good news is that I found the juice you use does not have to be perfectly clear to end up with a beautifully clear jelly. Just do the best you can and call it good.


Once you have the strawberry and lime juice prepared, mix it with the tequila and Triple Sec and heat it over medium heat. Once it is warm, add the sugar and stir until it is completely dissolved. Add the butter and then increase the heat to medium-high. Stir constantly until it reaches a full rolling boil. Add the pectin, return to a full boil, and boil for one minute while stirring. Remove from the heat and immediately ladle into waiting canning jars. Leave 1/4 inch head space and process for 10 minutes (for half-pint jars). Look at that beautiful color!


Strawberry Margarita Jelly
Yield: 5 half-pint jars for canning, plus a little extra
Adapted from Blue Ribbon Preserves by Linda J. Amendt

1 cup of filtered, fresh strawberry juice (from 2 quarts berries)
1 cup of filtered, fresh squeezed lime juice (4 large limes)
1/2 cup tequila
1/4 cup Triple Sec
4 1/2 cups sugar (divided)
1/4 tsp butter
1 (3 ounce) pouch liquid pectin

Wash and hull the strawberries. Chop into small pieces. Stir in 1/2 cup of the sugar and let macerate, stirring occasionally. Once there is a fair bit of juice, dump the strawberries into a cheesecloth lined colander to collect the juice. Filter the juice through a coffee filter or a piece of muslin.

Because lime juice becomes bitter over time, juice the limes right before using. Filter the lime juice through a coffee filter or muslin as well. Mix the juices, tequila, and Triple Sec and heat over medium. Once the liquid is warm, add the rest of the sugar and stir until it is all dissolved. Add the butter.

Increase the heat to medium-high and bring to a full, rolling boil. Add the pectin, return to a boil, and stir for one minute. Remove from the heat and skim any foam that formed. Ladle immediately into clean, half-pint jars. Leave 1/4 inch headspace, wipe the rims clean, and put on the lids and bands. Process in a water bath for 10 minutes. Turn off the heat and let the jars sit in the water for five minutes before removing to cool on a towel lined counter. Letting the jars sit in the water for five minutes makes sure that the jars do not bubble over upon removal from the water. Let jars sit on the counter for 24 hours before removing bands and wiping the jars clean before storing.

NOTE: If you would prefer to make a traditional margarita jelly, simply substitute water for the strawberry juice. For a nice color, mix one drop of green food coloring with 2 TBS of water and add a little at a time until you get a hue you like. Color is best added after dissolving the sugar and before ramping the heat up.


Wednesday, June 27, 2012

Lemon Cornmeal Crisps

I am so excited to finally share this recipe with you! A while ago (oh, geeze, can it really have been over two years ago!?!), I shared a recipe with you for lemon cornmeal cookies. In that post, I detailed how I had been fiddling with two different recipes. The recipe I previously posted makes a light, tender, lemony cookie that is sweet and - most definitely - a cookie. The other recipe, which I am sharing today, is a cookie-like crisp that is less sweet, more crispy, and has some resemblance to a thin, crispy cracker. Although the basic flavors of the two are the same, the end result is quite different, and I absolutely adore them both!

I am trying to come up with the best way to describe the texture of these lemon cornmeal crisps. If you look at the following picture, showing the top and bottom of the crisps, you can see they almost look like really thick tuile cookies. And in a way, they fit that bill. These crisps are snappy and delicious!

I mix the dough in a food processor. The procedure for making this dough is very similar to making pie crust. I love the wonderful texture and flavor that cornmeal adds!

After mixing the dry ingredients (including the sugar), add the cold butter (cut into cubes) and the lemon zest. Pulse just until the mixture resembles coarse crumbs.

Mix the buttermilk and vanilla together and then add to the processor, only working the dough until it just starts to pull together. A word of caution: this dough is quite a bit stickier than regular pie crust due to the high sugar content. If you dampen your hands before handling it, it helps a bit.

Dump the dough onto the counter and shape into a disk. Wrap in plastic wrap and refrigerate for 6 to 24 hours. Longer tends to be better in the case of this dough. Again, it's a bit sticky, but as it sits in the refrigerator, the cornmeal hydrates and results in a less sticky dough. When you are ready to cut the cookies, cut the dough into four sections so you can work with a small amount at a time. Keep the remaining parts refrigerated until you are ready for them.

Prepare sheet trays with parchment and preheat the oven to 375° F. The crisps don't spread too much, so you can place them fairly close together (closer even than I show in this picture).

The big thing is to roll them thin!! Again, this dough can be a little tricky to work with, but I promise the end result is worth it. Just roll them as thinly as you can while still having the dough maintain its integrity.

The last step, if you're so inclined, is to sprinkle the tops with sanding sugar. I really like the added crunch this adds to the crisp, but it is entirely optional. I also like how it adds a little sparkle to the crisps. In the photo below, the crisp on the left is naked while the one on the right was sprinkled with sanding sugar.

Bake for 12-14 minutes, or until the edges are nicely golden. The crisps will not brown evenly and they will burn on the edges before the centers become golden, so keep an eye on them. Like any cookie this thin, once they start to brown at all, keep a close eye on them; they can go from "not yet" to "oh no!" in a matter of moments. Let the cookies cool briefly on the sheet and then transfer to a cooling rack to finish cooling completely. Strangely enough, I find I prefer these cookies after they have had a chance to sit a few days. This can be a wonderful thing as they make great gifts that can be made ahead of time.

Lemon Cornmeal Crisps
Yield: approx 60 - 2 1/2 inch rounds

1 3/4 cup flour
3/4 cup granulated sugar
1/3 cup cornmeal
1/4 tsp salt
3/4 cup cold butter, cut into small cubes
zest of one lemon
1/2 cup buttermilk
1 tsp vanilla
sanding sugar (optional)

In a food processor, pulse together the first four ingredients. Add the butter and lemon zest and pulse until the mixture resembles coarse crumbs. Mix together the buttermilk and vanilla and add to the processor, mixing only until the dough starts to come together. Dump the dough out and shape it into a disk. Wrap the disk in plastic wrap and refrigerate for 6 to 24 hours. For easier dough handling, longer refrigeration is better.

When ready to bake, cut the dough disk into four pieces. Rolling one piece at a time, keep the remainder refrigerated until ready to use. Preheat the oven to 375° F. Roll the dough out as thinly as you can. This dough can be a bit tricky and you will want to use plenty of flour to keep it manageable. I cut mine into 2 1/2 inch rounds, but you can cut them in any shape you desire. Sprinkle with sanding sugar if you want a shiny, crispy top to the crisps. Bake 12-14 minutes, or until the crisps are nicely golden around the edges. They will not brown evenly; the edges will become too done before the center turns golden, so keep an eye on them. Cool slightly on the baking sheet before transferring to a cooling rack to cool completely. Store in an air tight container for up to ten days. These crisps actually taste best two or three days after they are baked.

Wednesday, January 4, 2012

Blackberry Liqueur

Sometimes, I really miss living in the Pacific Northwest. Growing up, I was very much an outdoor kind of gal. Considering how much time I spent engaging in activities that potentially could leave me stranded in the wilderness without much warning, I always felt it was a good idea to be prepared. That involved not only making sure I had a working "survival kit" with all the essentials when I was out in the high country, but I also made sure I had the requisite knowledge to feed myself if it came down to it. Fortunately, the northwest is bountiful! Some of the edibles are lesser known, but some are so prolific and in your face that they are part of the cultural psyche of any proper Pacific Northwesterner. I'm speaking, of course, of blackberries.

They not only grow wild there; they're freaking rampant. I miss all that free food! I have to buy blackberries here in Florida, and it makes me ill how much they go for. However, sometimes, it's worth it. This liqueur is so beautiful, fragrant, and satisfying. While I'm sure it would taste better with vine ripened berries from Washington, I've found I can make do with frozen berries from Wal-Mart.

The only bad thing about this recipe is that you have to be patient. This isn't one of those, "Hmmm, I think I'll make some blackberry liqueur for that party this weekend," kind of things. It needs time to steep. It needs time to mature. Ideally, you need to give it six months. I know that's asking a lot, but - trust me - it's worth it. This liqueur is as great to give as it is to enjoy. Whenever I use up some ingredient that comes in a nifty bottle, I clean it out and hang on to it so that I have something nice to decant my liqueur into when it's ready.

Blackberry Liqueur
Yield: approx. 4 cups

4 cups blackberries
zest of one lemon
2 whole cloves
2 cups vodka
1 cup brandy
1 cup sugar syrup (2:1 sugar to water)

Lightly crush the berries with a fork. If they are refrigerated or frozen, let them come to room temperature first. Using a vegetable peeler, zest one lemon. You can use a knife but be sure to remove any pith, which is bitter. In a large jar (I use a half-gallon canning jar), mix together the blackberries, lemon zest, cloves, vodka, and brandy. Place a lid on the jar and set in a cool, dark place for about three months.

After it has steeped, pour it through a strainer, then through a coffee filter (multiple times is better). Make a cup of sugar syrup and let it cool to room temperature. Add the sugar syrup to the liqueur until it is sweet enough to your taste. Mature in a cool, dark place for another 4-6 weeks. Decant into a pretty bottle. Store for up to one year.

Sunday, December 18, 2011

So Pretty!

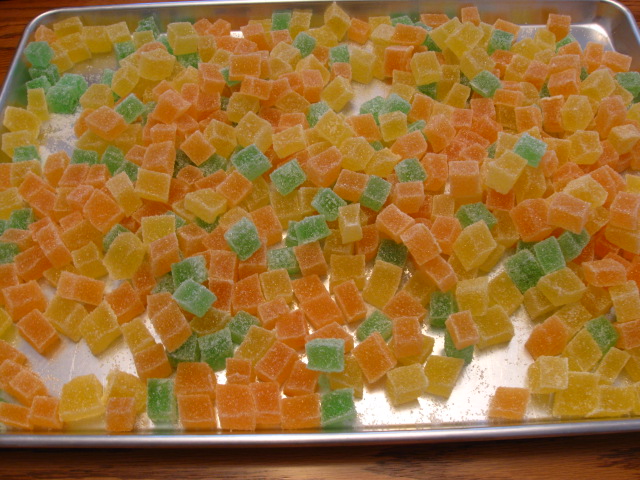
I've posted a few times already about making these cute little jelly candies. I originally posted about the lemon ones, but recently posted about making them in orange and lime as well. Well, I finally had an opportunity to make all three in the same time frame so that I could photograph them together. How cute they turned out! Yellow, and orange, and green, oh my!


Saturday, December 10, 2011

Gingerbread Cutouts

I've been in serious cookie making mode lately. Last week I made an army of these cute little guys for a "cookie caper" on base, where volunteers bring in homemade cookies and then they are packaged and distributed to airmen. (I also made a double batch of my sugar cookie holly cutouts.) What I love about gingerbread men is that the cookie is not overly sweet and has a nice spiciness to it. I often make and give them as gifts. They can be packaged in such cute ways and everyone loves to receive them!

The dough is very easy to mix. Probably the hardest part is grating the ginger, but a microplane makes short work of the task. Just be sure that the fresh ginger is ground into a paste; you want it to mix evenly into the dough. Mix the wet ingredients together first.

Then mix the dry ingredients in a separate bowl before adding the flour mixture to the wet mixture. I've tried a lot of gingerbread cookie recipes, and I love the combination of spices in this one.

Form the dough into a log and wrap in plastic wrap, letting it firm up in the refrigerator for at least an hour. Once it has firmed up, cut the dough into four or five large slices and roll one disk out at a time. Roll it fairly thin, about one eighth of an inch is best. Use a gingerbread cutter to make figures. Bake on a greased cookie sheet or a parchment lined pan. For best flavor, bake until the cookies are nicely browned. I've found if they are under cooked, the flavor is a bit lackluster.

Once they are baked and completely cooled, pipe decorations in royal icing (I use the recipe on the package of Wilton meringue powder). Let the cookies sit out for at least a few hours until the icing is dried hard. Then package them up! They keep fairly well in an air tight container. I like to maximize my time, so I always do the same decoration on them, but you can certainly get creative! You can use a variety of colors and small candy decorations if you want. Make your gingerbread army however you see fit!

Gingerbread Cutouts
Yield: approx. 70 3-inch cutouts

3/4 cup brown sugar, firm packed
1/2 cup butter, softened
2 eggs
1/4 cup molasses
1 tsp fresh ginger, grated
3 1/4 cup flour
1 1/2 tsp baking soda
2 tsp powdered ginger
1/2 tsp allspice
1/2 tsp cinnamon
1/2 tsp nutmeg
1/2 tsp salt

Beat the sugar and butter together until smooth. Add eggs, molasses, and fresh ginger. Mix thoroughly. In a separate bowl, mix the remaining ingredients. Stir well. Add slowly to the wet ingredients, stirring until well mixed. Shape dough into a log and wrap in plastic. Chill for at least one hour. Slice log into four or five disks. Roll out one disk at a time. Roll fairly thin, about 1/8 of an inch. Place on greased or parchment lined cookie sheets. Bake at 350° F for about ten minutes, or until nicely browned. Cool completely before decorating with royal icing.