I am now blogging new recipes on my farm website.

Cooking from Scratch is on facebook! Click here to check it out!

Showing posts with label Baking. Show all posts

Saturday, November 12, 2016

Chocolate Pastry Braid


I have been experimenting quite a bit lately with incorporating chocolate in breakfast pastries. There is no reason that chocolate cannot be a viable part of a special breakfast! This pastry is similar to my Pecan Praline Weave. I absolutely love that pastry, but I started wondering what else I could put in there. And I wondered what other types of dough recipes I could try. This is the result of that experimentation. I love how easy the dough is to make. It is easy to work with when the dough is cold and the filling is very chocolaty. The pastry is not overly sweet. It is rich and decadent, but not cloying in any way. I adore it!

I also love how easy it is to shape. It looks so amazing, you might be tempted to think it would be hard to put together, but it really isn't at all. Roll the dough out into either one large or two smaller rectangles. Use a pizza cutter to cut 1/2 - 3/4 inch wide strips along both edges of the long edges of the dough. It helps to imagine the dough as being folded in a tri-fold manner. Spread the filling down the middle third. To keep the pastry very pretty, I cut the last strip on each side on both ends off. This allows me to fold over the end of the middle third for a nice, well kept look.


Brush the pastry with egg wash and sprinkle with sanding sugar. They're completely optional, but I think the almonds add a certain je ne sais quoi. Another great thing about this bread is that it really doesn't need to sit to rise after the pastry is put together. This allows it to be easily made in the morning fairly quickly. I make the dough the night before and put it in the refrigerator. In the morning, I roll the dough out and put together the pastry. I then immediately put it in the oven, and thirty minutes later, I have chocolate pastry nirvana. Not bad!!


Hello, chocolate. How are you doing? Man, do I need more excuses to make this thing.


Chocolate Pastry Braid
Yield: Approx one 20x6 inch braid or two 10x6 inch braids

For the dough:
2/3 whole milk, lukewarm
5 TBS sugar
2 tsp instant yeast
2 large eggs
2 1/2 cups flour
1/2 tsp salt
1/2 cup (1 stick) salted butter, softened
1/2 cup flour

For the filling:
2/3 cup powdered sugar
1/4 unsweetened cocoa powder
4 ounces bittersweet chocolate
1/4 cup butter
2 TBS heavy cream

1 egg mixed with 1 TBS water
1/4 cup sanding sugar
sliced almonds (optional)

In a stand mixer, add all ingredients except for the final 1/2 cup of flour. Using the paddle attachment, mix until the dough is well mixed and fairly smooth. Switch to the dough hook, and while on speed 2, add the remaining flour. Let mixer knead the dough for 3-5 minutes, until it is very smooth. It will still be very sticky. Put into a greased container and cover tightly. This dough will easily double over night, so be sure to use a large enough container. Refrigerate overnight or at least 8 hours.

When ready to assemble the pastry, preheat the oven to 375 degrees F. Generously flour the counter and roll out the cold dough into one very large rectangle (or divide the dough in half and roll into two smaller rectangles). Consider transferring dough onto a piece of parchment (this helps transfer the finished pastry onto the baking sheet, especially if your kitchen is hot or you take a while to assemble the pastry). Place all filling ingredients into a microwave safe bowl. Heat gently in the microwave, stirring regularly, until the mixture is smooth. Spread evenly in the middle third (long ways) of the dough. Use a pizza cutter to cut the dough in 1/2 to 3/4 inch wide strips on each side of the middle third (see picture above). Remove the last strip on each side on both ends. Fold over the middle end of the dough on each end and then alternately lay the strips across the chocolate. Brush with egg wash and sprinkle liberally with sanding sugar. If desired, sprinkle with sliced almonds.

Immediately place in the preheated oven. Bake until puffed and golden, about 25-30 minutes. Let cool 10 minutes before slicing and serving. Keeps well, tightly covered, for 2-4 days.

Monday, February 1, 2016

Brownies - Perfected!


Quite some time ago, I posted a brownie recipe on here that I was pretty fond of. Fond enough that I called them "Devilishly Good." They are. But as time went on, I stopped using the coffee granules; I guess I just wanted that pure chocolate taste. And they are just a tad on the cakey side, and I found that I really was a fudgy brownie girl at heart. And even though I had already reduced the fat in them significantly from the brownies I used as my beginning recipe (Barefoot Contessa's), they still seemed a bit greasy. Lastly, they just never quite seemed dark enough, but just adding more chocolate didn't help them. 

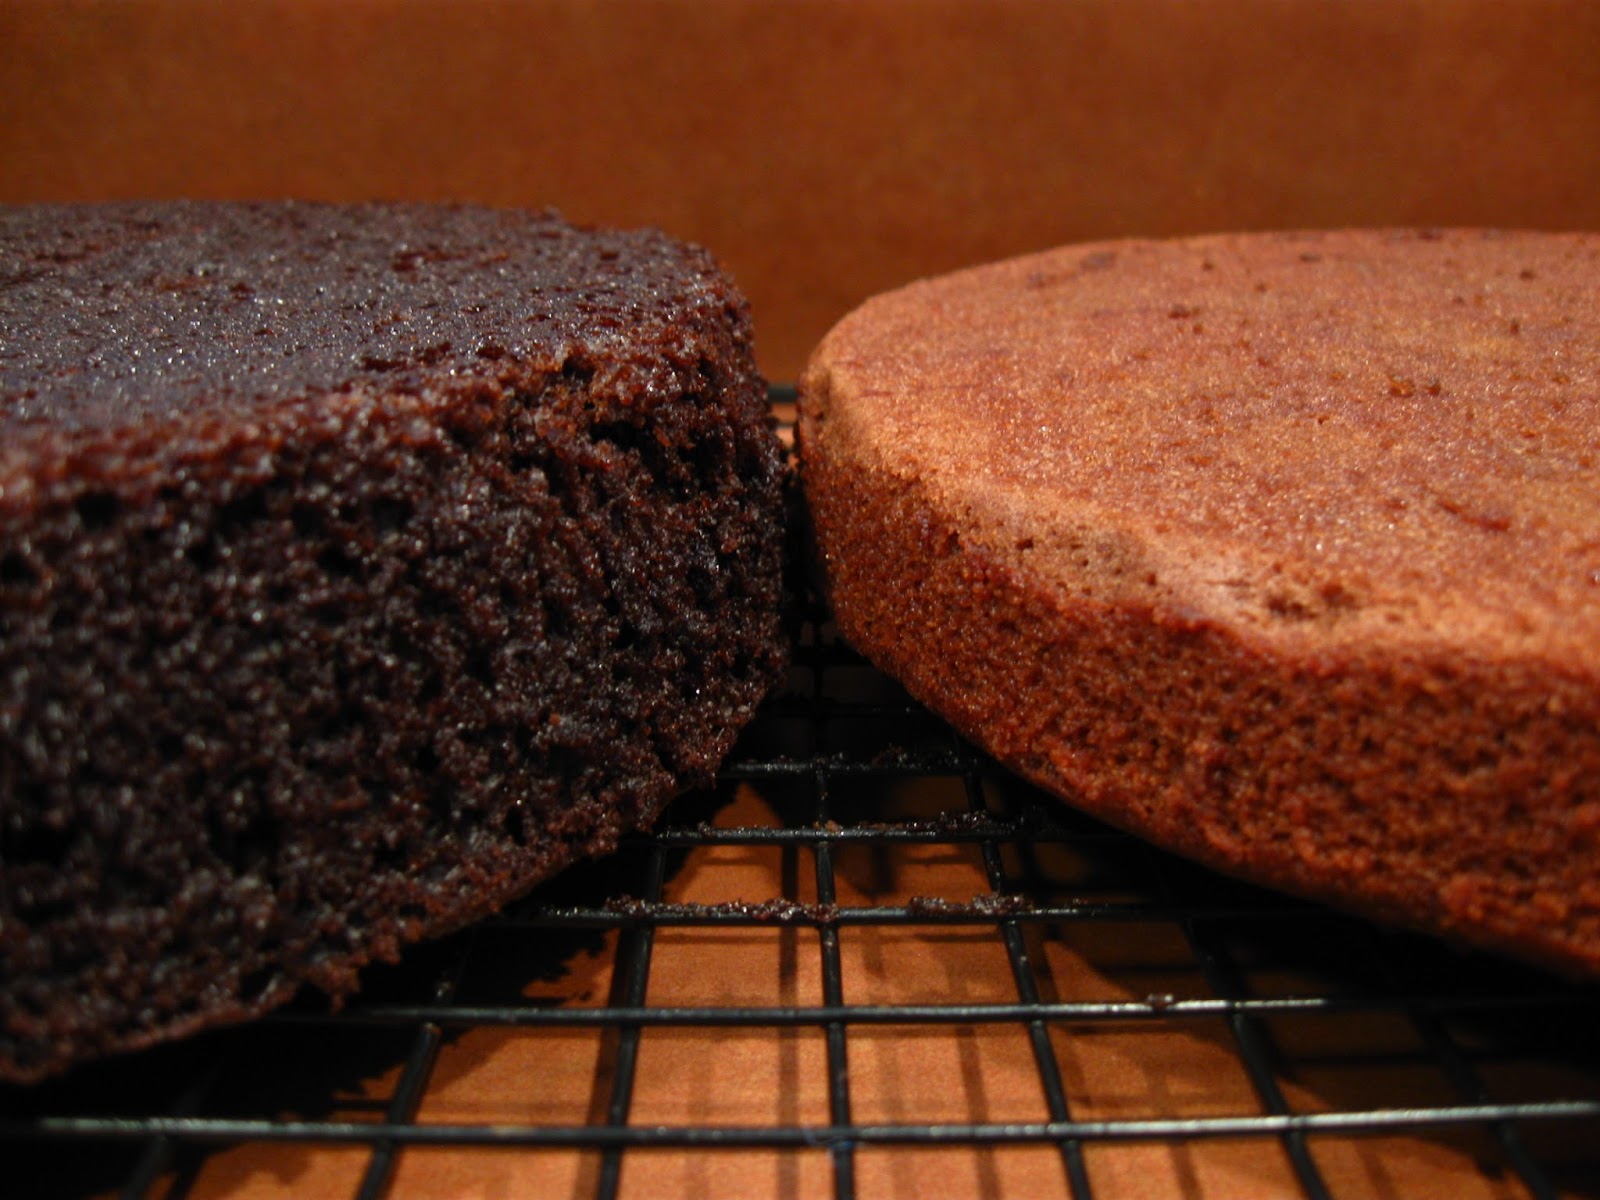
I pondered and pondered this darkness conundrum over the last few years. Then one day, out of the blue, I remembered an interesting accident I had once when making my favorite chocolate cake. I had messed up the leavening, substituting baking powder for baking soda and came out with drastically different results. And I do mean drastic... baking powder cake on right, baking soda cake on left. Interestingly, not only was there a difference in color, but the chocolatey-ness was completely different. It got me to wondering if there was some kind of a special chemical reaction that happens between the acidic cocoa powder and the basic soda that just wasn't happening when using baking powder.


And so there is! Check out these two batches of brownies. On the right is my original "Devilishly Good Brownies" and on the left is my "Brownies - Perfected!" recipe. The recipes really aren't that different, but look at the change in the end result! My new brownie recipe is fudgy and so, so, so chocolatey, they are divine. Hard to imagine that simply changing the type of leavening could make such a big difference in the color and flavor. Adjusting the fat and egg level did the rest. If you prefer cakey brownies, stick with my old recipe, but change to using baking soda. If you want the perfect fudgy brownie, this is the last recipe you will ever need.


The hardest part about this recipe is melting the chocolate and butter together in the microwave... just kidding - it isn't hard at all!


This recipe is a cinch to mix together and the end results are really, truly special.


Brownies - Perfected!
Yield: one 9x13 pan of brownies

1 1/2 stick salted butter
1 1/2 cup semi-sweet chocolate chips
1/2 cup cocoa powder
1 cup sugar
3 large eggs
1 1/2 tsp vanilla
1/2 cup flour
1 1/4 tsp baking soda

In a medium microwave safe bowl, melt together the butter and chocolate chips. Check regularly and stir until smooth. Add the cocoa powder and sugar and mix together. Add the eggs and vanilla and stir again. In a small bowl, mix together the flour and baking soda. Add to the batter and stir just to mix. Dump into a greased 9x13 pan. Smooth out with a spatula and bake in a 325 degree F oven for about 20 minutes. Be sure not to over bake or they won't be fudgy. Brownies are ready when the middle does not jiggle much when the pan is gently shaken on oven rack and a tester will come out clean. Let cool before cutting.


Wednesday, January 6, 2016

It Does Matter


I tend to think of myself as a pretty practical gal. When it comes to generic brands, for instance, all other things being equal, I find no reason to pay a premium price for an ingredient. Occasionally, I find there are exceptions where all things are not, in fact, equal. For example, take domestic pre-grated Parmesan cheese; the stuff in the green can is always better than the store brand version.

Recently, since I started doing a lot of baking for hire, I've been going through tubs of cocoa powder. It seems like such a basic ingredient I thought, surely it's all the same, right? Wrong!!! I made the mistake once. I will not make it again. I made my classic chocolate cake and all I changed was using store brand cocoa powder instead of Hershey's classic cocoa. The cake was horrible! The lack of chocolaty flavor was so obvious and overwhelming, I could hardly believe it.

But upon close inspection of the powders, it became obvious. The store brand powder's aroma was so weak in comparison and so was it's color! Take a close look a the picture above. Which is which? Depending on the type of screen you are using, you might have to move your head around to get a good look at the difference, but it is clearly there. Look how much richer the color of the powder on the left is (Hershey's). Lesson learned... some things are worth the premium price. Now, what do I do with the rest of that container of store brand cocoa? It feels wrong throwing it away, but I sure don't want to use it!

Sunday, July 26, 2015

Peach Crisp


Tap... tap... this thing on? Man, has it been a long time! I always have the best of intentions. I think about what I want to write all the time. I tweak new recipes regularly; I take pictures; I have things to say, dang it! But then I get tired or busy or... well, who the heck knows. But then I come across something that I just can't wait to share with you. In this case, it's that picture that greeted you today. Every now and then I take a picture that from the second I see it, I think, "Now that's a photograph worth looking at over and over and over." Don't get me wrong, this is a great, super easy recipe and totally worth posting with no photo at all, but the photo makes me drool uncontrollably. I've made this dish three times in the last two months (which is a lot since I normally make a cobbler/crisp type thing maybe once or twice a year), but that picture. It's been haunting me. I pull it out to look at multiple times a day. And then I think about making another pan of peach crisp. Living in the middle of peach country makes peaches an easy choice, but you could just as easily make this recipe with any fruit you like. I just happen to be partial to peaches... today, anyway. 

Peach Crisp
Yield: 9x13" pan, 8 servings

1 gallon frozen peach slices OR about 12 medium sized firm, ripe peaches *see note below*
1/4 cup - 1/2 cup sugar (depending on sweetness of the fruit)
2 TBS cornstarch for fresh peaches (3 TBS if using frozen)
1/4 tsp cinnamon
dash nutmeg

Preheat the oven to 350 degrees F. Toss the peaches, sugar, cornstarch, and spices together. *If you are using a fruit other than peaches, simply use enough fruit to fill the pan about two inches deep.* Level the fruit mixture into the bottom of a 9x13"pan.

1 cup flour
3/4 cup old fashioned oats
1/3 cup sugar
1/3 cup brown sugar
1/2 tsp ground cinnamon
1/2 cup (1 stick) salted butter, softened or melted

Mix the remaining ingredients together in a small bowl. It's easiest to mix it with your hands. Sprinkle the topping evenly over the top of the fruit. Bake in a 350 degree F oven until the topping is golden (about 40 minutes if using fresh peaches, an hour or more if using frozen peaches). Let cool slightly before serving. 

Thursday, November 20, 2014

Bran Muffins - Perfected!


I know I updated my original bran muffin recipe not that long ago... and I love that recipe. I really do. I love that there is no refined sugar in it. I love the rich flavor from using only date sugar to sweeten them. But you know what? Date sugar is expensive!!! That recipe calls for more than a cup of the stuff, and as I started making these muffins more and more (they're really tasty!), I found I was spending a fortune on date sugar.

So, I went back and decided to see if I could modify them a bit to maintain the flavor that I loved in this new version without breaking the bank. I think I did it, well - geeze - I know I did, because I make this new recipe all the time. These muffins are my new go-to breakfast. The half a cup of date sugar the recipe now calls for is enough to make them really yummy without making me go through ridiculous amounts of the stuff.

Incidentally, since I have moved away from the "big city," I've had to start buying my date sugar online. I've been really pleased with the NOW Real Food brand date sugar. It's very dry and powdery (which can lead to a crazy cloud of it in my kitchen), but I no longer have to sift the stuff and get out a sledge hammer to break up the clumps, which I kind of like.

If you like moist and rich, sweet but not cloying muffins, you'll love these! They are full of dietary fiber (a back of the envelope calculation suggests each muffin has over 3 grams of dietary fiber) which is an important part of a healthy diet. Sometimes you can have your cake and eat it too!

Bran Muffins - Perfected!
Yield: 12 standard-sized muffins

1/4 cup canola oil
1 TBS honey
3 TBS molasses
1/4 cup brown sugar
1/2 tsp vanilla
2 eggs
2/3 cup buttermilk
1/2 cup wheat bran

1 cup whole wheat flour
1 1/2 tsp baking powder
1/2 tsp baking soda
1/4 tsp cinnamon
1/4 cup wheat germ
1/2 cup date sugar
1/2 cup chopped dates (optional)

Preheat your oven to 375 degrees. In a medium bowl, combine the first group of ingredients. The bran in included with the wet ingredients so that it has time to soak up some liquid and soften. This helps the texture of the final product. Let this bowl sit while you prepare the rest of the ingredients.

In a separate bowl, mix together the second batch of ingredients. Stir together. If adding the chopped dates, mix those in as well so that they are covered with flour. This step helps to keep them from sinking to the bottom of the batter. Add the dry ingredients to the wet and stir just until mixed. Line a muffin tin with papers and scoop approximately 1/4 of a cup into each paper. I use a #16 disher (blue) flat filled. If you want, sprinkle the tops of the muffins with some turbinado sugar and/or wheat bran. Bake in the  preheated oven for 18-22 minutes or until they are gently browned.


Wednesday, November 5, 2014

Raspberry Chocolate Cake


I always love taking a tried and true recipe and giving it a little twist to end up with something that has a whole new feel to it. In this case, I took my favorite chocolate cake (the only chocolate cake in the world, as far as I'm concerned) and instead of making my usual decadent and rich chocolate frosting, I whipped together a batch of raspbery whipped cream. Making raspberry whipped cream is absolutely no more difficult than making regular stabilized whipped cream, but it ends up with a lovely pink hue and a delicate touch of raspberry flavor. What I love about this version is that it has a lighter feel and is fresh and beautiful looking when topped with a ring of fresh raspberries. Be sure to use stabilized whipped cream for this application so that it keeps for a few days without weeping and deflating.

Raspberry Chocolate Cake
Yield: 1 two layer 9 inch cake

1 recipe for Audrey's Chocolate Cake, baked in two 9-inch round pans

Double recipe of Stabilized Whipped Cream
1 pint fresh raspberries, mashed with a fork

8-10 large, fresh raspberries for decorating

Let the cake cool completely before assembling. When ready to put the cake together, make the double batch of stabilized whipped cream. Once it reaches stiff peaks, gently stir in the mashed raspberries. Place one cake round on a plate and spoon half of the whipped cream on it. Spread the whipped cream evenly to the edges. Gently place the second cake on top and spoon the remaining whipped cream on top of it. Spread to the edges. Place fresh raspberries, upside down, at even intervals around the edge of the cake. Keep refrigerated until ready to serve. Will keep, refrigerated, for two to three days.

Thursday, February 20, 2014

Updated Bran Muffins


A few years ago, I posted a recipe for bran muffins. I've been mainly eating my chocolate chip and banana nut muffins lately, but a couple weeks ago, I suddenly decided to change pace. But the old recipe exhibits one major pet peeve of mine... it does not make a convenient amount of batter. It makes enough for one and a half trays of muffins (it says it makes a dozen, but when I went to make it again recently, it made quite a few more than that). Who wants to make a half tray? So, I decided I would adjust the recipe to make one dozen muffins. I figured that was easiest, because if I wanted to make two dozen muffins, I could easily double the recipe. Well, one thing led to another, and suddenly, I found myself playing with the recipe.

First, I want you to know that the original recipe is darn tasty. They are sweet and moist and yummy. The recipe I am about to post produces muffins that are a little more moist and not quite as sweet. In fact, they have no refined sugar in them. The majority of the sweetness in this new version comes from the dates themselves. Instead of adding chopped dates into the batter at the end, I thought I would see how the muffins tasted if date sugar were used instead. Date sugar is not really a sugar, but simply dried and ground dates. But dates are so sweet, that they can be used like sugar in many instances. In the muffins, I found its use has a few advantages. First, the muffins are so incredibly moist now. It also makes eating the muffins less sticky. Those large chunks of dates, while delicious can make a mess while eating them (especially when feeding them to a one year old!). The updated recipe also has no refined flour. In the previous post, I post the disclaimer that they are "good tasting muffins, not to be confused with 'health' muffins." In this case, I think we can confidently state that these muffins are good tasting and healthy. They're not low calorie, but they are packed with good stuff!

While I've decided I like these muffins a little less sweet, if you want yours to be a little more... decadent, you can simply add 2-4 tablespoons of brown sugar to the batter.


If you want to make your life easy while mixing the batter, pour the oil into a glass measuring cup first. Then eyeball the amount of honey. Lastly, add the molasses until the total amount reaches a half cup for the three ingredients. Not only is the measuring easy, when the oil is poured in first, it makes getting the sticky ingredients out of the cup easy too.


As for decorating the tops of the muffins, in the original, I tossed a few oats on top. I got to thinking about it, and that just doesn't make a lot of sense; there are no oats in these! A better option is either to sprinkle them with a little turbinado sugar, which is a coarse grained, unrefined sugar that gives a nice crust and sweet bite to the tops of the muffins, or to sprinkle a little bran on them. You can also leave them plain, but where's the fun in that? As darkly colored as these are, they can be a little difficult to determine when they are done. For these muffins, I always use a cake tester to be sure the muffins are done.


Updated Bran Muffins
Yield: 12 muffins

1/4 cup vegetable oil
1 TBS honey
3 TBS unsulphured molasses
1/2 tsp vanilla
2 eggs
2/3 cup buttermilk
1/2 cup wheat bran

1 cup whole wheat flour
1/2 tsp baking soda
1 1/2 tsp baking powder
1/4 tsp cinnamon
1/4 cup toasted wheat germ
1 1/4 cup date sugar, sifted to remove lumps

Preheat oven to 375 degrees F. In a medium bowl, mix the first seven ingredients. Mix the bran in with the wet ingredients and let the mixture sit for 15-20 minutes so the bran can hydrate. In a small bowl, mix together the dry ingredients together. Once the bran has swelled and thickened the wet mixture, you can mix the dry ingredients into it. Spoon into lined muffin cups. A #16 disher slightly overfull will make 12 evenly sized muffins. Sprinkle the tops with either bran or turbinado sugar. Bake at 375 degrees for 18-20 minutes, until a tester comes out clean. Let cool slightly before serving. Keeps well in the freezer. Reheat in the microwave to enjoy at your leisure.


Sunday, January 12, 2014

Spiced Banana Bread


Well, hello, stranger! Long time no see.

Hard to believe that another holiday season has careened by. Fortunately, it was a lovely one. We finally are in a northern (read: cold and snowy) clime, which always helps get me in the holiday spirit. We live within a couple hours of my husband's side of the family and we received visits from multiple members of my side. My mom came and spent Christmas with us! It's been a number of years since we were together on Christmas day itself... and this year was extra special! It was my boy's first Christmas. Needless to say, there's been a lot of joy around here.

Speaking of the boy! He still keeps me on my toes. He's such a good guy though; the vast majority of the time, he plays really well and lets me get some things done. Naps are still tricky... and - apparently - cyclical in nature. We have a week or so of really good naps and then a few weeks of middling naps and then a week of horrible naps. Can you guess which part of the cycle we're in today?

He's also become a really good eater. I should post a before and after photo sometime of his meal plate. Not only does he go for volume, but he loves a wide variety of foods. While there are days when he is or isn't in the mood for one food or another, I cannot think of a single food he just won't ever touch. This week I made falafel and tabbouleh and he ate both! While he takes after his father and me, being a major carnivore, he also likes his carbs. I originally came up with this recipe when he first started eating because I wanted a bread that was easy to chew, tasted somewhat sweet without a huge amount of added sugar, and was very low in salt.

The funny thing is, while he eats it fine, I've come to really love the stuff! I make it all the time. It tastes sweet without being cloying (my big beef with most store-bought banana flavored baked goods) and has a satisfying twist of spice. I also love how easy it is to make. You can simply mix it together by hand in a bowl. No creaming or beating required.

Spiced Banana Bread
Adapted from The Recipe Encyclopedia, 1995
Yield: one 4x8 loaf

1 1/2 cup all purpose flour
1 tsp pumpkin pie spice (see note below to mix your own)
1 tsp baking powder
1/4 tsp baking soda
5 TBS unsalted butter, melted and cooled
1/3 cup sugar
2 eggs
1/3 cup plain yogurt
3/4 cup mashed, ripe bananas

Preheat the oven to 350 degrees F. Prepare a 4x8 inch loaf pan by spraying with oil and lining with a parchment strip, if available (this simply ensures your loaf comes out intact - if you have a really good non-stick pan, this step is optional). In a medium bowl, stir together the flour, spice, baking powder, and baking soda.

In a separate, smaller bowl, mix together the remaining ingredients. Add to the dry mixture and stir just until combined. Transfer to the prepared pan and bake for 45-50 minutes or until a tester comes out clean. Cool for five minutes before removing from pan to cool completely on a rack. Store in an air tight container either at room temperature or the refrigerator for up to one week. Baked bread can also be frozen for up to six months.

NOTE: You can make your own pumpkin pie spice by mixing 2 TBS cinnamon, 2 tsp nutmeg, 1 tsp ginger, and 1 tsp cloves. The leftover spice can be saved for use in other recipes. You can also use regular, salted butter, the resulting loaf just won't be as low in sodium.

Sunday, October 27, 2013

Puff Pastry Pumpkins


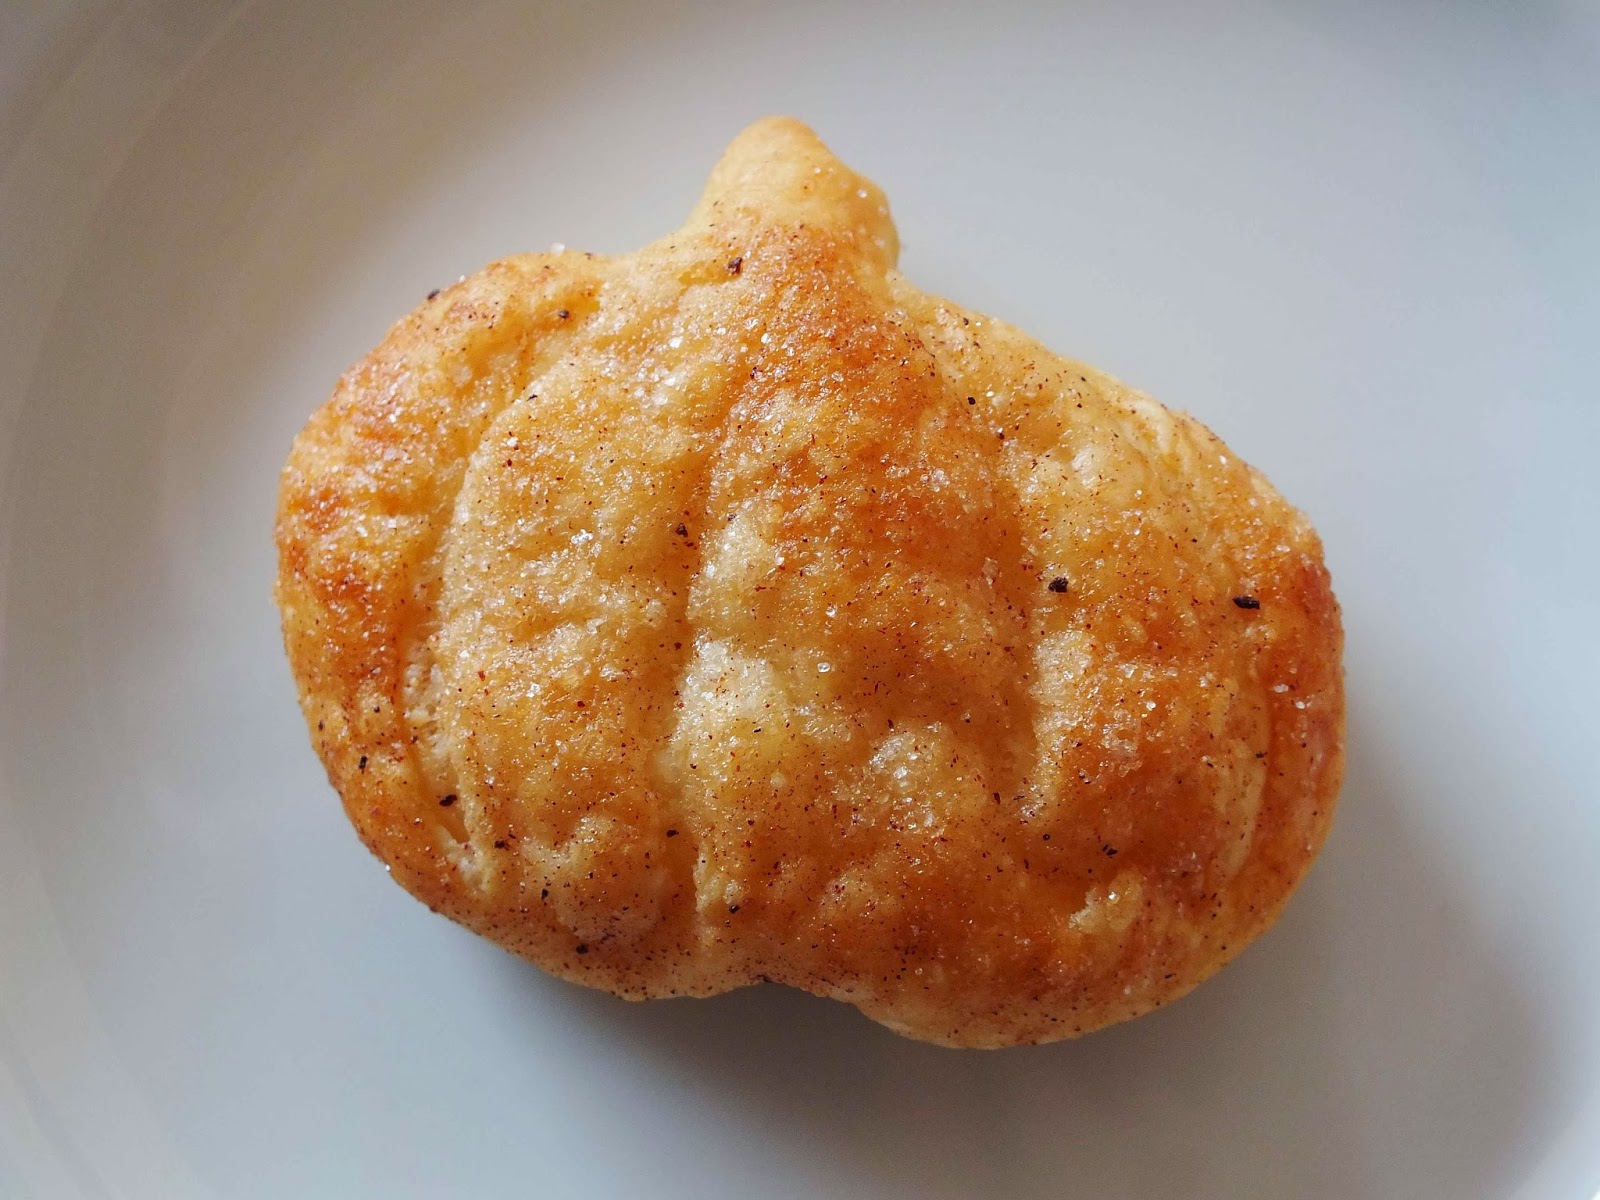
If you're looking for a super cute little treat for the impending "harvest" holidays, look no further. These are easy to make since they use frozen puff pastry from your local grocery store. I love puff pastry. There's something about that puffed up, crispy, buttery pastry that just knocks my socks off. In this case, they have a hint of fall wrapped up in them with pumpkin pie spice and a little pumpkin or sweet potato.

Thaw out the puff pastry overnight in the refrigerator and then lay it out on a lightly floured counter. Preheat the oven to 400 degrees F. Using a pumpkin cookie cutter, cut out as many pumpkins as you can. A medium sized cutter is best. Too small and they won't puff right. Too big and they'll have ungainly seams in the middle from where the dough is folded. Place the cut outs on a sheet pan lined with parchment.


Cutting lines into the face of the pumpkin is what gives them that ribbed pumpkin look. Be careful, though. Here, I used a paring knife. See how the knife dragged through the dough? Not good. Additionally, I didn't cut the dough deeply enough. Also not good.


Here's what this poor cutting job turned out like... and this was the good one of the batch. So how do you get good cuts?


Use a razor! Here you can see how the dough is sharply cut. What you can't see is that I cut much more deeply that I did in the example above, about two thirds of the way through the dough. Be careful not to cut completely through, but go deep. If you're still having problems getting the dough to cut nicely, your dough has probably warmed up too much. Put the pan in the refrigerator for thirty minutes and then try cutting again.


Mix together the coating ingredients and use a pastry brush to apply. You can use either pumpkin or sweet potato puree. It only takes one tablespoon of puree per batch of eighteen cut outs. You can steal this amount from your pie or other holiday recipe without making much of an issue in most cases. Here, I used some homemade sweet potato puree that I had made for my baby.


Brush the top of each cut out with some of the coating. I think it looks best not to coat the stem of the cut out... it gives a little contrast to the finished product that I like.


Sprinkle each one with a bit of granulated sugar. You can forgo this part and make savory puffs, but - to be honest - the finished product doesn't have an overwhelming flavor (coating them too thickly keeps them from puffing and crisping properly) and that sweet touch on the tongue helps to bring out the flavor of the puree and spices.


Bake the puffs in a 400 degree F oven for 10-15 minutes or until puffed and golden. Be careful not to take them out of the oven too early or the texture of the finished product once they are cool will be disappointing. As soon as they come out of the oven, transfer them to a cooling rack so that they can fully crisp. Hey! Don't waste those scraps! I threw them on a separate sheet and sprinkled sugar on them. They were tasty! Don't forget to take the cooks commission!


Puff Pastry Pumpkins
Yield: 18 puffs

1 box of frozen puff pastry, thawed
2 TBS melted butter
1 TBS pumpkin or sweet potato puree
1/4 tsp pumpkin pie spice
granulated sugar for sprinkling

Preheat oven to 400 degrees F. Cut out pumpkin shapes from the puff pastry using a 2 1/2 inch (approximately) cookie cutter. Place cut outs on a parchment lined baking sheet. Score each cut out with a razor to make the ribs of the pumpkin. Cut about two thirds of the way through the dough. If the dough is not cutting well despite using a very sharp implement, chill the dough for thirty minutes.

Mix together the butter, puree, and pumpkin pie spice.  You can make your own pumpkin pie spice if necessary by mixing 3 TBS ground cinnamon, 3 tsp ground nutmeg, 1 1/2 tsp ground ginger, and 1 1/2 tsp ground cloves. Brush each cut out with the coating. Lastly, sprinkle each cut out with sugar. Bake in a 400 degree F oven for 10-15 minutes, until the pastry s puffed and nicely golden. Be sure not to under bake to insure your cooled pumpkins will be flaky and crispy. Transfer pumpkins to a cooking rack as soon as they come out of the oven. They can be stored in an air tight container for a few days, but they taste best fresh.

Tuesday, August 20, 2013

Oatmeal Cookies


It's great being within a couple hour drive right now of my husband's family. It's especially nice to be near family during our boy's first year of life. My husband's mother is ecstatic to be able to see her new grandson so often.

A month ago or so, I was down visiting for the day and my husband's grandmother mentioned, in passing, that she loves oatmeal cookies. Since I always enjoy surprising folks with their favorite baked goods, I filed that little nugget of knowledge away. Last week, I decided to make and send her some cookies. Operation Oatmeal Cookie was a great success. It also reminded me of just how good an oatmeal cookie can be.

I made Grandma's cookies with raisins, and they were really good, but when I decided to make another batch for our family, I decided that I would make them with chocolate chips. I think I might like them better than traditional chocolate chip cookies. They're chock full of tasty, chewy oats and have a nice crisp texture. I love the hint of spice from the cinnamon and nutmeg. These are really good cookies!

Oatmeal Cookies
Yield: 3 dozen #40 disher cookies (1 2/3 TBS each)

1 cup brown sugar
1/2 cup sugar
3/4 cup shortening
1/4 cup water
1 egg
1 tsp vanilla

1 cup all purpose flour
1/2 tsp soda
1/2 tsp salt
1/4 tsp cinnamon
1/8 tsp nutmeg

3 cups old fashioned oats
1 cup raisins or 1 1/2 cups chocolate chips (optional)

Preheat the oven to 350 degrees F. Cream together the sugars and the shortening. Beat in the water, egg, and vanilla. In a separate bowl, mix together the flour, soda, salt, and spices. Add the flour mixture to the sugar and egg mixture. Then stir in the oats and raisins or chocolate chips. Spoon onto parchment lined baking sheets (or greased sheets). Bake until lightly golden, about 15 minutes. Cool for five minutes on the sheet pan before transferring to a cooling rack to cool completely.

Friday, May 17, 2013

Easy Peasy Blueberry Tart


I had a ball of leftover pie crust dough last week. It had been in the refrigerator for a bit and I knew I needed to do something with it or I'd end up having to throw it away. I wanted to be able to use all of the dough and not have any scraps to mess with. I was also looking for quick and simple... hmmmm. What to do? I opened the freezer, as I am wont to do these days, trying to find things I can clean out of there in preparation for our impending move at the end of this month (yes, I know, we just moved here, right?). I saw a bag of frozen blueberries and knew that my crust was gonna marry those blueberries.

I decided on a free-form tart. I rolled the dough out into a roughly circular shape. In a bowl, I mixed the frozen berries (about 2 cups) with 2 TBS of cornstarch, a 1/4 cup of sugar, a teaspoon of lemon zest, and a few shavings of fresh nutmeg. I stirred that all together and plopped it in middle of the crust.

I folded up the edges and made an egg wash. I brushed all exposed crust surfaces so that they might develop a beautiful golden luster in the oven. Lastly, I sprinkled toasted sliced almonds and sanding sugar on the top of the crust. I baked it at 400 F until the crust was nice and golden (I think it took about 35 minutes). It was delicious! So quick and easy!

Saturday, March 16, 2013

Cinnamon Rolls - Mastered!


My in-laws showed up yesterday to come meet their newest grandson. I feel fortunate to have such a great relationship with my in-laws such that I am excited for their visit. It helps that my mother-in-law is great with babies and this has allowed me to get a few things done around here. To celebrate the first morning of their visit, I decided to make a pan of cinnamon rolls.

Now, I posted my recipe for cinnamon rolls a long time ago. You can see that post here. However, while the basic recipe has remained the same, there have been a number of changes that have turned these rolls from good to super-freaking fantastic. I used to have a hard time passing by a Cinnabon when out and about, but now it's not a problem. I like these rolls better! It's amazing what a difference a few subtle changes can make. You may want to read through my last post first if you are not familiar with the general gist of how cinnamon rolls are made. In this posting, I will focus on the changes to the recipe and then will re-post the recipe in full at the end in case you want to print it out.

The first major change was in the filling. I'm not sure why it makes such a big difference, but changing from regular sugar to brown sugar completely changes the way the filling melts. If you mix the butter and sugar together first into a paste, along with the cinnamon, it melts even better and makes a nice gooey filling. Here you can see the dough rolled out with the filling spread out on it.


The nest major change was the way that I rolled the dough. If you look at my pictures in my original post, you'll notice just how thick the dough was when I rolled it up. That resulted in rolls that were very bread-y without a lot of that delicious filling. I now roll the dough almost as thin as I can manage. I shoot for no thicker than one quarter of an inch now. In my experience, it is imperative to have the dough cold to manage this. That's why I put the dough in the refrigerator for a second proofing. Roll the dough up and then use a serrated blade to cut perfect rolls.


Compare this photo with the similar one in the previous cinnamon roll post and you can see just how many more rolls you get in the dough when it is rolled thinly. It leads to a much better balance of dough and cinnamon/sugar filling.


You can see here how that filling melts so much better than in my previous recipe. The last change that I made to the recipe was in the icing. Adding a little cream cheese to the icing, with that little bit of tang it imparts, is absolutely divine and really puts these rolls over the top. My goodness, these things are delicious! Be sure to have a plan for all twelve rolls or you may find them all in your own tummy!


Cinnamon Rolls - Mastered!
Yield: 12 rolls

2 1/4 tsp instant yeast
1 1/4 cup warm milk
1/4 cup sugar
1/4 cup shortening
1 tsp table salt
3 whole eggs
4 to 4 1/2 cups flour

1/2 cup butter (one stick)
1 cup brown sugar
4 TBS cinnamon

4 ounces softened cream cheese
2 cups powdered sugar
1-2 TBS milk

Mix the first 6 ingredients together in the bowl of a stand mixer (through the eggs). Add two cups of the flour. Mix on medium with a paddle for 3 minutes. Add the remaining 2 to 2 1/2 cups flour. The amount of flour can vary depending on the humidity of your kitchen. You are looking for a dough that is still somewhat soft and sticky. It will become more workable after it rises and is chilled.

Place the dough in a grease bowl, covered with plastic wrap, until it is doubled. Knock down the dough and refrigerate for 2 hours (and up to 24 hours). Turn the cold dough out onto a floured counter. Roll out into a rectangle as thin as the dough will reasonably allow; shoot for less than 1/4 of an inch. The rectangle will be approximately 20 inches by 12 inches. Beat together the softened butter, brown sugar, and cinnamon. Heat gently in the microwave if it is not soft enough to spread on the dough. Spread the mixture evenly on the dough. Roll up tightly and slice, using a serrated blade, into twelve rolls. I trim off the ends before slicing so each roll has a nice look to it.

Place the rolls in a greased 9x13 inch pan. They also fit nicely four to a pan in 8" disposable aluminum pans if you want tot gift them. Cover the pan with plastic wrap and allow the rolls to rise for 30 minutes or until slightly puffy. Preheat the oven to 350 degrees F. Remove the plastic wrap and bake rolls for 25 minutes or until baked through and gently golden. Remove rolls from the oven and cool for 15 minutes before icing.

Beat the cream cheese, powdered sugar, and milk together until it forms a smooth icing. It will be too thick to pour. Spread the icing over the rolls. Serve immediately or store in an airtight container and reheat in the microwave before serving.

7/31/13: I have altered the amounts for the filling slightly. I decided, if your going to go all out and have a cinnamon roll, it might as well be the best roll it can be! I upped the amount of brown sugar slightly (from 3/4 cup to one) and increased the amount of cinnamon a bit (from 3 to 4 TBS). I just made these again this weekend. Sooooo fabulous!!!

Sunday, December 16, 2012

Refrigerator Dinner Rolls

You're going to love this recipe! If you've been intimidated by making dinner rolls from scratch, be afraid no longer! These are so easy to mix, so easy to shape, and so easy to bake. And the best part? They taste phenomenal!!!!! These rolls have a lovely flavor, are light and soft, and are the perfect vehicle for sopping up whatever gravy or juices you've got going on in your meal.

This recipe makes a good sized batch of rolls, somewhere in the neighborhood of three dozen. The other nice thing about the dough is that once it is made, it keeps fairly well. You can leave it in the refrigerator up to three days or store it in the freezer for up to a month. If you freeze the dough, thaw it completely in the refrigerator before proceeding. This is a fairly soft dough that can be mixed by hand fairly easily, but if you have a stand mixer, it is the easiest dough ever to mix.

Refrigerator Dinner Rolls
Yield: approx. 3 dozen rolls

4 1/2 tsp instant yeast (or 2 pkg active dry yeast)
1/3 cup sugar
2 cups warm water
5 1/2-6 1/2 cups of flour, divided
2 tsp table salt
1 whole egg
1/3 cup shortening, melted and cooled slightly
egg yolk wash (one yolk and 1 TBS water) optional

If using active dry yeast, mix the yeast, water, and sugar together first until it become frothy. If using instant, you can simply mix the ingredients together. Add 4 cups of the flour to the yeast, water, and sugar. Stir together and then add the salt, egg, and shortening. Add as much of the remaining flour as is necessary to make a soft dough. Knead a couple of minutes until the dough is smooth. It will still be sticky at this point, but once it rises in the refrigerator, it will be a nice dough to handle.

Place the mixed dough in a greased bowl, at least 4 quarts in size. Cover the bowl and place in the refrigerator for two hours or until doubled in size. If you want to store the dough at this point, punch it down and put it back in the refrigerator or in the freezer. If you are ready to make rolls, dump the dough out and punch it down. Cut the dough into strips to make shaping easier. Cut the strips into small pieces such that when you roll each piece into a sphere it's about 3/4 of an inch in diameter. Spray a muffin tin with oil and place three of the dough balls in each cup. Cover with plastic wrap and let rise in a warm place until double, about an hour. Brush the tops with egg wash and bake at 400F for about 12 minutes or until nice and golden. Remove from the oven and let cool a few minutes before removing from tins.


Thursday, December 13, 2012

Chocolate Pie


We had a guest for dinner last night; it was someone we hadn't seen in almost ten years! It was great to catch up and also a great excuse to have some fun in the kitchen. I made a shepherd's pie with chicken, salad, and some rolls (which I'll share with you in the next few days). For dessert, well, you know that's where my true passion lies, I wanted to go all out; I absolutely love baking!

I decided to go with making a chocolate pie. First, nearly everyone loves chocolate pudding, so I feel pretty confident that no one will turn down a chocolate pie when made. Secondly, I like the fact that I can make the  whole thing in advance... like a whole day in advance. It's perfect!

This is another one of those "put together" recipes that uses a handful of other recipes that I have already posted to end up with a fabulous new creation.

The first step is to make the crust. I used my new flaky pie crust recipe that I posted yesterday, but you could go with a traditional crust as well, or - gasp - with a store bought crust. (Don't worry, I won't hold it against you if you do use a store bought crust. I don't use them because I don't like the flavor, but if they taste good to you, then why wouldn't you?). Blind bake the empty pie shell (pricked with a fork, lined with foil, and filled with pie weights or dried beans) at 425 degrees for ten minutes. Remove the foil and weights and continue baking until the crust is beautiful and golden. Let the pie shell cool completely at room temperature.

The next component is the filling. I started by making my chocolate pudding recipe. Once the pudding was thickened and off the heat, I added a few extra things. The first thing was about a half cup of bittersweet chocolate chips. I wanted to up the ante on the chocolate-y-ness of this filling. I also added about half a teaspoon of coffee liqueur. Both of these items are completely optional. Fiddle with it at this point as you see fit. You could add mint extract for a mint pie or hazelnut liqueur for a nutty essence. The only change that I made that I strongly recommend making is the addition of some gelatin. This pudding sets up pretty well, but for perfectly cut pieces, it really could use a little added stability. To do this, soften one teaspoon of gelatin in two tablespoons of cold milk. Let sit for 3-5 minutes. When the pudding first comes off the heat, stir in the milk/gelatin mixture. That's all there is to it, but it makes a huge difference. Pour the pudding into a bowl and place plastic wrap directly on the surface to prevent a skin from forming. Let the pudding cool completely but not become cold (you don't want it to start setting up yet). Pour the cooled pudding into the pie shell and smooth the top. Cooling the pudding is important for two reasons: first, it keeps the crust from getting soggy, and second, at this point you don't have to worry about a nasty skin from forming. Now you can put the pie in the refrigerator uncovered without any problems.

The last part of this process is the whipped cream edge. Because I wanted to be able to make everything in advance and then have any leftovers keep beautifully (there were only three of us, after all), I used stabilized whipped cream. Follow the recipe exactly and pipe the whipped cream onto the pie in any design you choose. I usually use a rope type border around the edge. I then sprinkled some chocolate shavings on the whipped cream for contrast. Refrigerate for at least a few hours before serving! Cuts beautifully and tastes wonderful!

*Per a commenter's request, I have written up my pudding recipe with the pie filling additions here. As I was writing the recipe, I remembered that I did also add a wee bit of sugar to balance the addition of the chocolate. It wasn't a lot, and you can certainly add some to taste if you find it necessary.*

Chocolate Pudding for Pie
Yield: enough for one pie

1/3 cup sugar
1/3 cup cocoa powder
1/4 tsp salt
3 TBS cornstarch
2 1/2 cups milk
1 tsp vanilla extract

1/4 cup bittersweet chocolate chips (optional)
1/2 tsp coffee liqueur (optional)
additional sugar to taste, if necessary
1 tsp unflavored gelatin softened in 2 TBS cold milk

Sift the sugar, cocoa powder, salt, and cornstarch into a medium sauce pan. Mix the milk and vanilla. Pour just enough of the milk into the dry ingredients to make a loose paste. Once the dry ingredients are all moistened, pour in the rest of the milk and whisk until well mixed.

Cook over medium-high heat, whisking occasionally, until the pudding just about reaches a boil and is thick and smooth. Remove from the heat and add the chocolate chips and liqueur, if using. Stir to mix. Add in the softened gelatin/milk mixture and stir again until well mixed and smooth. Pour into a bowl and place plastic wrap directly on the top of the pudding to prevent a skin from forming. Cool in the refrigerator until cool but not cold (and not set). Once cool, stir and then pour into pie shell, smoothing the top. Pie can now be refrigerated uncovered until served. Pipe a border of stabilized whipped cream, if desired. 


Wednesday, December 12, 2012

Super Flaky Tender Pie Crust


I know I have already posted a recipe and tutorial on pie crust, but this one is just so phenomenal, I can't not share it with you. Look at how flaky that pie crust is! It's almost like puff pastry. I've been messing with this recipe for a little over a year now, but have finally gone a few times making it without making any adjustments to the recipe.

You use the exact same technique as I outline in my Pie Crust 101 post and video. It's amazing how just a few alterations in the recipe make such a huge difference. A pleasing bonus is that the dough is easier to work with when rolling because using half cake flour reduces the amount of gluten in the dough. Give this dough a try in your next pie crust application - I promise you will not be disappointed!

Super Flaky Tender Pie Crust
Yield: enough for two thin single crusts or one thick crust with some extra

1 cup all purpose flour
1 cup cake flour
1/2 tsp table salt
11 TBS chilled butter cut into small pieces
5-6 TBS chilled water
1 TBS white vinegar

I think making crust is easiest in a food processor, but you can certainly mix it by hand. Mix together the flours and salt. Cut in the butter until the mixture resembles coarse crumbs with some pea sized pieces of butter remaining. Mix the water and vinegar together and then add to the mixture while pulsing in the food processor or add all but the last TBS and then mix by hand. Hold back the last TBS of water regardless of your method until you are sure you need it. The ambient humidity will impact how much water is required to allow the dough to come together into a ball. Pulse just until the dough starts to clump. Dump out onto the counter and shape into a disk of dough about 6 inches across. Wrap in plastic wrap and chill 30-60 minutes before rolling.

Wednesday, June 27, 2012

Lemon Cornmeal Crisps

I am so excited to finally share this recipe with you! A while ago (oh, geeze, can it really have been over two years ago!?!), I shared a recipe with you for lemon cornmeal cookies. In that post, I detailed how I had been fiddling with two different recipes. The recipe I previously posted makes a light, tender, lemony cookie that is sweet and - most definitely - a cookie. The other recipe, which I am sharing today, is a cookie-like crisp that is less sweet, more crispy, and has some resemblance to a thin, crispy cracker. Although the basic flavors of the two are the same, the end result is quite different, and I absolutely adore them both!

I am trying to come up with the best way to describe the texture of these lemon cornmeal crisps. If you look at the following picture, showing the top and bottom of the crisps, you can see they almost look like really thick tuile cookies. And in a way, they fit that bill. These crisps are snappy and delicious!

I mix the dough in a food processor. The procedure for making this dough is very similar to making pie crust. I love the wonderful texture and flavor that cornmeal adds!

After mixing the dry ingredients (including the sugar), add the cold butter (cut into cubes) and the lemon zest. Pulse just until the mixture resembles coarse crumbs.

Mix the buttermilk and vanilla together and then add to the processor, only working the dough until it just starts to pull together. A word of caution: this dough is quite a bit stickier than regular pie crust due to the high sugar content. If you dampen your hands before handling it, it helps a bit.

Dump the dough onto the counter and shape into a disk. Wrap in plastic wrap and refrigerate for 6 to 24 hours. Longer tends to be better in the case of this dough. Again, it's a bit sticky, but as it sits in the refrigerator, the cornmeal hydrates and results in a less sticky dough. When you are ready to cut the cookies, cut the dough into four sections so you can work with a small amount at a time. Keep the remaining parts refrigerated until you are ready for them.

Prepare sheet trays with parchment and preheat the oven to 375° F. The crisps don't spread too much, so you can place them fairly close together (closer even than I show in this picture).

The big thing is to roll them thin!! Again, this dough can be a little tricky to work with, but I promise the end result is worth it. Just roll them as thinly as you can while still having the dough maintain its integrity.

The last step, if you're so inclined, is to sprinkle the tops with sanding sugar. I really like the added crunch this adds to the crisp, but it is entirely optional. I also like how it adds a little sparkle to the crisps. In the photo below, the crisp on the left is naked while the one on the right was sprinkled with sanding sugar.

Bake for 12-14 minutes, or until the edges are nicely golden. The crisps will not brown evenly and they will burn on the edges before the centers become golden, so keep an eye on them. Like any cookie this thin, once they start to brown at all, keep a close eye on them; they can go from "not yet" to "oh no!" in a matter of moments. Let the cookies cool briefly on the sheet and then transfer to a cooling rack to finish cooling completely. Strangely enough, I find I prefer these cookies after they have had a chance to sit a few days. This can be a wonderful thing as they make great gifts that can be made ahead of time.

Lemon Cornmeal Crisps
Yield: approx 60 - 2 1/2 inch rounds

1 3/4 cup flour
3/4 cup granulated sugar
1/3 cup cornmeal
1/4 tsp salt
3/4 cup cold butter, cut into small cubes
zest of one lemon
1/2 cup buttermilk
1 tsp vanilla
sanding sugar (optional)

In a food processor, pulse together the first four ingredients. Add the butter and lemon zest and pulse until the mixture resembles coarse crumbs. Mix together the buttermilk and vanilla and add to the processor, mixing only until the dough starts to come together. Dump the dough out and shape it into a disk. Wrap the disk in plastic wrap and refrigerate for 6 to 24 hours. For easier dough handling, longer refrigeration is better.

When ready to bake, cut the dough disk into four pieces. Rolling one piece at a time, keep the remainder refrigerated until ready to use. Preheat the oven to 375° F. Roll the dough out as thinly as you can. This dough can be a bit tricky and you will want to use plenty of flour to keep it manageable. I cut mine into 2 1/2 inch rounds, but you can cut them in any shape you desire. Sprinkle with sanding sugar if you want a shiny, crispy top to the crisps. Bake 12-14 minutes, or until the crisps are nicely golden around the edges. They will not brown evenly; the edges will become too done before the center turns golden, so keep an eye on them. Cool slightly on the baking sheet before transferring to a cooling rack to cool completely. Store in an air tight container for up to ten days. These crisps actually taste best two or three days after they are baked.

Saturday, February 4, 2012

Vanilla Cake

I am usually all about a chocolate cake. As I've mentioned previously, growing up, there was only one cake for us. I talked about it here. But, you know, sometimes, chocolate isn't what you're looking for (Really!). And sometimes, maybe, you want a change of pace or to offer a variety. I have a friend who is getting ready for her son's birthday. She made cupcakes out of my chocolate cake batter and loved them. Then she asked me if I had any good vanilla cake recipes. I did not, so I told her I would need to get back to her.

Six batches of cake and four pounds later, I think I have a recipe I feel good about sharing! It has a very nice crumb, and a sweet, subtle vanilla flavor. It makes great cupcakes or a layer cake. The other great thing about this cake is how easy it is to make. You just throw all the ingredients into a bowl and beat them together! The cupcakes above and below are this recipe with a nice butter cream frosting. I made a layer cake but took it to a function and felt a little too weird about trying to take a picture of a slice after it was cut.

There are two things to be careful of in making this recipe. The first is to be sure to use cake flour. Because this cake is beaten after the flour is mixed, you can't use all purpose flour. All purpose flour has way too much gluten in it; if you beat it the way you beat this recipe, you'll end up with chewy goo. That's no good! So stick with the cake flour. Secondly, don't over-bake the cake. Start testing with a cake tester a few minutes early and take it out of the oven the second that tester comes out clean. I've found if it is over-baked, it can come out a little on the dry side. It's still tasty, just not as luscious as it should be.

Vanilla Cake
Yield: 2 dozen cupcakes or 2 9" layers
Adapted from The Good Housekeeping Cookbook

2 1/4 cup cake flour
1 1/2 cup sugar
3/4 cup room temperature butter
3/4 cup milk
3 eggs
2 1/2 tsp baking powder
3/4 tsp table salt
1 tsp vanilla extract

Preheat the oven to 375 F. Line either 24 standard sized muffin cups with papers or oil and cut a parchment round to fit the bottom of two 9" round cake pans. Measure all ingredients together into a large bowl. Beat with an electric or stand mixer for 3-5 minutes, until the batter is smooth and thick. If making cupcakes, a size 16 disher is the perfect portion size. Otherwise, spoon batter in until the cups are about 2/3 full. If making cakes, divide the batter evenly between the two pans. Bake cupcakes for 20-25 minutes, until puffed and just slightly golden and a tester comes out clean. Bake cakes 25-30 minutes, also until puffed, slightly golden, and a tester comes out clean. Let cool in the pans for about 10 minutes and then remove from pans to cool completely before frosting.