 It's hard to believe that I am thinking about food at this moment... considering the fact that I ate so much today that I feel like I might explode. But, nonetheless, I have some down time now that everyone is in a food stupor to post something I've been meaning to share for a few months now.
I absolutely adore making these cute little chocolate bowls. They are so easy and fun and they never cease to amaze. Because I always make and consume them within the same day, I don't worry about tempering the chocolate. I just try to be sure that I do not let my chocolate get too hot in my double boiler. The risk there is that too high a temperature can cause the chocolate to end up not hardening at all. Not a good thing, obviously.
Melt enough semi-sweet chocolate in a bowl over some lightly simmering water. Prepare a sheet pan with some parchment, wax paper, or a Silpat. The first step is to make a small puddle of chocolate that will become the base of your bowl. Keep the puddle somewhat small, you don't want it oozing all over the place!
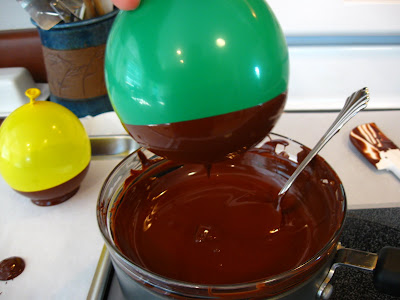
 Then inflate some small balloons. I use the size that you typically use to make water balloons. Obviously, you can make your bowls whatever size you want, but if you want to make small bowls, you want to use small balloons. Under-inflated balloons tend not to have a smooth bottom on them, which can deform your bowl. Dip the balloon into the chocolate. I usually dip a couple of times to make sure I have a good, solid coat. Too thin a coat becomes a nightmare when you go to remove the balloons later. You can dip the balloons with one even motion for a straight edged bowl...
 Or dip them at an angle four to five times around the balloon to form a scalloped edge that is very pretty.
 Place the dipped balloon into the puddle you previously poured. Usually, they stand on their own fairly well, but if you get a troublesome one, just hold it for a minute or two until the chocolate firms up a bit. (It's best to work with chocolate in a somewhat cool room).
When making bowls, always do a few extra because it is not unheard of for one or two to break one while removing the balloon. Place the tray in the refrigerator to harden for 30-60 minutes. To remove the balloon, be ready to work quickly! If the chocolate softens just a little too much, I find it makes removing the balloon more challenging. Take a straight pin and - pinching the top of the balloon - carefully poke a hole in it. Slowly let the air out. As the balloon deflates, you can start to peel it away from the bowl. Deflating the balloon too rapidly will usually result in a broken bowl, so go easy! Once the balloons are removed, chances are you'll want to keep them in the refrigerator. If you'd rather have bowls that are more shelf stable and can be made ahead of time, you can do that, you'll just have to be sure to temper the chocolate then. Serve with ice cream or mouse... or anything that goes well with chocolate and is served in a bowl!


