I am now blogging new recipes on my farm website.

Cooking from Scratch is on facebook! Click here to check it out!

Saturday, April 4, 2020

Quick Chicken Noodle Soup


I love to make really involved, complicated things sometimes. I enjoy experimenting and trying new recipes and techniques. But I don't want to do it all the time. Life is busy and a lot of the time, I just need to put healthy, wholesome food on the table. These days, it doesn't hurt if the ingredient list doesn't include a bunch of items I need to run to the store for, since I'm trying to go two weeks between shopping trips. 

This recipe uses canned chicken, but you could easily substitute cooked, shredded chicken. I like to use the canned stuff because I always have it on hand and on those evenings when I'm suddenly realizing that dinnertime is 30 minutes away and I haven't planned anything, let alone thawed anything out, I'm good to go. I always have onion, carrot, and celery in the fridge since they last so long.

My family comes from Pennsylvania Dutch country and chicken corn soup was a staple in my house growing up. This is a quick and easy nod to that childhood favorite. I use the thick, kluski noodles here, but you could really use any noodle you have on hand. And if the idea of corn is just too weird to you in a chicken soup, you can always leave it out, but I urge you to try it. Especially if you use really high quality sweet corn, there is nothing like that crunchy burst of sweetness to make this soup come alive. Did I mention it takes only 30 minutes or so to make?


The recipe starts with a standard mirepoix, which is a French word referring to the trinity of onion, celery, and carrot. I like to cut them up really small. For one, they cook more quickly that way, but it also means you get the chance for more flavors in each bite. If you like it really chunky, by all means, make them chunky!


Once you saute the mirepoix until they are a bit soft, the rest comes together very quickly. Add the broth, seasonings, noodles, corn, and chicken and cook until the noodles are tender. That's it! If you want to make it even more hearty, you can always stir in a whisked egg, stirring as you add it to make little wisps of eggy goodness in your soup. And, maybe I'm weird, as I've never heard anyone else eating it this way, but my favorite way to serve any chicken noodle soup is with shredded cheddar cheese. It's amazing!


Quick Chicken Noodle Soup
Yield: 4 servings

1/3 cup minced carrots
1/2 cup minced celery
1/2 cup minced onions
1 TBS oil
pinch salt

4 cups chicken broth
1/2 cup frozen sweet corn kernels
1 cup kluski egg noodles
1/4 tsp ground sage
1/8 tsp ground thyme
1/8 tsp ground rosemary
1/8 tsp ground bay leaf
1 10oz (ish) can chicken breast meat (or 1 1/2 cup cooked chicken), chopped
salt and pepper to taste
1 whisked egg, stirred in at the end, optional

Heat a large sauce pan or small stock pot over medium heat. Add the oil and vegetables and a pinch of salt. Cook, stirring regularly, until they are becoming soft and the onions are translucent. Reduce heat as necessary to keep them from browning. 

Add the remaining ingredients (except the egg, if using and the salt and pepper), and bring to a gentle boil. Cook until the noodles are tender and the carrots are pleasantly soft. Add salt and pepper to taste. Remove from the heat. Stir in the whisked egg, if desired, stirring until the egg is distributed throughout the soup and is cooked through (the egg white will turn white). 


Sunday, March 29, 2020

Spinach and Feta Breakfast Casserole


Looking for something new and different for breakfast - or dinner... who doesn't like a good breakfast for dinner? Either way - look no more! This dish is so easy to throw together but has flavor galore. It's eggy. It's cheesy. It has crispy bits on top. It pretty much has everything in it you might want out of a breakfast casserole. OK. So it doesn't have sausage, but I promise, this thing has enough deliciousness, you'll never miss it.


Not that we're doing many potlucks right now, but this is a great potluck dish. As soon as we all get to leave our houses again, you'll want this one in your back pocket. Again, it is super easy to put together, fairly cheap to make, and is super tasty. I use fresh spinach because it is so tender, but you could use frozen as well. You would just need to thaw and drain it. This thing takes about five minutes to put together and then takes only about 30 minutes to bake. Enjoy!


Spinach and Feta Breakfast Casserole
Yield: 8 servings

8 slices fresh sandwich bread
8 eggs
1 1/4 cup whole milk
1 1/2 cup grated cheddar cheese
1/4 tsp onion powder
1/4 - 1/2 tsp salt
1/4 cup crumbled feta
1 1/2 cup coarsely chopped spinach

Preheat your oven to 350 degrees F. Grease a 9x13 glass baking dish. In a large bowl, lightly beat the eggs and milk together. Add the cheese, onion powder, salt, feta, and spinach. Stir thoroughly. Cut or tear the bread into roughly one inch cubes. Place in the egg mixture and stir to coat evenly. Pour into the dish and level. Bake for 30 minutes or until the top is golden brown and bubbly. Let cool 5-10 minutes before serving.


Saturday, September 1, 2018

Sweet Cherry Preserves

As gorgeous as I think that strawberry jam is, I sure have gotten sick of looking at it! Wow, has this year been a whopper. Major changes, but all for the good. We have purchased a farm and I am finally getting back to my agrarian roots. Besides all the physical labor of getting the farm how we want it, I have been spending an enormous amount of time brainstorming and researching what I want our farm to be and what I want to produce. I feel like I'm really getting close to a plan. Yay! But all of this has kept me very, very busy. 

One of the things we did this year was put in an orchard. I chose a wide variety of trees and sweet cherries definitely made the cut! When I saw the most beautiful Bings I've ever seen on ridiculous sale earlier this summer, I went a bit crazy and justified it as business research saying, "I'm going to have to come up with recipes for putting them up for when my trees start producing." Sadly, then, as the summer went on, it was becoming clear that there was something up with the cherry industry this year. I think they are suffering from the ramifications of the tariff fiasco and have been having to dump huge amounts of cherries into the domestic market. I feel badly for them! But I will also do my part to "help" them out by buying way more than my share! When I saw sweet cherries on sale for 99 cents a pound last week, I knew I had to put up more of this amazing preserve recipe I developed this year. It's very simple and very, very tasty. I will be gifting quite a bit of it at the holidays this year!


Is that not just gorgeous!?! And the flavor and texture are divine. I originally thought it'd be great on ice cream or used in lemonade, etc., but it turns out I've mostly just been eating it straight out of the jar. 


As far as canning goes, this recipe is pretty simple. the most time consuming part is pitting the things. You can do it without any special tools or go whole hog and get a fancy contraption. I'm somewhere in between. I have this hand held pitter that came from Pampered Chef and I like it quite a bit. I can pit six to eight pounds in less than 30 minutes. 

Now days, when I develop a new canning recipe that requires pectin, I stick with Pomona's because it means that in the future I can scale the recipe to any amount of fruit I want. I've posted a couple of Pomona's recipes previously and if you aren't familiar with the stuff, I'd check out those posts, too. You don't use it quite the same way as regular pectin. My standard recipe uses eight cups of pitted cherry halves, but as long as you scale the recipe, you can make it with any amount of fruit that you have on hand. 


After you pit and halve the cherries, add the first batch of sugar and macerate the cherries overnight in the fridge. This helps to keep the fruit from floating in the jar, only an aesthetic issue, but one that irks me nonetheless. It also helps to bring out the cherry's delicious juice, helping to make a wonderful syrup for the cherries to swim in. 


When you are ready to can, be sure to have your water bath canner and jars ready. If you are new to canning, check out my Canning 101 post for more details on the process. Follow the Pomona's pectin process for when to add the different batches of sugar and it will come out perfectly! The only other detail I'll mention in detail is the optional citric acid ingredient in the recipe. Sometimes, cherries can be so sweet that when canned with sugar, they become cloying. The first two batches I made were naturally well balanced fruit and I only used the lemon juice. The last batch was made with almost overripe cherries and they needed some citric acid to balance the sweet. You can start with a 1/4 teaspoon and taste to decide how much they need. You can add the citric acid at any point in the process, so feel free to continue tasting to be sure they turn out just right. Go help those cherry growers and be prepared to be wowed!

Sweet Cherry Preserves
Yield: 8-9 cups

8 cups pitted and halved dark sweet cherries
1 cup sugar

Mix the fruit and sugar together and let macerate overnight in the refrigerator before proceeding.

1 cup sugar
1 1/2 tsp Pomona's pectin

Mix the sugar and pectin together thoroughly and set aside.

1/4 cup lemon juice
1/4 tsp citric acid (optional and to taste as needed for extra sweet cherries)
1/4 tsp canola oil (or butter, to prevent foaming)
2 tsp calcium water (provided with the Pomona's pectin)

In a large pan, add the macerated cherries, lemon juice, citric acid, if needed, canola oil, and calcium water. Heat over medium high heat until the mixture is at a roiling boil. Add the sugar/pectin mixture and stir thoroughly until the mixture returns to a hard boil. Boil, stirring continually, for one minute. Pour into prepared jars, leaving 1/4 inch of headspace. Process in a boiling water canner for 10 minutes for half-pints and 15 minutes for pints.


Saturday, May 13, 2017

Strawberry Jam


Well, goodness, it has been a long time! I've got no excuses; I just have been doing other things. But I still cook and I still love developing new recipes. Some day, I'll start posting all the wonderful concoctions I've come up with in the last couple years. 

One of the things I have been working on for years now is strawberry jam. I can't tell you how many batches I have made that I was so unhappy with I couldn't hardly even eat them. Firstly, I am a hardcore strawberry jam snob. I do not care for the taste of overly cooked strawberries, and most strawberry jams just don't taste fresh. They have a very dull color and are just not that tasty. You would almost have to pay me to eat store bought strawberry jam, for instance. I've mostly stuck with strawberry freezer jam in the last decade, but it's not great for gift giving, honestly. 

So I've been fiddling. My biggest hurdles were: color, fresh taste, and floating fruit. I am so excited to report that I have finally achieved success in all three categories. This jam is perfect. Absolutely perfect. And so easy to make. I use Pomona's pectin which means that I can scale it up or down to use the exact amount of strawberries I have on hand. If you are unfamiliar with Pomona's pectin, I highly recommend it! Since I discovered it last year, it has revolutionized my jam making. But, it's a bit different than traditional pectin, so if you aren't familiar with it, I urge you to read through my first Pomona pectin post which was for Peach Pie Jam.

The trick for keeping the fruit evenly distributed in the jam is to macerate the mashed strawberries in some of the sugar overnight. This allows the water in the strawberries to be partially replaced by sugar, making them a little closer in density to the syrupy jam they'll be sitting in. Look at these jars! The fruit is evenly distributed all the way to the bottom!! Yay!!


The benefit to taking care of the floating fruit problem before the fruit ever hits the pot is that you can cook the jam really fast and maintain that color and flavor quite well! I am suddenly sad that I only made a small batch. I think I might have to go back out to the strawberry fields this week!!

Strawberry Jam
Yield: approx 5 1/2-pints

4 cups hulled, finely chopped, and hand mashed strawberries
4 cups sugar, divided into 1/2, 1/2 c, and 3 c amounts
2 tsp Pomona's pectin (available on amazon and elsewhere)
2 tsp Calcium water (included with the Pomona's pectin)
1/4 tsp butter, as needed

Prepare your water bath canning gear. If you need instructions on this process, consult my Canning 101 page. Combine the strawberries and 1/2 cup of the sugar, stirring to mix thoroughly. Cover and refrigerate overnight, up to two days. When ready to make jam, add the strawberries to a minimum 3 qt pot. Add the calcium water and stir. Combine the pectin and 1/2 cup of the sugar; set aside. Bring the strawberries to a boil. Add the pectin/sugar mixture all at once and stir until the jam returns to a boil. Stir for another two minutes to allow all the pectin to dissolve. Add the butter as needed to reduce foaming. Add the last 3 cups of sugar and reduce the heat to a gentle simmer. Stir until the sugar is completely dissolved. Skim and foam and immediately ladle into prepared 1/2-pint jars. Allow 1/4 inch head space. Process for 10 minutes. Allow to sit in the water bath off the heat for five minutes after processing to prevent oozing. Let cool to room temperature before removing bands to dry them for storage.

NOTE 1: Here's another thing I love about Pomona's. Would you rather have a jam that has even less sugar? You can leave out any and all of the last 3 cups of sugar and this recipe should work great. The nice thing about adding it at the end like you do is that you can actually add a bit at a time until you get it to the sweetness you want. Just remember, the longer this jam cooks, the less red and fresh it will end up being.

NOTE 2 (added 5/18/17): I am so in love with this jam that I went and picked another bucket of strawberries and made another batch. These strawberries must have been more ripe as the jam came out a bit cloyingly sweet. It's good, but not quite eat-by-the-spoonful good, so think I'm going to actually reprocess them after adding a little acid. The moral of the story here is to make sure and taste your jam and adjust tartness as necessary. If it comes out too cloying (even in this reduced sugar jam compared to standard pectin jam), just add a little lemon juice or citric acid to taste. 

Saturday, November 12, 2016

Chocolate Pastry Braid


I have been experimenting quite a bit lately with incorporating chocolate in breakfast pastries. There is no reason that chocolate cannot be a viable part of a special breakfast! This pastry is similar to my Pecan Praline Weave. I absolutely love that pastry, but I started wondering what else I could put in there. And I wondered what other types of dough recipes I could try. This is the result of that experimentation. I love how easy the dough is to make. It is easy to work with when the dough is cold and the filling is very chocolaty. The pastry is not overly sweet. It is rich and decadent, but not cloying in any way. I adore it!

I also love how easy it is to shape. It looks so amazing, you might be tempted to think it would be hard to put together, but it really isn't at all. Roll the dough out into either one large or two smaller rectangles. Use a pizza cutter to cut 1/2 - 3/4 inch wide strips along both edges of the long edges of the dough. It helps to imagine the dough as being folded in a tri-fold manner. Spread the filling down the middle third. To keep the pastry very pretty, I cut the last strip on each side on both ends off. This allows me to fold over the end of the middle third for a nice, well kept look.


Brush the pastry with egg wash and sprinkle with sanding sugar. They're completely optional, but I think the almonds add a certain je ne sais quoi. Another great thing about this bread is that it really doesn't need to sit to rise after the pastry is put together. This allows it to be easily made in the morning fairly quickly. I make the dough the night before and put it in the refrigerator. In the morning, I roll the dough out and put together the pastry. I then immediately put it in the oven, and thirty minutes later, I have chocolate pastry nirvana. Not bad!!


Hello, chocolate. How are you doing? Man, do I need more excuses to make this thing.


Chocolate Pastry Braid
Yield: Approx one 20x6 inch braid or two 10x6 inch braids

For the dough:
2/3 whole milk, lukewarm
5 TBS sugar
2 tsp instant yeast
2 large eggs
2 1/2 cups flour
1/2 tsp salt
1/2 cup (1 stick) salted butter, softened
1/2 cup flour

For the filling:
2/3 cup powdered sugar
1/4 unsweetened cocoa powder
4 ounces bittersweet chocolate
1/4 cup butter
2 TBS heavy cream

1 egg mixed with 1 TBS water
1/4 cup sanding sugar
sliced almonds (optional)

In a stand mixer, add all ingredients except for the final 1/2 cup of flour. Using the paddle attachment, mix until the dough is well mixed and fairly smooth. Switch to the dough hook, and while on speed 2, add the remaining flour. Let mixer knead the dough for 3-5 minutes, until it is very smooth. It will still be very sticky. Put into a greased container and cover tightly. This dough will easily double over night, so be sure to use a large enough container. Refrigerate overnight or at least 8 hours.

When ready to assemble the pastry, preheat the oven to 375 degrees F. Generously flour the counter and roll out the cold dough into one very large rectangle (or divide the dough in half and roll into two smaller rectangles). Consider transferring dough onto a piece of parchment (this helps transfer the finished pastry onto the baking sheet, especially if your kitchen is hot or you take a while to assemble the pastry). Place all filling ingredients into a microwave safe bowl. Heat gently in the microwave, stirring regularly, until the mixture is smooth. Spread evenly in the middle third (long ways) of the dough. Use a pizza cutter to cut the dough in 1/2 to 3/4 inch wide strips on each side of the middle third (see picture above). Remove the last strip on each side on both ends. Fold over the middle end of the dough on each end and then alternately lay the strips across the chocolate. Brush with egg wash and sprinkle liberally with sanding sugar. If desired, sprinkle with sliced almonds.

Immediately place in the preheated oven. Bake until puffed and golden, about 25-30 minutes. Let cool 10 minutes before slicing and serving. Keeps well, tightly covered, for 2-4 days.

Thursday, September 29, 2016

Homemade Pizza Sauce


We love pizza around here. I adore keeping these handy freezer crusts on hand. They are the perfect vehicle for cheesiness. But they are small. Even if you are doing two or three at a time, the amount of sauce needed is pretty small. Certainly less than even the smallest commercial jar of sauce out there. Plus, as far as I've seen, the commercial sauces tend to be a bit on the runny side. I like a nice, thick sauce for my pizza.

Like so many other things, I make a big batch at one time and freeze it in individual use portions. In this case, I freeze them in roughly 1/4 cup servings. That is enough to cover three of my individual size freezer crusts or enough to cover one small family pizza. Obviously, when you need sauce, you can thaw however many you need. They thaw so quickly in the microwave. 

To get the best thickness, I mix one can of plain tomato sauce and one can of plain tomato paste. Make sure you get the plain stuff (I also get it with no salt added), or the added flavors may make the final product a bit wonky. 


Add in the remaining ingredients. I like to add a little sweetness to my sauce and, believe it or not, light corn syrup gives the best flavor in my experience. You can leave it out if you'd rather. Or cut it down. Or double it. That's the nice thing about making things yourself at home - you can customize it to your family's tastes.


Freeze in individual portions. You could use a regular ice cube tray. I found this great cubical tray a couple years ago. I don't even remember where I got it, but it's great. The bottom is silicone, so you have some added leverage in popping the cubes out once they're frozen. These things keep for months and months as long as they're in an air tight container. and, again, they're super easy to thaw out when you're ready to make your own pizza.


Homemade Pizza Sauce
Yield: 1 1/2 cups sauce

6 ounces salt-free, plain tomato paste
8 ounces salt-free, plain tomato sauce
3 TBS light corn syrup (optional)
1/4 tsp garlic powder
1/2 tsp onion powder
1 1/2 tsp dried oregano
1 tsp dried basil
1/8 tsp ground thyme
3/4 tsp table salt (or to taste)

Mix all ingredients together. Freeze in individual portions. Thaw in the microwave as needed.

Tuesday, September 27, 2016

Did You Know? Banana Edition


In the not too distant past, I somehow came across a bunch of online forums where moms were debating the best way to manage bananas for their babies. The complaint was regarding how to best store bananas after peeling them because their babies were only eating a small part of the banana at a time. There were all kinds of methods mentioned, but not one single person discussed the simplest method of all.

Simply cut whatever amount of banana off that you want to use and... leave the rest there. That's it. That's all there is to it.

The end of the banana dries out and seals itself and when you are ready to consume the rest of the banana, all you do is cut or peel off the dried end and proceed as usual. How long will it last like that, you might ask? As long as the banana will last before turning to goo on your counter. Yay for simple answers!


Saturday, September 24, 2016

Easy Single Serve Muesli


I really love this stuff. I first posted about it seven years ago. (Wow... I've had this blog for over seven years?) It has not exactly been one of my most popular posts. The view tracker only gives it a paltry 98 hits over it's lifetime. That's a darn shame because this stuff is really, really good. I think this may be the only oatmeal type breakfast recipe I've ever come across that does not cook the oatmeal, and it really makes a difference in the final product. It's fresh tasting, fruity, and not in the least sticky. 

My biggest problem over the years has been having the opportunity to make it. The original recipe makes enough for 2-4 people, depending on how hungry they are and requires you to use an entire apple. If I only wanted to make a part of a recipe to feed myself during the week, for instance, what do I do with the rest of the apple? Needless to say, the result was that I just didn't end up making it very often. Recently, I made it to take to a brunch. When making it ahead of time, it's important not to mix the oats until the last minute. That got me thinking about whether I could make the liquid base of the muesli all at once and freeze it in individual portions. I was worried the texture or flavor might be off after freezing and thawing, but I was pleasantly surprised! It works fabulously!! 

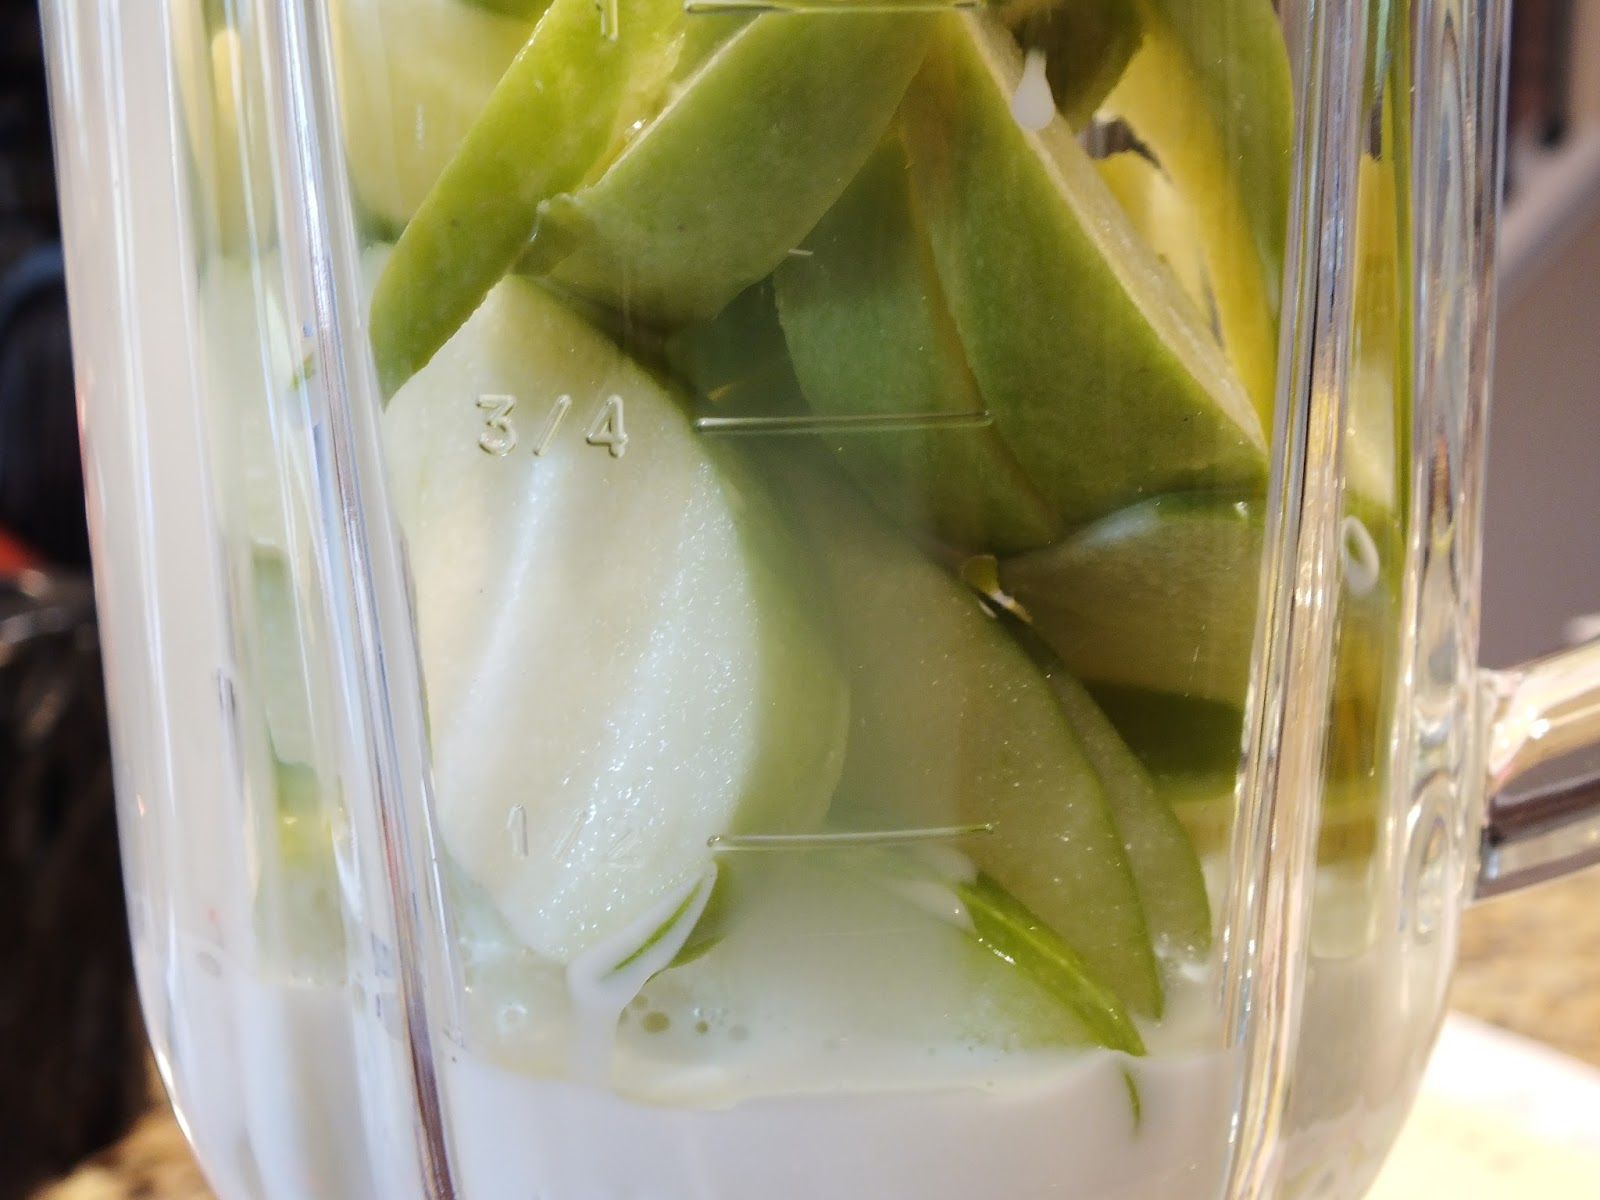
This recipe uses two medium sized Granny Smith apples and make six 1/2 cup or nine 1/3 cup frozen servings. You blend the apples (peels on!) and milk in a blender and then add the remaining base ingredients (note -  you do not add all the ingredients as shown in the original recipe). 


When done blending, it should look something like this. Kind of frothy, kind of smooth, but kind of bumpy looking. Not a very appealing description, I know, but it really does make some good stuff. Trust me.


Divide the mixture into your freezer containers. Freeze immediately.


The night before you want to eat it, take one of the containers from the freezer and place it in the refrigerator. In the morning, toss in the quick oats and delicious add-ins of your choice. As always, my favorite combination is bananas, raisins, and peanuts. I totally love homemade freezer convenience foods and this one absolutely makes me smile! I hope you give it a try!


Easy Single Serve Muesli
Yield: 6 or 9 individual freezer servings

For the Freezer Base:

2 medium (about 8 oz each) Granny Smith apples, peel on, cored
1 cup whole milk
2 TBS sugar
3 TBS lemon juice
1/4 cup heavy cream


To Make the Muesli:

1 individually frozen portion, thawed
quick oats (1/4 cup for each 1/2 cup portion, 2 heaping TBS for each 1/3 cup portion)
sliced banana
raisins
peanuts
other add-ins, to taste, such as grapes, pear chunks, spelt grains, or blueberries

In a blender, puree the cored, sliced apples with the milk. Add the sugar, lemon juice, and cream and blend just until evenly pureed. Divide into freezer containers as either six 1/2 cup or nine 1/3 cup servings. Freezer immediately. To prepare, place the frozen container in the refrigerator to thaw over night (be sure to use within two days for best flavor). Pour now thawed base into a bowl. Add the quick oats and add-ins. Stir and enjoy!


Sunday, August 21, 2016

Spiced Pear Jam


It's still jam season in my house! We were on the road so much this summer, that I really didn't get much canning done at all... except for jams. I've been a jam making fool this year! I've been having so much fun experimenting with new flavors and fruits and pectin. This is my newest creation. I was in the grocery the other day and there was a bin full of the most beautiful Forelle pears I'd ever seen. It was a split second decision that there would be pear jam in my future. I had never made pear jam before. I've canned many pears over the years... you know, in syrup. And I know how delicate the flavor can be, so I wanted to be sure that when you took a bite, you knew - yup - that's pear. So, I decided to use the Pomona's pectin, which can jell with much less sugar than conventional pectin. I knew from making my Peach Pie Jam with Pomona's that it's great for getting a more intense flavor punch (you know, instead of the sugar punch).

I was winging it a bit on making this recipe, but it came out superb! I am so happy with this recipe, I am headed back into the world to see if I can find more Forelles... 'cause I'm sad since the batch only made five jars. This is definitely a jam flavor I will be thrilled to gift this holiday season!

If you are new to Pomona's Pectin, be sure to read the directions on the package and/or check out my Peach Pie Jam post to get the basic gist of the stuff. This recipe will NOT work as intended with regular powdered or liquid pectin!!


Spiced Pear Jam
Yield: approx 5 half-pint jars

4 cups Forelle pears, minced and treated with Citric acid or Fruit Fresh
1/4 cup lemon juice
4 tsp Calcium water (mixed as directed from the Pomona's packet)
2 + 1/2 cup sugar (do not add sugar all at once!!!)
3 tsp Pomona's Universal Pectin
1/4 cup ginger syrup (see note below)
1/2 tsp ground cardamom

Prepare the jars and a water bath canner. If you are new to canning , please review my Canning 101 post for details on how to safely can using a water bath canner. Peel and core the pears, placing in a bowl of acidified water to prevent browning. Mince pears quickly, hand crush them a bit, and then place in a stock pot on the stove. Heat gently to a simmer. Let pears cook, stirring occasionally until fairly soft, about 5-10 minutes. Add the lemon juice and calcium water to the pear mixture. In a separate bowl, mix the pectin and 2 cups of the sugar. DO NOT ADD ALL THE SUGAR ALL AT ONCE! Be sure it is evenly mixed. Bring the pears to a hard boil. Add the sugar/pectin mixture and stiff completely. Continue stirring and return the mixture to a hard boil. Add the rest of the sugar, the ginger syrup, and the cardamom. Stir thoroughly and bring to a boil again. Remove from the heat and fill the jars, leaving a 1/4 inch head-space. Secure lids and rings. Process in a water bath canner for 10 minutes. Let jars cool 5 minutes in canner before removing to cool. If the jars have sealed properly, they can be stored in a cool, dark place for over a year. Please note that lower sugar jams will not last as long in the refrigerator once they've been opened as traditional jams.

NOTE: I make a lot of crystallized ginger and so I usually have some thick, sticky ginger syrup on hand. If you don't have it on hand, you can make your own by peeling a two inch finger of ginger, slicing it, and simmering it in one cup of water for ten minutes. Add one cup of sugar and simmer another twenty minutes. Strain syrup and keep refrigerated until ready to use.

9-8-16 I loved this jam so much that I wanted to make another batch. I couldn't find Forelles this time and thought, "How much different could it be with Bartletts?" Well, I'm here to tell you, quite different. The Bartletts have a somewhat cloying flavor and do not make a jam that is nearly as good. I strongly advise making this delicious jam with Forelles. 


Sunday, July 10, 2016

Peach Pie Jam


I have discovered something new and - oh so - exciting lately! Have you heard of Pomona's Universal Pectin? I'm not sure how I hadn't heard of it earlier, as much jam and jelly as I make. This pectin is different from the standard powdered or liquid pectin you find at the store because instead of being activated by sugar, it is activated by calcium (which is included in each pack). Why is this exciting? Have you ever thought about how much sugar goes into a standard batch of jam? To ensure proper jelling, most recipes typically require considerably more sugar than fruit! Sometimes twice as much sugar as fruit! Additionally, with traditional pectin, you can't scale recipes and be certain that it will turn out properly. Don't quite end up with the four cups of fruit required by the recipe? With traditional pectin, too bad! This pectin alleviates all of those problems. The price even ends up being more reasonable than regular pectin. Each box of Pomona's (I bought a 3-pack on Amazon for $15) has enough pectin for three or four batches. So far, I am a fan! 

The only drawback I can see so far is that there just aren't as many tested recipes out there using the stuff. They have come out with a book with a wide variety of recipes using their pectin. There are quite a few in there I plan on trying. But, you know me, I always feel the need to make things my own, so I've already been fiddling with making my own recipes (they give guidelines on how to do that, too, on the package insert). 


Using their guidelines, I made a batch of peach jam last night that was phenomenal! While you can make very low sugar jams and jellies with this pectin, I think I'll probably end up making recipes somewhere in between their recipes and traditional. There are some trade offs to using less sugar. The jam ends up looking more like just mashed fruit and less translucent/crystal beautiful. I've also found the really low sugar recipe jams are harder to spread. And, as you might guess, if you use a lot less sugar, you end up with a lot less jam. This peach jam contains a bit more than Pomona's standard recipe, but it is still so much less than you would use in a traditional batch. For comparison, this recipe has 2 cups of sugar for 3 cups of fruit (notice there is more fruit than sugar), while the traditional recipe has 7.5 cups of sugar for 4 cups of fruit (almost two times more sugar than fruit)! For a delicate fruit flavor like peach, this is huge. This jam is so much more peachy than you get with the traditional recipe, and it's a nice balance between fruit and beautiful clear spread.

There are a couple things to note. Pomona's pectin needs to be used properly for good results. For instance, this pectin will not dissolve in a high sugar environment. Therefore, in this recipe, the sugar is added in two batches at two separate times. DO NOT ADD IT ALL AT ONCE! My understanding is that when the pectin doesn't dissolve, not only do you not get a good jell, but the jam is then grainy. Yuck! Be sure to follow the directions for good results. The other thing is that I made this jam at 10 pm last night. I had already finished another batch and was getting tired, so I forgot to mash the fruit with my hands after mincing it. The jam still tastes fabulous, but the texture is a bit more chunky than I prefer.

Lastly, this jam can be made as just a plain peach jam, but I think the spice really takes it over the top. You can certainly leave out the spice, but I highly recommend it!

Peach Pie Jam
Yield: 4 1/2 half-pint jars

3 cups minced peaches, mashed with your hands
1/4 cup fresh squeezed lemon juice
2 tsp calcium water (mixed as directed from the Pomona's packet)
1/4 tsp butter (optional - this jam does not foam as much as traditional ones)
2 cups sugar (separated - DO NOT ADD ALL AT ONCE!)
1 1/2 tsp Pomona's Universal pectin
1/4 tsp fresh grated nutmeg (optional)
3/8 tsp cinnamon (optional)


Prepare jars and a water bath canner. If you are new to canning, please review my Canning 101 post for details on how to safely can using a water bath canner. In a large sauce pan, heat the peaches, lemon juice, calcium water, and butter (if using) together. Bring to a boil. Meanwhile, thoroughly mix the pectin and one cup of the sugar together. This step is very important so the pectin does not clump. Stir the sugar/pectin mixture into the boiling fruit. Return to a hard boil, and cook, stirring, for 1-2 minutes. Then add the remaining cup of sugar, stir, and reheat to boiling to ensure the sugar is all dissolved. Remove from the heat and add the spice, if using. Fill jars leaving a 1/4 inch head space. Put on lids and rings. Process in a water bath canner for ten minutes. Remove canner from heat and remove lid. Let jars cool in canner for five minutes before removing to cool. If jars have sealed properly, they can be stored in a cool, dark place for over a year. Please note that lower sugar jams will not last as long in the refrigerator once they've been opened as traditional jams.


Tuesday, June 21, 2016

Maple Vinaigrette


I'm a relatively new convert to Chick Fil A. I'm not nearly as hardcore as many of the locals around here (I don't make it my life's ambition to eat there at least once a day, for instance, like some people I know), but I appreciate their classy take on the fast food theme. Additionally, I like the fact that for a fast food place, you can choose to eat relatively well. Take their new "superfood" salad. I know that kale is in vogue right now, so it strikes me as kind of a publicity stunt, but it's a darn tasty one. I don't think I'll complain too much that they decided to jump on the bandwagon.

I really like the maple vinaigrette, too. It's sweet but has just a bit of an edge and a pleasantly complex taste. After looking online to see if someone had already developed a good "copycat" recipe, I realized I'd have to do it myself. Most of the recipes I looked at in no way resembled the ingredient profile of Chick Fil A's vinaigrette. My version, I think, really comes very close to the flavor profile of the original.

This maple vinaigrette is darn tasty. While I do really like it on the kale/broccolini mixture Chick Fil A uses, it would work on all kinds of other salad mixtures. The original is fairly sweet, I think to help mitigate some of the bitterness you can often get in kale. If you want to make it less sweet, just reduce or eliminate the brown sugar. As for the nut mixture, you can use candied nuts or just a mixture of roasted ones. The nice thing about making the superfood salad at home is that you can customize it to your palate! They cap it off with dried, tart cherries, which I think is perfect, but you could use any other kind of dried fruit that floats your boat.

Lastly, before I give you the recipe, let's have a brief word about massaging. Massaging bitter greens like kale releases enzymes that help break those bitter compounds down, making your salad a more enjoyable experience. Simply wash, spin, and cut/tear your greens as usual, dress them, and then get in there with your hands and give them a back rub! While you're working them, you'll notice that the leaves will lose some of their inherent toughness (making kale especially more palatable, in my book) and the color will darken. It usually takes 2-3 minutes to get them just right. I don't like to do it too long, or the leaves become wilty and remind me of cooked greens - not what you want for a salad! This works for kale and also broccolini. You could make this salad with broccoli rabe as well (in my experience, broccolini has been hard to find), but it is a bit more bitter. Some folks like that more than others. You do not, by the way, need to blanch the broccolini or broccoli rabe, if using them; just be sure to give them a little massaging, too.

Maple Vinaigrette
Yield: approx 1 cup vinaigrette

1/4 real maple syrup
1/4 cup canola oil
1/4 cup apple cider vinegar
1 TBS soy sauce
1 TBS balsamic vinegar
1 tsp onion powder
4 tsp brown sugar (optional, or to taste)
1/16 tsp guar gum (optional, helps to emulsify the dressing)

Mix all ingredients together in a jar. Place a cap on the jar and shake vigorously for a full minute. Keep leftovers refrigerated and use within a week.


Monday, June 20, 2016

Lebanese Yogurt Sauce


I cannot begin to tell you how excited I am to have figured out this recipe. We love Middle Eastern fare. One of our favorites is kabobs, although we love everything else we've ever tried of it, too. Yogurt sauce is ubiquitous in many Middle Eastern and Mediterranean cuisines. Unfortunately, I've just usually never been a big fan of them. Tzatziki is probably the best known, but it's always too tart for my taste. Enter our local Mediterranean/Middle Eastern eatery (hey, it's a small town - thus this one place has a wide range of cuisine). From the first time we ordered their gyros and souvlaki, I was hooked. I had never enjoyed eating a yogurt sauce so much! But what was the difference? When I asked them, they said it was basically just yogurt and cucumber, but when I would buy Greek or other yogurt from the supermarket, it never came out right.

Then I recently placed an order for some more cheese cultures. While surfing New England Cheese Making's site, I came across a yogurt culture that claimed to be "sweet." Was this what I was looking for? I had to give it a try!! I ordered some culture, but just sat on it for a while, never quite getting around to it. Then, while out of town, I was in a Mediterranean grocery and started asking them about the yogurts they had for sale and whether any of them had a sweeter flavor. The clerk suggested I try this one, which is a strained yogurt "cheese" (i.e. is drained until it is almost the texture a soft cheese). I gave it a whirl and it turned out exactly how I wanted it! It was absolutely delicious!


Just one problem. I live in a small town in the South. Not many Mediterranean groceries around here. But now that I had a recipe, I knew I had to give that "sweet" yogurt culture a try. It worked perfectly. It's a bit time consuming to make the yogurt sauce when you have to make the yogurt yourself first, but - I'm telling you - it's worth it! If you have a market nearby you can buy the stuff from, even better!! Even my three year old scarfs it down like there's no tomorrow. Give him a plate of kabob meat and yogurt sauce, and you've got one happy little boy.

Well, if you can buy the stuff, then you can ignore the next few paragraphs (lucky devil!). Otherwise, here's how to make your own yogurt.

First, you have to scald the milk. The starter culture that I use will work for 1-2 quarts. The process is the same for either amount, you just need to change the size of the vessels you use. I did one quart this time, but I'll probably do two in the future to maximize my time. Place the whole milk (please don't skimp on this) in a pan and heat to 185 degrees, stirring occasionally to reduce the chance of scorching. Use a thermometer and pull it off the heat as soon as it reaches temperature. Have a sink of cold water ready to set the pan in. The goal is to cool it down to between 110 and 112 degrees F fairly quickly.


Add the starter culture and stir for one to two minutes. Pour the milk into a jar (or other vessel) to culture. I use a jar when I make yogurt because you typically don't want to disturb the yogurt once it's done because it causes it to separate. In this case, it's not as big an issue because you're going to dump it all into a colander to drain anyway. I drilled a hole in the top of my lid so that my instant read thermometer can sit in there and keep tabs for me without having to disturb the whole kit and caboodle.


Use a heating pad to keep the yogurt at around 112 degrees F for approximately seven or eight hours. If you have a yogurt maker, even better. This set up works really well for me, though. I wrap the heating pad around and then a towel for insulation (and to hold it all together). A binder clip finishes it off. Adjust the heating pad temperature as needed to maintain as consistent a temperature as possible in the milk.


Once the yogurt is set and thickened, it's ready to drain, This particular yogurt culture did not set as firmly as some others I have used, but since I was going to drain it anyway, I wasn't concerned. I lined a colander with butter muslin (you can also use multiple layers of cheesecloth, but it will let some of the "curd" through). Let it drain for a couple of hours, until the yogurt is very thick.


Here, you can see just how thick it is, that it holds its shape quite well in the muslin. One quart of milk made about 1 1/2 cups of drained yogurt.


Add approximately an equal amount of grated English cucumber. Do not squeeze the liquid out. Add the remaining ingredients and let sit in the refrigerator for at least four hours. I actually think this sauce tastes best on days two and three. The first day, it's still a bit tart. By day four, it's starting to break down a little bit.


Lebanese Yogurt Sauce
Yield: about 2 cups

1 - 1 1/2 cups Labna* or "sweet"**, drained yogurt
1 cup grated English cucumber, finely chopped
1 tsp fresh lemon juice
1/4 tsp microplaned garlic (or very, very finely minced)
1/2 tsp salt ***
1/8 tsp (white) pepper

After grating the cucumber, run a chef's knife through it to cut the shreds into smaller pieces. Do not squeeze the liquid out of the cucumber. Mix all ingredients together. Place in a covered container in the refrigerator for four hours or overnight. Tastes best if used within three days.

* Look for Labna in Middle Eastern or Mediterranean groceries.
** You can make your own "sweet" yogurt using the directions in the post above. Use the starter you can purchase here.
***The amount of salt you will need will depend on whether you use store bought or homemade Labna. Homemade will need more. Be sure to taste regularly to get it just right. In general, this sauce tastes best when it is a bit on the salty side.

Friday, June 17, 2016

Better Butter


This is one of those things that I always feel weird posting because it seems too simple. I originally started doing this when my boy first started eating solids, about three years ago. I wanted to reduce the amount of sodium in the butter I used, so I could use a wider range of other ingredients without feeling like I was blowing his daily limit too badly. Interestingly, a couple times over the last few years, I've briefly had to go back to regular butter and it's just not as good! I find myself getting anxious to get back to the "good stuff."

When I recently had multiple people in a short time period asking what butter I used because they thought it tasted so good, I decided maybe it was time to share my secret with the world. It's so simple, it's hard to imagine it making such a big difference! All I do is mix one stick of salted butter with one stick of unsalted butter. Then I put the mixture in a crock and leave it on the counter. So, so easy.

Why does it make such a big difference? I think the reason is two fold. First, I think salted butter is salty enough that it tends to overwhelm the delicate flavor of the butter. Second, look at the photo below. The top box is salted. See the ingredients? Cream and salt. That's it. Now look at the bottom box. See those ingredients? Cream and natural flavoring. Initially, I was, like, whoa!, what are they sticking in my butter!?! But after a little snooping around, it appears that to keep it from tasting too flat without any salt, manufacturers add a little lactic acid to the butter to give it a little tang. It's a cheaper way to give a little bit of cultured flavor to butter (like what the Europeans do) without actually having to culture the cream. I think between those two things, the butter just tastes extra fresh and delicious. Additionally, now that I am used to the lower sodium, regular salted butter seems overwhelming to me.


The other good news is, that in my experience, it doesn't matter what butter you use. Name brand or store bought, it all comes out tasting about the same. Yay! 

In other news, see the utensil in that bowl? That's called a "sandwich spreader" in food service lingo. May just be the most awesome tool ever made. I use them for everything. In this case, though, they make mixing butter like this a breeze and they make spreading soft butter on toast amazingly easy. I own around half a dozen of them and almost start crying when I realize they're all in the dishwasher. :-)


Wednesday, June 15, 2016

Blueberry Jam


It's blueberry season here in middle Georgia! Despite triple digit heat indexes yesterday, my boy and I went picking. We didn't get a lot picked, just enough for this one batch of jam, but the bushes are loaded with plenty of berries yet to come! I imagine there will be many more trips out there... hopefully on days that aren't quite so hot.

It's been a few years since I made blueberry jam. Long enough that I couldn't remember which recipe I had previously used. I decided to start with Linda Ament's recipe in her Blue Ribbon Preserves book. I tweaked it a bit here and there, but the important part is that her sugar to fruit to pectin ratios are generally spot on and I rarely have trouble with my jam setting with her recipes. This one was no exception.

This recipe makes a nice, large batch of jam: nine half-pints. I like recipes that maximize my time like that! I crushed the berries, measured them out, and heated them slowly with the sugar and lemon juice. I initially was concerned because the mixture seemed so liquid-y, even right up until I poured it into the jars, but the little bit left in the pot began setting up before I even had the lids on the jars! The flavor of this jam is fantastic. The lemon gives the palate a little fresh kick and the hint of cinnamon and nutmeg bring on warm memories of pie and days at grandma's.


Blueberry Jam
Adapted from Linda Ament's Blue Ribbon Preserves
Yield: 9 half-pints

5 cups crushed blueberries (fresh or frozen)
2 TBS fresh, strained lemon juice
1 tsp lemon zest
1/2 tsp butter (salted or unsalted)
1/8 tsp cinnamon
dash nutmeg
7 cups sugar
2 (3-ounce) packets of liquid pectin

Measure the berries into a minimum 7 quart pot. Add the lemon juice, zest, cinnamon, nutmeg, and sugar. Stir and heat gently over medium-low heat. When the berries begin to pop and the sugar is dissolved, increase the heat and bring to a full rolling boil. Boil for one to two minutes. Add the liquid pectin, stirring. Return to a full rolling boil and boil, stirring constantly, for one full minute. Remove from the heat. Skim any foam. Let the mixture sit for five minutes, stirring occasionally, to help keep the fruit pieces from floating in the final product. Pour jam into prepared jars, leaving 1/4-inch head space. Wipe rims with a clean, damp cloth. Put on the lids and process in a slowly boiling water bath for ten minutes for half-pint jars. Increase processing time to fifteen minutes for pint jars. When processing is done, let jars sit in water five minutes with the heat off and canner lid off before removing to cool. This step helps prevent oozing jars, which are never fun.

If you are not an experienced canner, you can check out my Canning 101 post for more details on the process.

Monday, February 1, 2016

Brownies - Perfected!


Quite some time ago, I posted a brownie recipe on here that I was pretty fond of. Fond enough that I called them "Devilishly Good." They are. But as time went on, I stopped using the coffee granules; I guess I just wanted that pure chocolate taste. And they are just a tad on the cakey side, and I found that I really was a fudgy brownie girl at heart. And even though I had already reduced the fat in them significantly from the brownies I used as my beginning recipe (Barefoot Contessa's), they still seemed a bit greasy. Lastly, they just never quite seemed dark enough, but just adding more chocolate didn't help them. 

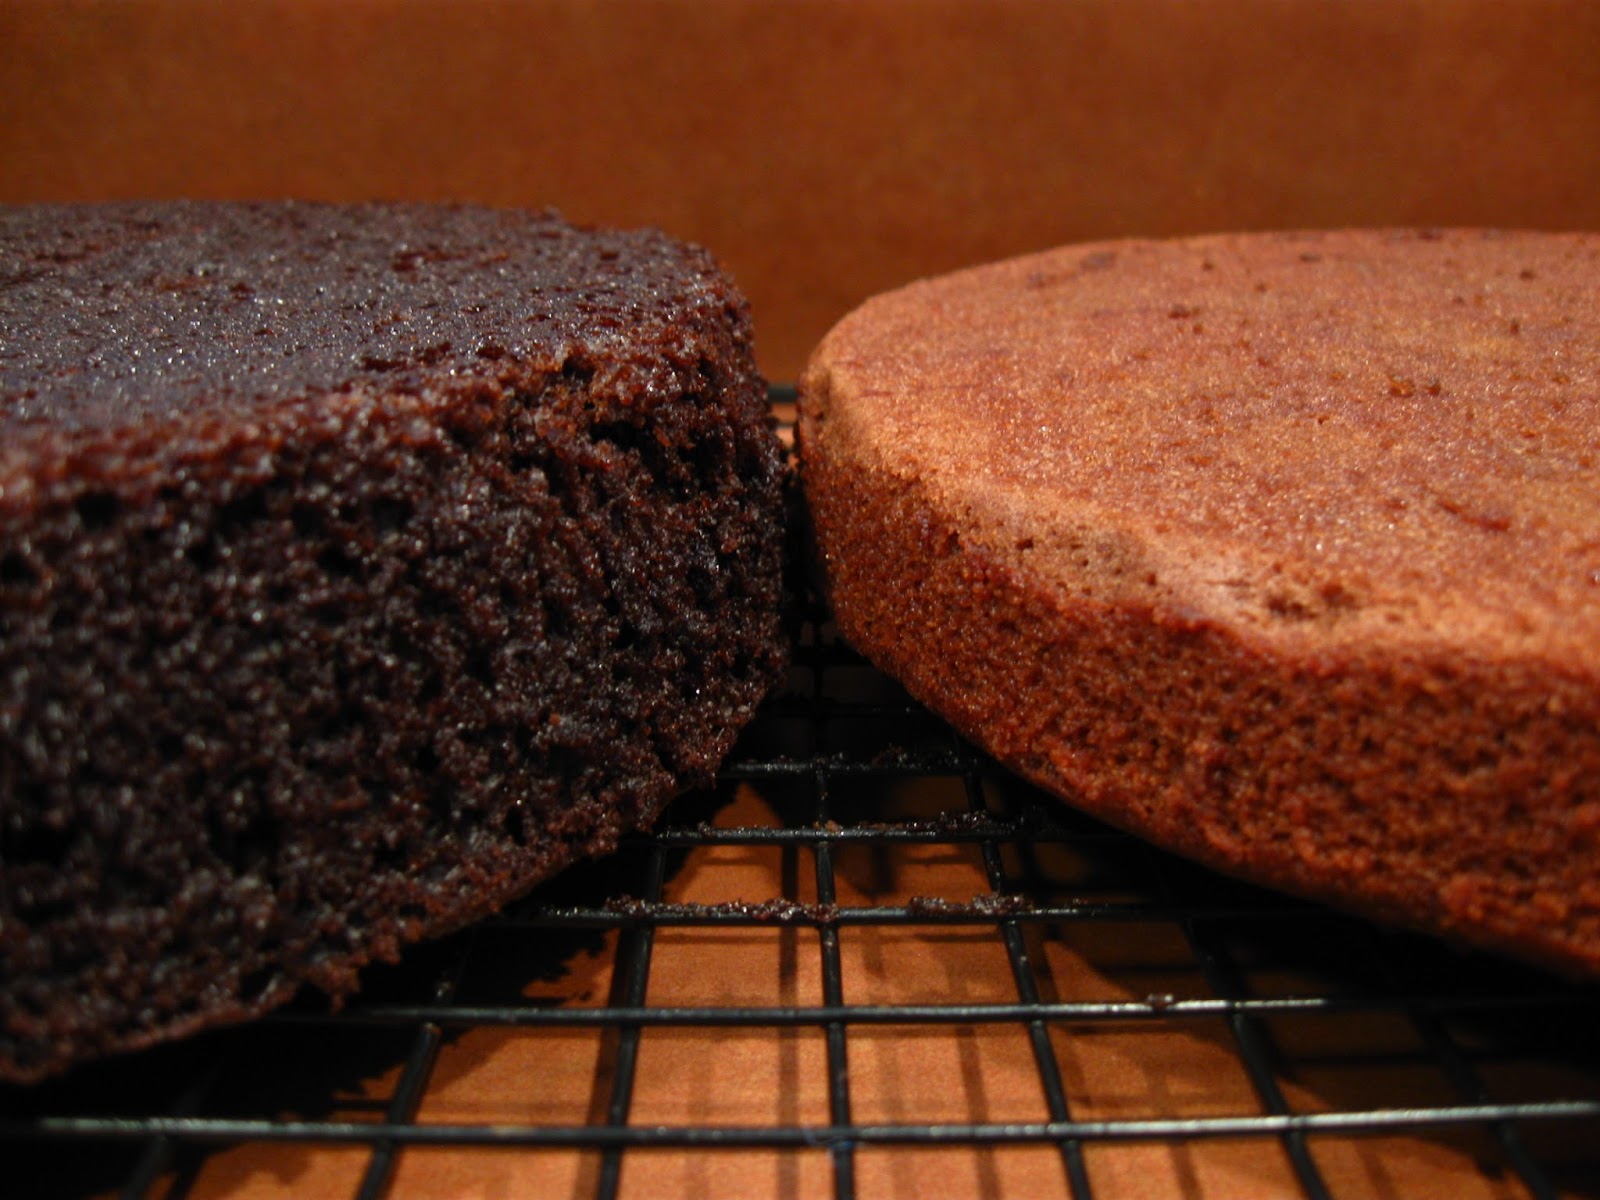
I pondered and pondered this darkness conundrum over the last few years. Then one day, out of the blue, I remembered an interesting accident I had once when making my favorite chocolate cake. I had messed up the leavening, substituting baking powder for baking soda and came out with drastically different results. And I do mean drastic... baking powder cake on right, baking soda cake on left. Interestingly, not only was there a difference in color, but the chocolatey-ness was completely different. It got me to wondering if there was some kind of a special chemical reaction that happens between the acidic cocoa powder and the basic soda that just wasn't happening when using baking powder.


And so there is! Check out these two batches of brownies. On the right is my original "Devilishly Good Brownies" and on the left is my "Brownies - Perfected!" recipe. The recipes really aren't that different, but look at the change in the end result! My new brownie recipe is fudgy and so, so, so chocolatey, they are divine. Hard to imagine that simply changing the type of leavening could make such a big difference in the color and flavor. Adjusting the fat and egg level did the rest. If you prefer cakey brownies, stick with my old recipe, but change to using baking soda. If you want the perfect fudgy brownie, this is the last recipe you will ever need.


The hardest part about this recipe is melting the chocolate and butter together in the microwave... just kidding - it isn't hard at all!


This recipe is a cinch to mix together and the end results are really, truly special.


Brownies - Perfected!
Yield: one 9x13 pan of brownies

1 1/2 stick salted butter
1 1/2 cup semi-sweet chocolate chips
1/2 cup cocoa powder
1 cup sugar
3 large eggs
1 1/2 tsp vanilla
1/2 cup flour
1 1/4 tsp baking soda

In a medium microwave safe bowl, melt together the butter and chocolate chips. Check regularly and stir until smooth. Add the cocoa powder and sugar and mix together. Add the eggs and vanilla and stir again. In a small bowl, mix together the flour and baking soda. Add to the batter and stir just to mix. Dump into a greased 9x13 pan. Smooth out with a spatula and bake in a 325 degree F oven for about 20 minutes. Be sure not to over bake or they won't be fudgy. Brownies are ready when the middle does not jiggle much when the pan is gently shaken on oven rack and a tester will come out clean. Let cool before cutting.