I am now blogging new recipes on my farm website.

Cooking from Scratch is on facebook! Click here to check it out!

Tuesday, January 17, 2012

Tarta Pascualina

I tell you, that dinner club we've been participating has prompted some interesting stuff! Our theme last month was Argentine cuisine and I was tasked with coming up with a side dish. I looked and looked. I became a little frustrated because Argentine food appears to be an amalgamation of many different cultures: Italian, Spanish, and Arabic influences are prominent. I wanted to try something that seemed a little more authentic. I'm not sure how authentic this dish really is, but it sure is a stunning knock out! I originally served it as a side dish, but to be honest, it's filling enough to be a wonderful vegetarian main course. That's how I served it last night.

According to Rebecca of "From Argentina with Love," Tarta Pascualina, or Eastertime Tart, was brought to Argentina by the Italian in the 16th century. I figured 500 years in one culture was enough time to consider it "authentic." And I immediately loved the idea of a pie with whole eggs baked in it! When this thing is sliced, it is so gorgeous. The first time I made it, I made it exactly as Rebecca wrote the recipe. Last night I made some adjustments. While I liked it the first go around (I used all kale), I really liked it last night. I am not a huge fan of strong tasting greens, so I prefer to use all spinach, but you can use whatever mixture of greens appeals to you. I have posted my version of this recipe below.

The first step is to prepare the filling. Mix the cheeses, garlic, nutmeg, salt, pepper, cornstarch, and milk together in a bowl. Add your greens. If you use frozen greens, thaw them completely and then squeeze them to get the excess moisture out. If you use fresh greens, steam them until wilted through, cool, squeeze, and then chop into small pieces. After adding the greens, make sure to mix thoroughly. If you don't mix it really well, you can end up with large globs of cheese that mess with the great texture of the cooked filling.

This tart is made in a 9-inch spring form pan. Prepare a batch of pie crust (or use store bought) and line the bottom of the tart. Gently lay the crust into the pan so that it reaches all the way down into the "corners." Try not to stretch or press the dough down or it will become too thin or tear. Spoon the filling into the shell and even it out across the top. Then gently press open 6-7 holes in the filling. Last night, without thinking, I put an egg in the middle as well, which I think was a mistake, as I think it messes with the cut presentation of the slices.

Crack a raw egg into each hole you made. Note that this picture is from the first time I made it when I did not put an egg in the middle. Try to ensure that the hole is big enough to contain the whole egg. If it runs over, stick your finger into the hole and gently enlarge it until the egg white falls back into the hole.

Place the top crust on making sure that it lays flat across the filling. Seal the edges and flute however you prefer. Make an egg yolk wash (one yolk and 1 TBS water) and brush it on the crust to help with browning. Bake in a 375° F oven for approximately one hour. Now, this is important! Be sure to bake with your spring form pan sitting on a sheet pan. I forgot to do that the first time and there was leakage of grease from the crust onto the bottom of my oven... oh the smoke! You only make that mistake once! Bake until the tart is golden and a thermometer stuck in the middle reads 160° F. If you pull it out below this temperature, there's a good chance your eggs will not be hard baked yet.

Remove from the oven and let it cool in the spring form pan on a rack for 10 minutes. Run a knife around the edge of the fluting to ensure it isn't stuck to the pan before releasing the band. Remove the spring form band and let it cool another 10 minutes before slicing and serving. It serves well hot or at room temperature.

The trickiest part of this whole deal is trying to be sure you slice right down the middle of an egg for the best presentation! It seems like once you get your bearings with the first slice, it's fairly easy to get it right. Isn't that pretty? The combination of the cheesiness and the flaky crust along with the creamy spinach and that hard boiled egg surprise makes this one a true delight.

Tarta Pascualina
Yield: 6-8 servings
Adapted from the blog From Argentina with Love

One recipe for a double pie crust (or store bought)
18-20 ounces of greens, frozen or fresh (spinach, kale, chard, or a mixture)
1 cup ricotta cheese
1 cup shredded mozzarella cheese
1 cup grated Parmesan cheese
2 cloves garlic, grated
dash nutmeg
1/2 tsp salt
1/4 tsp ground black pepper
1 TBS cornstarch
2 TBS milk
6-7 eggs

Preheat the oven to 375° F. Prepare the greens: if using frozen, let them thaw completely and squeeze the excess water out. If using fresh, steam them until they are completely wilted. Cool and then squeeze the excess water out. Chop into small pieces.

Line a 9-inch spring form pan with the bottom crust, gently placing flat across the bottom and up the sides. Mix together the cheeses, garlic, nutmeg, salt, pepper, cornstarch, and milk. Add the greens and mix very thoroughly. Place the filling into the tart shell and gently pat it flat. Using a spoon or your fingers, make 6-7 holes in the filling about an inch from the edge of the tart. Make sure the wells are large enough to completely contain a raw egg. Crack a raw egg into each hole. If it spills over a little, simply stick your finger in and gently make the hole larger. Place the top crust over the filling and ensure that it sits flat on it. Seal the edges, crimp, brush with egg yolk wash, and make a couple of slits to let steam escape. Place the spring form pan on a baking sheet and bake for about an hour, until the pie is golden and the temperature in the center reads 160° F.

Let the tart cool in the spring form pan on a rack for 10 minutes. Run a knife around the edge of the crust to loosen it and then release the spring form mold. Let the tart cool another 10 minutes before slicing and serving. Serves well hot or at room temperature.

Saturday, January 14, 2012

Candied Orange Twists

As usual, in the run up to Christmas, I made huge amounts of food to give away as gifts. I made breads, candies, pancake mix, jellies, cookies, and... truffles! I love making truffles. I don't make them super often, because they are a bit of work (although as I do it more, it becomes quicker and more efficient). I originally posted about making truffles in the first few months of this blog. You can check out the "Making Chocolates" posts here.

As you might imagine, I rarely am satisfied leaving well enough alone. I always figure I can make something tastier, cheaper, easier, or prettier. In this case, I was going for the latter. Whenever I make truffles, I make more than one kind. Because I am not a fan of the whole stick a tooth in it to figure out what's inside technique, I like to decorate my truffles in a way that I can give my recipients a key describing what's what. For my usual Grand Marnier truffles, I decided to try and make cute little candied orange twists. They were a smashing success. Not only were they easy to make, but they look like a million bucks and taste great too.

You can make the candied orange peel in advance and keep them, untwisted, in syrup for quite some time. As such, I made a fair amount and am simply keeping the left overs in the pantry. Using a zester, get a bunch of zest strips from a couple of washed oranges. Try to keep the strips at least 2-3 inches long. They're very challenging to knot when they get too short.

In a sauce pan, mix one cup of sugar, two cups of water, and 2 tablespoons of corn syrup or glucose (or a similar ratio of the three). This last bit is critical if you want to be able to store the twists for any length of time. Without the corn syrup or glucose, undesirable crystallization can occur and make your life very difficult. Simmer the zest on medium low heat, stirring occasionally, until the zest is tender and translucent. I just keep tasting until it gets to where I like it; it usually takes an hour or two. Cool the mixture completely. If storing, keep the twists submerged in the syrup and store in an air tight container in a cool, dark place.

When you are ready to make the twists, get out a piece of parchment or wax paper and simply tie them loosely into knots. A single loop is plenty and the twists are sticky enough to stay wherever you put them. Let them dry slightly so that they don't ooze syrup all over your pretty truffles.

When you are ready to apply them to the truffles, use a small brush to dab a little bit of melted chocolate onto the top of the truffle and then place the twist in the middle of that blob. Once the chocolate hardens, the twist will be an integral part of a beautiful confection. And the shiny, citrus packed twist not only adds a delicious punch to a tasty treat, but is a gorgeous way to distinguish it from the other flavors you've concocted! In this tin: Grand Marnier, hazelnut, coffee, mint, and plain.


Tuesday, January 10, 2012

Smoked Salmon Ravioli

You know, it's funny how long it can take for me to get around to trying an idea sometimes. I first imagined this ravioli over a year ago. Just the thought of it set off an uncontrollable Pavlovian response. Somehow, I just knew it was a flavor combination that would be out of this world. And when I finally tried it? Divine! It's smokey. It's meaty yet delicate at the same time. It's sinfully creamy! I strongly urge you to give it a try.

However, I will be the first to admit, making homemade ravioli can be labor intensive. Ahhhh, but is it ever worth it. And when you do go to the trouble, take the time to make way more than you need so that you can freeze a bunch to enjoy spur of the moment some other day.

This recipe requires cooked smoked salmon, not the cold slimy stuff. I posted how our family makes smoked salmon (a Pacific Northwest favorite!) some time ago. If you make this salmon and have leftovers, this is a fantastic way to put them to use. Of course, to do that, you have to have leftovers... When I made this batch, it was for a dinner I was hosting, and I smoked the salmon specially for this ravioli. Either way would work great.

Once you have some smoked salmon, you're ready to go! The procedure for making the ravioli themselves is exactly the same as I posted previously for my cheese ravioli, we're simply going to change the filling we stick in there. I even use the same sauce as what I use for the cheese ravioli.

Smoked Salmon Ravioli Filling
Yield: enough for about 4 doz. 1 TBS full ravioli

2/3 pound salmon, smoked (about 2 cups shredded)
1 cup cottage cheese
3 oz goat cheese (chevre)
1 TBS fresh chopped chives
1 TBS fresh minced parsley

Mix all ingredients together until they are evenly distributed. Spoon by the tablespoon into pasta, sealing the edges to form ravioli, as shown in this post. Stack in layers with parchment between to prevent them from sticking together until ready to cook or freeze. Cook in boiling water 3-8 minutes depending on whether they are fresh or frozen. Serve with a cream sauce (recipe also available in that same ravioli post linked above).

Saturday, January 7, 2012

Soft Pretzels

I am so excited to share this recipe with you! I have eaten a lot of pretzels in the last two months as I've been tweaking this recipe to get it just right. I also have to send out thanks to my mom for her role in mastering this process. We've been playing with this recipe for the last six months, both together when she came to visit and separately, reporting our results to one another. All in all, it's been a very satisfying collaboration.

As for our love of pretzels, that's a given. I think I've mentioned before that I'm from Pennsylvania Dutch folk and we're all about pretzels. Growing up, I'd visit my Nana in Lancaster, PA, and we'd walk down to the corner and tour the Anderson Pretzel factory. My mom had her sister ship large tins of pretzels to her for years. When you grow up on the best, only the best will do.

Speaking of which, that's part of the reason this was such a process. There are so many recipe versions for pretzels out there, but most of them have ingredients that are never found in a true Lancaster area pretzel. A true pretzel has no fat in it! That means no butter, no shortening, no oil, and no milk. We were looking for tasty and authentic. I think we did good!

Making the dough is easy. It's easiest if you have a stand mixer, but it mixes pretty easily by hand too. Knead the dough until it is smooth and elastic. If, for some reason, it seems too sticky, add a little flour until the dough is no longer sticky. Let it rise, covered, until double and then knock it back. I form it into a log, cut it into eight even pieces and then let it rest so that I'm not fighting that gluten quite so much while trying to shape them. Keep the pieces covered while they rest so the pieces don't dry out too much. A ten to twenty minute rest is plenty. Then take each piece and roll it out into a long rope. Shoot for a rope between 14 and 18 inches long.

Shape pretzels by twisting the ends once and, dabbing a little water on the pieces so they stick better, gently press the ends back on the pretzel itself. This picture shows the pretzel on a sheet of parchment. That was a mistake I made early on. You don't want to use parchment. You need to use either a SilPat or "Super Parchment" (available on Amazon). Regular parchment will permanently affix itself to the pretzels when they're in the oven and you'll have to resign yourself to either tossing them or eating parchment paper.

If you have trouble with the shape, you can always do them this way. They taste the same, look fairly similar, but are super easy to shape (and are only one twist away from the shape above).

Let the pretzels rise while you prepare the water bath. You don't want to let them rise too long or they may collapse while they are in the water. Shoot for about 20 minutes.

Now, here's where a lot of people get scared, but there's really no reason to be intimidated. To get an authentic tasting pretzel, you have to cook it in a lye bath. I purchased my food grade lye on Amazon from the Essential Depot. This is the two pound bottle of micro beads. It cost less than five bucks, although the shipping drove the price over $15. However, now I can make authentic pretzels whenever the urge strikes and the bottle lasts quite a while.

The main thing to consider is that you always want to add the lye to the water, not the other way around. Like acids, strong bases release a lot of heat when they dissociate in water. If you add water to the lye, it can spatter and that's not good.

I've found that the best results are achieved with a 0.5M solution. That translates to 6 cups of water and about 1 tablespoon (30 grams) of lye. (If you want to see how to calculate the concentrations, see NOTE 1 at the end of this post). While lye (NaOH, sodium hydroxide) can be very dangerous, at this concentration it is mostly an irritant. Dangerous to the eyes, but not too bad for the skin. I'd recommend wearing goggles or glasses and being sure to wash off any skin contamination immediately. If you're nervous working around it, by all means wear both goggles and gloves, but don't be unduly scared of it. It's not as dangerous as a lot of people fear. Of course, you do want to be sure that you keep the bottle (and the pot!) out of reach of children!

The water bath is the trickiest part of the whole process. You want to use a non-reactive, stainless steel pot (do NOT use a nonstick or aluminum pan unless you want to buy a new one) and a skimmer. Add the water and then the lye. Stir to dissolve. Heat the water to just below a simmer. You want it steaming, but not bubbling in any way. Gently lower the pretzels one at a time into the water. Count off 25 seconds, remove them from the water, and let them drip for a few moments before returning them to the baking sheet. By the way, be sure not to use an aluminum baking sheet either. I now have permanent marks on one of mine because I forgot and used it once. Oops!

Why do I say this is the trickiest part? Because if the water is too hot or if the pretzels are in the water too long, they can deflate once they're out the water in a very unflattering and untasty way. In my experience, it is better to under do it than over.

Wait until you are done "boiling" all of the pretzels before sprinkling salt on them. If you sprinkle the salt immediately, I've found the salt absorbs a lot of the water and the pretzel doesn't keep as well (I show pictures of what happens below).

You can use kosher salt (on the right, below) or pretzel salt (on the left). Pretzel salt is available online and at some bulk food stores. I like the pretzel salt, again, because it seems more authentic. You can see how the grains of the pretzel salt are much larger, giving that characteristic crunch.

So, what happens if you use a different concentration of lye? Well, it impacts how much the exterior of the pretzel is gelatinized, which affects how dark they will get in the oven. The more lye, the darker the pretzel gets. I've been using the 0.5M solution and expect good results up to about 0.75M, but if you go too high, the pretzels get so dark and bitter, they're practically inedible.

How about storage? They're best eaten within eight hours. If you are not going to eat them in that time frame, then you need to freeze them, and the sooner the better. Pretzels left overnight, whether wrapped or not, turn into some nasty, diseased looking shade of their former self. Apparently, the moisture left in the pretzel is sucked up by the salt, causing it to dissolve on the pretzel's surface. Needless to say, it isn't appealing in the least. Freezing them, however, works great! Simply freeze them on a sheet until hardened and then place in an air tight container or bag. When ready to eat, zap them in the microwave in twenty second increments until they are thawed and nicely warm. If you choose, you can then toast them a bit as well.

What about hard pretzels? Well, I'm still fiddling with that technique, but it involves letting the pretzels continue to dry out after baking. If I can ever get it right, I'll let you know. In the meantime, enjoy these wonderful, chewy authentic soft pretzels!

Soft Pretzels
Yield: 8 3-4" pretzels

2 cups bread flour (or all purpose)
1/4 tsp instant yeast
1/4 tsp table salt
1/4 to 1/2 tsp diastatic malt powder (optional, see NOTE 2)
3/4 cup water

pretzel salt (or kosher)

Mix all ingredients together to form a dough. Knead until it is smooth and elastic, about 5-10 minutes depending on whether you are doing it by hand or in a mixer. Let rise, covered, in a warm location until doubled. Knock dough down and form into a log. Cut into eight equal pieces. Cover and let rest 10-20 minutes. Shape each piece into a 14-18" long rope and then fold it into a pretzel shape. Place on a non-reactive baking sheet lined with a silicone mat. Let rise slightly, about 20 minutes.

Add six cups of water to a large sauce pan and then stir in 30 grams (1 TBS if using Essential Depot's microbeads) food grade lye. Heat to just below a simmer. Water should be steaming, but not bubbling. Dip pretzels individually, timing each for 25 seconds in the water. Remove, let drip, and then return to the sheet pan. After all pretzels have been dipped, salt, if so desired.

Place into a preheated 425° F oven. Bake for 12-15 minutes or until browned to your liking. Eat within 8 hours or freeze within four.

NOTE: Molarity (M or mol/L) is a measurement of concentration. To determine the amount of NaOH to use for a specific concentration, you need to use a little chemistry. Because a liter and a quart (4 cups) are so close in volume, I will use the measurements interchangeably. The formula is: amount of substance (in grams) = molar mass x molarity x volume. The molar mass of NaOH comes from the periodic table and is always approximately 40 grams/mol. The molarity is the concentration of the solution you are interested in making and the volume is how much solution you want to end up with at the end. For the 0.5M solution used above, the formula is: ? g = 40 g/mol x 0.5 mol/L x 1.5 L (again, 6 cups is approximately 1.5 liters). When you multiply 40 times 0.5 times 1.5, you get 30 g (notice how the units cancel out leaving you in grams). When I used my scale, that came to about 1 TBS of those microbeads. If you wanted to do a 0.75M solution, that would be: ? g = 40 g/mol x 0.75 mol/L x 1.5 L, which comes to 45 grams. If you want to use more or less than 6 cups of water, you can use this formula to make sure you still use the right amount of lye.

NOTE 2: I've tried these pretzels both with and without the malt powder. I kind of like it in there as it adds a layer of flavor that I really like, but it's not very authentic, so use your own judgement. The other thing you can do to increase the flavor profile is to make the dough 24 hours before you want to make pretzels. Let the dough rise at room temperature for one hour and then punch the dough down and stick it in the refrigerator until the next day.

Wednesday, January 4, 2012

Blackberry Liqueur

Sometimes, I really miss living in the Pacific Northwest. Growing up, I was very much an outdoor kind of gal. Considering how much time I spent engaging in activities that potentially could leave me stranded in the wilderness without much warning, I always felt it was a good idea to be prepared. That involved not only making sure I had a working "survival kit" with all the essentials when I was out in the high country, but I also made sure I had the requisite knowledge to feed myself if it came down to it. Fortunately, the northwest is bountiful! Some of the edibles are lesser known, but some are so prolific and in your face that they are part of the cultural psyche of any proper Pacific Northwesterner. I'm speaking, of course, of blackberries.

They not only grow wild there; they're freaking rampant. I miss all that free food! I have to buy blackberries here in Florida, and it makes me ill how much they go for. However, sometimes, it's worth it. This liqueur is so beautiful, fragrant, and satisfying. While I'm sure it would taste better with vine ripened berries from Washington, I've found I can make do with frozen berries from Wal-Mart.

The only bad thing about this recipe is that you have to be patient. This isn't one of those, "Hmmm, I think I'll make some blackberry liqueur for that party this weekend," kind of things. It needs time to steep. It needs time to mature. Ideally, you need to give it six months. I know that's asking a lot, but - trust me - it's worth it. This liqueur is as great to give as it is to enjoy. Whenever I use up some ingredient that comes in a nifty bottle, I clean it out and hang on to it so that I have something nice to decant my liqueur into when it's ready.

Blackberry Liqueur
Yield: approx. 4 cups

4 cups blackberries
zest of one lemon
2 whole cloves
2 cups vodka
1 cup brandy
1 cup sugar syrup (2:1 sugar to water)

Lightly crush the berries with a fork. If they are refrigerated or frozen, let them come to room temperature first. Using a vegetable peeler, zest one lemon. You can use a knife but be sure to remove any pith, which is bitter. In a large jar (I use a half-gallon canning jar), mix together the blackberries, lemon zest, cloves, vodka, and brandy. Place a lid on the jar and set in a cool, dark place for about three months.

After it has steeped, pour it through a strainer, then through a coffee filter (multiple times is better). Make a cup of sugar syrup and let it cool to room temperature. Add the sugar syrup to the liqueur until it is sweet enough to your taste. Mature in a cool, dark place for another 4-6 weeks. Decant into a pretty bottle. Store for up to one year.

Sunday, December 25, 2011

Chocolate Bowls

It's hard to believe that I am thinking about food at this moment... considering the fact that I ate so much today that I feel like I might explode. But, nonetheless, I have some down time now that everyone is in a food stupor to post something I've been meaning to share for a few months now.

I absolutely adore making these cute little chocolate bowls. They are so easy and fun and they never cease to amaze. Because I always make and consume them within the same day, I don't worry about tempering the chocolate. I just try to be sure that I do not let my chocolate get too hot in my double boiler. The risk there is that too high a temperature can cause the chocolate to end up not hardening at all. Not a good thing, obviously.

Melt enough semi-sweet chocolate in a bowl over some lightly simmering water. Prepare a sheet pan with some parchment, wax paper, or a Silpat. The first step is to make a small puddle of chocolate that will become the base of your bowl. Keep the puddle somewhat small, you don't want it oozing all over the place!

Then inflate some small balloons. I use the size that you typically use to make water balloons. Obviously, you can make your bowls whatever size you want, but if you want to make small bowls, you want to use small balloons. Under-inflated balloons tend not to have a smooth bottom on them, which can deform your bowl. Dip the balloon into the chocolate. I usually dip a couple of times to make sure I have a good, solid coat. Too thin a coat becomes a nightmare when you go to remove the balloons later. You can dip the balloons with one even motion for a straight edged bowl...

Or dip them at an angle four to five times around the balloon to form a scalloped edge that is very pretty.

Place the dipped balloon into the puddle you previously poured. Usually, they stand on their own fairly well, but if you get a troublesome one, just hold it for a minute or two until the chocolate firms up a bit. (It's best to work with chocolate in a somewhat cool room).

When making bowls, always do a few extra because it is not unheard of for one or two to break one while removing the balloon. Place the tray in the refrigerator to harden for 30-60 minutes. To remove the balloon, be ready to work quickly! If the chocolate softens just a little too much, I find it makes removing the balloon more challenging. Take a straight pin and - pinching the top of the balloon - carefully poke a hole in it. Slowly let the air out. As the balloon deflates, you can start to peel it away from the bowl. Deflating the balloon too rapidly will usually result in a broken bowl, so go easy! Once the balloons are removed, chances are you'll want to keep them in the refrigerator. If you'd rather have bowls that are more shelf stable and can be made ahead of time, you can do that, you'll just have to be sure to temper the chocolate then. Serve with ice cream or mouse... or anything that goes well with chocolate and is served in a bowl!

Sunday, December 18, 2011

So Pretty!

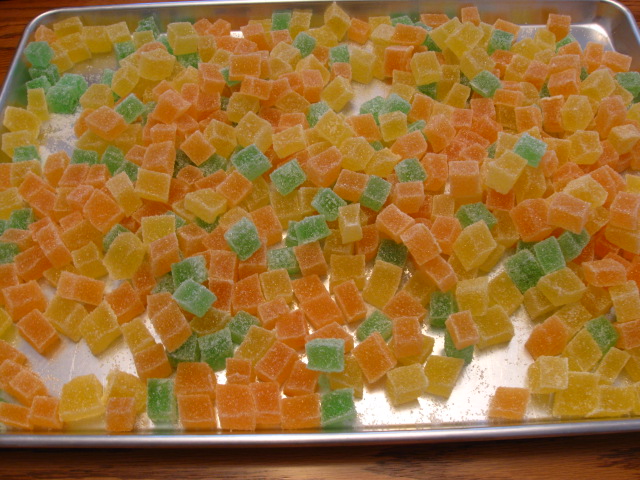
I've posted a few times already about making these cute little jelly candies. I originally posted about the lemon ones, but recently posted about making them in orange and lime as well. Well, I finally had an opportunity to make all three in the same time frame so that I could photograph them together. How cute they turned out! Yellow, and orange, and green, oh my!


Sunday, December 11, 2011

Pumpkin Pie

Everyone has their favorite pumpkin pie recipe, I guess... unless you always get yours from the store. As a scratch cooker, obviously, I can't condone such actions. ;-) I am, however, a serious pumpkin pie snob. Pretty much, unless I've made it, I usually don't eat it.

I have a number of problems with most of the pumpkin pie out there, not the least of which is that canned pumpkin tastes, well, like canned pumpkin. It's the same reason I don't eat canned peas or green beans. Canning vegetables just changes their flavor and texture in a way I can't enjoy. I also often find other's pie too sweet. I don't like it savory, mind you, but I don't want it to be syrupy either. This started out as the recipe from the back of a can of Libby's pumpkin, I think. Then my mom tweaked it, and then I tweaked it even more. I really like the balance. I use the frozen pumpkin puree I put up every fall. The frozen, not canned, puree gives this pie a fresh flavor that can't be beat. To me, it's the perfect pumpkin pie.

Pumpkin Pie
Yield: one 9-inch pie

2 eggs
1 1/2 cup pumpkin puree (preferably not canned)
1/4 cup white sugar
1/4 cup brown sugar
1/2 tsp salt
1 tsp cinnamon
1/2 tsp dry ginger
1/4 tsp cloves
1 1/2 cups evaporated milk (one 12 oz. can) or light cream

Prepare a 9-inch pie shell. If you want to be sure your pie shell does not get gummy (see note 2 below), blind bake it first in a 425° F oven for 10-15 minutes lined with a little foil and weighted down with pie weights or beans. Let pie shell cool completely before filling. Preheat the oven to 425° F. In a bowl, lightly beat eggs. Add the remaining ingredients and stir gently to mix. If you mix too aggressively, you will end up with foam on the top of your pie. It doesn't taste bad, your pie just won't be as pretty. Pour the filling into a prepared pie shell. Bake at 425 F for 15 minutes. Reduce the heat to 350° F and bake for another 45 minutes or until a knife comes out clean. Serve well chilled.

NOTE 1: I also like to make this as a custard, where I simply make the filling and bake it in a dish without a crust. Use a 9x9 inch glass/porcelain baking dish or similar. Otherwise, make exactly the same as for a pie. It's a great, easy, treat to make year round!

NOTE 2: The picture above shows a pie crust that I did not blind bake first. I was in a hurry, so I skipped that step. See how the crust looks like it has two layers? The inside layer here was chewy and not flaky at all like the outside half. The pie still tastes good, but the crust is not quite as delicious. I strongly recommend blind baking first, if you have the time and patience. If you do go this route, be prepared to lightly cover the edge crust with foil as it may begin to darken too much toward the end of the baking period.

Saturday, December 10, 2011

Gingerbread Cutouts

I've been in serious cookie making mode lately. Last week I made an army of these cute little guys for a "cookie caper" on base, where volunteers bring in homemade cookies and then they are packaged and distributed to airmen. (I also made a double batch of my sugar cookie holly cutouts.) What I love about gingerbread men is that the cookie is not overly sweet and has a nice spiciness to it. I often make and give them as gifts. They can be packaged in such cute ways and everyone loves to receive them!

The dough is very easy to mix. Probably the hardest part is grating the ginger, but a microplane makes short work of the task. Just be sure that the fresh ginger is ground into a paste; you want it to mix evenly into the dough. Mix the wet ingredients together first.

Then mix the dry ingredients in a separate bowl before adding the flour mixture to the wet mixture. I've tried a lot of gingerbread cookie recipes, and I love the combination of spices in this one.

Form the dough into a log and wrap in plastic wrap, letting it firm up in the refrigerator for at least an hour. Once it has firmed up, cut the dough into four or five large slices and roll one disk out at a time. Roll it fairly thin, about one eighth of an inch is best. Use a gingerbread cutter to make figures. Bake on a greased cookie sheet or a parchment lined pan. For best flavor, bake until the cookies are nicely browned. I've found if they are under cooked, the flavor is a bit lackluster.

Once they are baked and completely cooled, pipe decorations in royal icing (I use the recipe on the package of Wilton meringue powder). Let the cookies sit out for at least a few hours until the icing is dried hard. Then package them up! They keep fairly well in an air tight container. I like to maximize my time, so I always do the same decoration on them, but you can certainly get creative! You can use a variety of colors and small candy decorations if you want. Make your gingerbread army however you see fit!

Gingerbread Cutouts
Yield: approx. 70 3-inch cutouts

3/4 cup brown sugar, firm packed
1/2 cup butter, softened
2 eggs
1/4 cup molasses
1 tsp fresh ginger, grated
3 1/4 cup flour
1 1/2 tsp baking soda
2 tsp powdered ginger
1/2 tsp allspice
1/2 tsp cinnamon
1/2 tsp nutmeg
1/2 tsp salt

Beat the sugar and butter together until smooth. Add eggs, molasses, and fresh ginger. Mix thoroughly. In a separate bowl, mix the remaining ingredients. Stir well. Add slowly to the wet ingredients, stirring until well mixed. Shape dough into a log and wrap in plastic. Chill for at least one hour. Slice log into four or five disks. Roll out one disk at a time. Roll fairly thin, about 1/8 of an inch. Place on greased or parchment lined cookie sheets. Bake at 350° F for about ten minutes, or until nicely browned. Cool completely before decorating with royal icing.

Tuesday, December 6, 2011

A few more thoughts on tempering...

In the first few months after starting this blog, I posted a whole series on making chocolates. In my Tempering Chocolate 101 post, I discussed the technique involved in making sure your chocolate cools in the right crystalline form. Improper crystallization results in the development of an unappealing fat "bloom" in the final product. The amount of bloom shown here is excessive, and is the amount I typically see - for instance - with the chocolate that is leftover after dipping truffles that gets collected and thrown in the back of the pantry for eight months. It also can happen with a chocolate bar that is left in a car on a hot day and then eaten a week later. While it doesn't look appropriate when making chocolate confections, I do think it's pretty in its own, strange way. It may have something to do with my geology background regarding the crystallization of minerals, but I find fat bloom in chocolate fascinating.

Unfortunately, it's not very fascinating when it happens to the results of my hard work. I try very hard to be sure my chocolate is in temper before I dip a batch of truffles. I made a batch the other day for the first time in a while. I tried some new things; I tried to perfect some old things. In the end, I decided I had a few additional thoughts to add regarding tempering:
  • Tempering is a pain in the butt. There are no ifs, ands, or buts about it. So I often catch myself pushing the envelope of what I deem acceptable when testing whether my chocolate is in temper. Tempering is a pain, but it's even more of a pain when you jump the gun and coat a bunch of truffles with chocolate that dries with horrible looking streaks, or - even worse - won't properly harden at all. In the end, it's always better to be safe than sorry. If you have to go through the procedure again to ensure a good temper, do it!
  • I have found that I don't usually have great luck getting proper temper using the seed method (see my other post for a refresher). It's been three times in a row now of tempering chocolate when I try to do the seed method first, am not satisfied, and then go through the longer but very straight-forward seed-free method. In the future, I may just start with that method. Again, it takes longer, but you can be doing other things for the vast majority of the time.
  • Although I described a series of things to look for to determine the level of temper in your chocolate, the frustrating thing is that you often can't be totally sure you got it right until the next day. Sometimes, it all looks right, but by the next day, those darn streaks have shown up! The moral here is that I never make truffles the same day or day before I expect to give them away. I like to be able to make sure that fat bloom doesn't show up after the fact!
  • In my previous post, I only discussed dark chocolate. If you want to use milk chocolate or white chocolate, you still have to temper them, but they require slightly lower temperatures. As a guideline, use temperatures 2-3 degrees less than what you use for dark chocolate. Speaking of white chocolate... it's pretty darn hard to find real white chocolate these days. Virtually all white chips sold in stores today are not chocolate at all. You have to look closely. If it doesn't actually say "white chocolate" and have cocoa butter in the ingredient list, you are using a totally different beast. White "chips", such as Ghirardelli or Nestle, do not need to be tempered (but they don't really taste that good either). Real white chocolate must be tempered to ensure proper set up, gloss, and shininess. Baker's brand white chocolate blocks are the only real white chocolate I've seen around in a long, long time.
  • Remember that chocolate can build up heat very rapidly. Be sure to heat it slowly. If you get impatient and crank the heat up too much, there will be too much residual heat and even once you remove the chocolate from the heat source, chances are it will continue heating another 5-10 degrees. So go slow and easy. Patience is key.
  • Lastly, you really do get what you pay for. The cost of chocolate is typically proportional to how pure it is. Cheap brands have more sugar and other fillers in them and can be more challenging to work with. Most confectioneries use couverture when dipping truffles because it has more cocoa butter and is easier to work with and has a nicer mouth feel. Unfortunately, it's really expensive. I've had very good luck using Ghirardelli's 60% cacao chips and find it to be a nice middle ground compromise.